
MPM-G2 Assembly Instructions


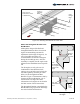

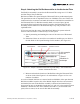
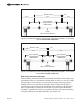

Table Of Contents

Be certain to insert the 1/2" x 1-1/4" hex/lock bolt as shown in figure 3-4. If the
hex/lock bolt is inserted from the opposite side, it will not secure the Rail Bracket
to the Strongback Bracket creating an unstable rack.
Figure 3-5 Attaching Strongback Bracket to Rail Bracket (0-degree Tilt Angle)
Figure 3-4 Correct and Wrong methods of installing hex/lock bolt
Insert Bolt through
Strongback Bracket
first, then thread into
Rail Bracket.
Do not thread Bolt
through Rail Bracket
first as this will not
secure it to the
Strongback Bracket.
Correct
Wrong
1/2” x 1-1/2”
Pivot Bolt
1/2” x 1-1/4”
Hex/Lock Bolt
Flat
Washer
Threaded
Holes
Flat
Washer
Strongback
Bracket
Lock
Washer
1/2"
Flange
Nut
South
A. Align the pivot bolt holes and insert the
washer, securing with a 1/2” flange nut. Finger tighten only for now. (See
Figure 3-5)
B. Rotate the Strongback Bracket to align the 3 & 5 hole combination.
Referring to figures 3-4 and 3-5, insert the 1/2” x 1-1/4” hex/lock bolt with
flat and lock washers and tighten securely. Torque to 45-50 ft-lbs.
C. Return and tighten the pivot bolt. Torque to 45-50 ft-lbs.
1/2” x 1-1/2” pivot bolt with flat
WARNING:
The Rail Bracket
must be secured
to the Strongback
Bracket using the
hex/lock bolt as
shown in figure
3-4. Failure to do
so could lead to
structural failure
and or personal
injury.
6 of 15 Assembly Instructions, Multi-Pole Mount - G2 (Version 1, Rev D)