GEN3 PRO SEFI System System Hardware Installation & BigComm Software User Instruction Manual Revision 2.
BigStuff3 Pro SEFI System Table of Contents 1 2 3 4 5 6 7 8 9 10 11 12 13 14 15 16 17 18 19 20 21 22 23 24 25 26 27 28 29 30 31 32 33 34 35 36 37 38 39 40 41 42 43 44 45 46 47 48 49 50 51 Section Frequently Asked Questions Key Notes Summary (from the Manual) Introduction Features Package Contents Main Wire Harness Installation Injector Wire Harness Installation Wide Band Oxygen Sensor Installation ECU Installation BigComm Software Overview BigComm Software Installation Communication Cable-to-PC Connectio
BigStuff3 Pro SEFI System Table of Contents Continued 52 53 54 55 56 57 58 59 60 61 62 63 64 65 66 67 68 69 70 71 72 73 74 75 76 77 78 79 80 81 82 83 84 85 86 87 88 89 Chapter MAP AE Inc Rate Run Time Correction dMAP Parameters DTPSdt AE Position Correction Individual Cylinder Individual Cylinder – Spark Individual Cylinder – Fuel Boost Boost Parameters Boost PWM Boost Stage (spark) 1,2 & 3 Start Line Timing Dash Configure Dash Save a Dash Load from File Save to File BigStuff3 Data Acquisition Logging to
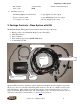
BigStuff3 Pro SEFI System 2. GEN3 PRO SEFI System Standard Features Configurable Load & RPM axes to enable optimization in desired operating range. Programmable “peak-&-hold” injector drivers with current chopping capability. Programmable injector opening vs. battery voltage. “Wide Band Oxygen Sensor” (WB02) Air/Fuel Ratio (AFR) control to eliminate base engine and transient fuel calibration guesswork. Optional system methanol system capable of reading AFR down to 2.9:1.
BigStuff3 Pro SEFI System Aesthetically pleasing, nylon braided wire harnesses with integrated ECU and Injector/WBO2 fuse protection. OEM style Packard & TYCO waterproof connectors & terminals GEN3 PRO SEFI System Optional Features New four (4) Stage, Dry Nitrous, Oxide System available in February 2011! For more information, see the manual on our website under Manuals. Integrated CO2 Boost controller! No longer any need for a separate, standalone system.
BigStuff3 Pro SEFI System - Pan Vacuum - Accelerometer - TCC % slip - MPH - Clutch or trans-brake input Auxiliary control of: - Fuel Pump (High & Low Side drive) - 2 spare high & low side outputs - Torque converter clutch - 1 spare PWM high & low side output - 1 to 3 stage boost control - Fan low & high speed control 3.
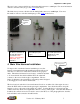
BigStuff3 Pro SEFI System The gray 2-way connector kit below is the mating half connector to cam input. Fore more information on how to wire the cam sync go to the Cam section below. The black 2-way connector kit below is the mating half connector to crank input. Fore more information on how to wire the crank input go to the Crank section below. Terminal location “A” Mating half connector to the “Boost” connector on the main wire harness. Used for the “Data Trigger” / “Timer Enable” (wire) input.
BigStuff3 Pro SEFI System The instructions below are specific to the BigStuff engine management systems. Hyperlinks (underlined, blue wording) in the column titled “Further Details” were included to further assist with the main wire harness installation. Left clicking the PC’s mouse on the hyperlink will immediately link to a photo of the connector along with additional installation information.
BigStuff3 Pro SEFI System Harness Label Calport Wire Color/Connector Type Black 3-way Packard connector with a purple seal Label Definition Further Details Connect one end of the RS-232 communications cable (supplied) to the ECU and the other end to the serial port of an external computer. Connect to the negative side of the fuel pump relay. Click CalPort for further information.
BigStuff3 Pro SEFI System Harness Label HEI Wire Label Color/Connector Definition Type Black, 4-way High Energy Packard Ignition connector [Original Equipment (OE) ignition] Connect To Further Details Connect to GM factory installed ignition system. Inductive pickup ignitions will not use this connection! See paragraph below titled “HEI” for further relevant information. Ignition Used only for injector phase angle and individual cylinder spark control.
BigStuff3 Pro SEFI System Harness Label MAP Crank 2-Step Boost Main Fuse & Relay Vehicle Battery Fuse Header Connector Wire Label Color/Connector Definition Type Green, 3-way Manifold Packard Absolute connector Pressure Sensor Black, 2-way Packard connector with a separate ground wire (3/8” ring) Single yellow wire Black 4-way connector with an orange seal Connect to the MAP sensor MAP Connect to System includes a crankshaft sensor mating 2-way Packard connector & terminals Crank 2-Step trigger fun
BigStuff3 Pro SEFI System Primary Fuel Pump (LS) – (Single lead Packard connector with a single black/white wire). This is the PRIMARY pump connection. If only one fuel pump is being used, it must be wired to this low side connection! This connector must go to the negative side of a fuel pump relay, not directly to the fuel pump.
text Standard 40 Amp relay Relay text 87 Battery Black/White wire from BS3 harness labeled “Primary Fuel Pump (LS)” 85 30 Vehicle Chassis Ground 86 87a Switched 12 Volt Line + text - + text Fuel Pump Battery or Vehicle Chassis Ground
Standard 40 Amp relay Relay 87 Red/White wire from BS3 harness labeled “Secondary Fuel Pump HS” 85 30 text 86 87a text + text Battery or Vehicle Chassis Ground text text Battery or Vehicle Chassis Ground text - + Battery Vehicle Chassis Ground Fuel Pump
BigStuff3 Pro SEFI System Fan Control (engine cooling fan) – (Single lead Packard connector with a single black with red stripe wire) This termination must go to the negative side of a fan relay, not directly to the fan. Terminating this connection directly to a fan will damage the BigStuff controller and will void the warranty! The fan connector is identical to the fuel pump connectors; so make sure to read the label to ensure the connector is terminated correctly.
text Standard 40 Amp relay - + text Switched 12 Volt Line Battery 87 Relay 30 Battery Ground Black with red stripe wire from BS3 harness labeled “Fan (LS)” + text 86 85 87a Ground text
BigStuff3 Pro SEFI System Points – (Single white wire) Do not connect this wire if a factory ignition system is being used. This is the GEN3’s "points" signal wire. It needs to be connected to the "points" output connection from the aftermarket ignition module, e.g. MSD 6A box. Note : Applying 12V to the BS3 points wire will immediately damage the GEN3 ECU! Back_to_Points 12V Switched – (Single pink wire) A secure connection must be made to a switched 12V supply.
BigStuff3 Pro SEFI System The positive and negative battery cable lengths have been designed (are long enough) to accommodate a trunk-mounted battery. If the cable lengths are not long enough, splice, solder and shrink wrap AWG 8 wire the remaining distance to the battery. Make sure the two clearly marked black wires battery (-) are securely fastened to the negative battery post (NO EXCEPTIONS). The red cable battery (+) must be securely fastened to the positive (+) battery post.
BigStuff3 Pro SEFI System HEI Connector on Main Wire Harness Ford TFI GM HEI Buick DIS GM Optispark GM Northstar DIS A B C D Spout EST EST EST EST PIP REF HI REF HI LOW RES Crank Ref Not Used Bypass Bypass Not Used Bypass Ground DIST RTN DIST RTN DIST RTN DIST RTN Ford Thick Film Ignition (TFI) Pin-out Detail Top To BigStuff Connector Pin B To BigStuff Connector Pin A Not Used Connector Clip +12V Switched Power supply Ignition run and start To Negative Coil Lead or Points Input on Ignition System
BigStuff3 Pro SEFI System GM High Energy Ignition (HEI) Pin-out Detail (For Distributors with External Ignition Coil) Connector Clip BigStuff Harness Connector Pin A Pin B Pin C Pin D To distributor connector pin A To distributor connector pin B To distributor connector pin C To distributor connector pin D More GM HEI ignition wiring information is available on the Bigstuff3 website via this link: http://bigstuff3.com/pdf/Visio-Small%20Cap%20HEI%20Drawing.pdf.
BigStuff3 Pro SEFI System GM Northstar Direct Ignition System (DIS) Pin-out Detail BigStuff ESC Harness Connector BigStuff HEI Harness Connector Connector Clip ESC Pin A Pin B Pin C Pin D To Coil Pack C4-F To Coil Pack C4-D To Coil Pack C4-C To Coil Pack C4-E To Coil Pack C4-B GM Opti-spark Ignition Pin-out Detail Connector Clip BigStuff Harness Connector Pin A Pin B Pin C Pin D To distributor connector pin D Not Used To distributor connector pin A To Coil Driver Module - Connector B More GM
BigStuff3 Pro SEFI System CAM – [(Gray, 2-way Packard connector with a separate ground wire (3/8” ring terminal)] For distributor based applications, BigStuff3 recommends using the cam sync input. The cam sync input is required for all coil-on-plug applications. The GEN3 system will to operate sequentially without the cam sync hooked up, but the point of injection (the number of degrees BTDC where the fuel is injected) will vary every time the engine is started.
BigStuff3 Pro SEFI System BS3 2-by-2 IAC Connector Pin-out Identifier 4-by-1 In-line IAC Connector Pin-out Identifier A B C D D C B A More IAC wiring information is available on the Bigstuff3 website via this link: http://bigstuff3.com/pdf/IAC.pdf. Back_to_IAC TPS (Throttle Position Sensor) – (Black, 3-way Packard connector) The main harness TPS connector was designed to work with a GM “L98” style TPS.
BigStuff3 Pro SEFI System Crank Trigger Reference MSD Distributor MSD Crank Trigger Accel 44000 Series Accel Crank Trigger BS3 Connector - A (Red wire) Violet/Black wire Green Black Black BS3 Connector - B (Black wire) Orange/Black wire Purple White White MAP (Manifold Absolute Pressure) – (Green, 3-way Packard connector) The GEN3 system is supplied with Packard green connector, which directly mates to a GM style 1 BAR Manifold Absolute Pressure (MAP) sensor.
BigStuff3 Pro SEFI System Trigger three (3) stages of timing and/or boost control (connector locations B, C & D). All GEN3 DAI systems are all sold with the mating half, 4-way connector, terminal (used for the “Timer Enable/DAI Trigger wire) and seal. Connector location “A”, on all GEN3 base systems, enables two (2) functions. 1. The internal timer, referred to as the “Timer Enable”.
BigStuff3 Pro SEFI System cells the staged boost and timing retard control will not work, since a zero value forces the ECU to automatically revert to the base timing map. Note: The three (3) stage Boost control feature can be used to just retard the timing (without switching solenoids on) if the criteria outlined in the section directly above are met. Minimum TPS, RPM and Timer Parameters For more information see Boost_Control in Section 60. Back_to_Boost Version 2.
BigStuff3 Base System - Data Log Trigger/Timer Enable - Wiring Diagram Using the Brake Pedal Switch Switched 12V from the vehicle “Boost Connector” from Main Wire Harness A B C D Brake Switch - 12V applied to this wire when the brake pedal is depressed Required ON/ OFF Switch to turn the “Replay Trigger” signal On and Off. 87 Relay Timer Enable Wire Ground 85 30 86 87a With all GEN3 base systems, the Boost connector location “A” is used to enable two (2) functions. 1. 2.
BigStuff3 - Data Log Trigger/Timer Enable/Starting Line Timing - Wiring Diagram Off Foot, Trans-brake or Dual State Clutch Switch – No BS3 2-Step Switched 12V Source in the Vehicle GEN3 ECU Header 1 - Terminals A - K A B C D E F G H J K Row 1 With Clutch IN – 12V is supplied to the optional systems wire Row 2 Row 3 Foot brake Switch or Trans-brake Button (12V applied to this wire when foot or trans-brake button is depressed) Boost Connector from Main Wire Harness A B C OR With Clutch OUT –
BigStuff3 Pro SEFI System 2-Step (Yellow wire) The 2-step function is not a standard feature on the GEN3 distributor ignition based systems, but the yellow 2-Step wire can be hooked to enable starting line timing retard for stick shift cars and turbo applications. The 2-step and 3-step functionality are available as options on the GEN3 distributor ignition based systems. The 2-Step and 3-Step upgrade must be ordered along with part number BS3-005-025.
BigStuff3 - Data Log Trigger & Timer Enable - Wiring Diagram Off Foot Brake & Trans-brake Switches – With Optional 2-Step Switched 12V Source in the Vehicle On/Off Switch (required) for Data Trgger wire GEN3 ECU Header 1 - Terminals A - K A B C D E F G H J Foot brake or Transbrake Switch (12V applied to this wire when foot or trans-brake button is depressed) K Row 1 Brake Lights or Transbrake Row 2 Row 3 Yellow 2-Step Wire To Hdr 1, B2 GEN3 ECU Header 2 - Terminals L - Y L M N P R S T W X
BigStuff3 - Data Log Trigger & Timer Enable - Wiring Diagram Off Foot Brake & Trans-brake Switches – With Optional 2-Step & 3-Step Switched 12V Source in the Vehicle On/Off Switch (required) for Data Trgger wire Foot brake Switch (12V applied to this wire when foot or transbrake button is depressed) Trans brake Button (12V applied to this wire when trans-brake button is depressed) GEN3 ECU Header 1 - Terminals A - K A B C D E F G H J K To Hdr 2, W1 Row 1 Row 2 Row 3 GEN3 ECU Header 2 - Termina
BigStuff3 Pro SEFI System Main Fuse & Relay WBO2 & Coil V-Batt Relay WBO2 & Coil V-Batt 30 Amp fuse Back_to_Main_Fuse_and_Relay ECU 3-Amp Fuse This fuse protects the ECU electronics. Back_to_Vehicle_Battery_Fuse Two (2) Thirty (30)-Way ECU Header Connectors To avoid the potential of severely damaging the ECU, connect the head connectors to the ECU only after the battery connections are made.
BigStuff3 Pro SEFI System The main-harness-to-injector harness connection should be made on the end of the engine opposite the ignition distributor. Injector Wire Harness diagrams, and pin out information, for Chevy (Chrysler), Ford and Buick V6 applications, are available on the BigStuff3 website via the following links: Chevy (and Chrysler) - http://bigstuff3.com/pdf/Visio-chevy%20Injector%20Harness.pdf. Ford - http://bigstuff3.com/pdf/Visio-Ford%20Injector%20Harness.pdf.
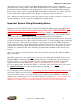
BigStuff3 Pro SEFI System The mounting angle of the sensor should be tilted a minimum of 10o to the horizontal tip of the sensor. The tip of the sensor must be tilted down. See the diagram below. The optimum sensor angle is 90o. Oxygen sensor mounting bung (entire circumference needs to be welded) The optimal angle is completely vertical or 90o Oxygen Sensor 10o angle, minimum Exhaust Pipe Make sure sensor cabling is routed and secured away from the exhaust system.
BigStuff3 Pro SEFI System The GEN3 system hardware installation process in now completed. The next step is to install the BigComm software, which allows the sensor interfaces to be checked, and ultimately start and operate the engine. The remainder of the manual will describe how to install and use the BigComm software to monitor and calibrate the GEN3 ECU parameters and variables. 8.
BigStuff3 Pro SEFI System Double click on the BigComm_Setup.exe link shown below. Version 2.
BigStuff3 Pro SEFI System Double click on “Run”. Download progress will be displayed as shown below. Again, double click on “Run”. Double click on ”Next”. Version 2.
BigStuff3 Pro SEFI System The software will automatically install using the correct file hierarchy, which is C:\Program Files\BigStuff\BigComm. This file structure is required for the software to work correctly. Do not change the file location or file hierarchy!! Click “Next”. Click “Next” again. Version 2.
BigStuff3 Pro SEFI System To create a link on your desktop, and in the short cut tool bar in the lower right-hand corner of the PC’s desktop, put a check box next to both the “Create a desktop icon” and “Create a Quick Launch icon” as shown in the screen print below, then double click “Next”. Next, double click “Install”. The software will self install on your PC as shown below. Version 2.
BigStuff3 Pro SEFI System Lastly, if you want to open software put a check mark in the box next to Launch BigComm, as shown below. Connecting to the PC The BigComm software has now been successfully installed on your personal computer! A 5’communication cable connects the BigStuff3 ECU with a personal computer (PC). A 25’ cable is also available from BigStuff3.
BigStuff3 Pro SEFI System Packard connector – Connects to the Main Wire Harness 5’ Communication Cable (supplied) CALPORT connector on the Main Wire Harness. AMP RS-232 connector – Connects to PC Connects to the Communications cable CalPort Problems? If the RS-232 connector located at the end of the interface cable (supplied with the system) cannot be connected to your PC, a 9-pin serial port interface adapter will need to be procured. If the PC is a newer model it will most likely have a USB port.
BigStuff3 Pro SEFI System If the Com Port selected is not available, the following message will appear. Select another Com Port until an available port is identified. Once the PC identifies an available Com Port, the following screen will appear. Press the PC’s “Enter” key or left mouse click on Yes and the Com Port will resynchronize. Next, double click the left mouse button on the BigComm short cut icon located on the Windows desktop. BigComm desktop icon BigComm.
BigStuff3 Pro SEFI System following screen will appear. If the GEN3 ECU is not powered up (the ignition key is not in the “Run” position) and the Communications cable is not connected, communication cannot be established. The following screen will appear. This may also occur if the Comm Port is not configured correctly. If this occurs, use the above process of configuring the Comm Port until communication is established. Left mouse click the Work Offline button.
BigStuff3 Pro SEFI System Files/BigStuff/BigComm. Double left click on the calibration to be used for “off-line” modifications and the calibration will be loaded. After the calibration is loaded, the Main BigComm window will open. 12. Establishing a Connection The sequence for connecting the GEN3 ECU to the Main Wire Harness is as follows: First connect battery terminals. With the ignition switched off, connect the 30-way header connector, with terminals A-K to the ECU.
BigStuff3 Pro SEFI System Once communication has been established, the BigComm “Main Menu” screen will open and the Green_Sliding_Ball in the tool bar will become active. 13. BigComm Main Menu Screen View logged data short cut Fuel Table short cut Air/Fuel ratio table short cut Record Log short cut Spark Table short cut The engine is not yet ready to be started.
BigStuff3 Pro SEFI System 15. Closing Windows Open windows can be closed using the PC’s mouse. To close an open window, left mouse click on the “X” in the upper right corner of any window, or simply hit the PC’s “Esc” key. If multiple windows are open, continue to hit the Esc key until all windows are closed and the main BigComm window is displayed. Hitting the Esc key too many times may result in a message stating, “Do you really want to quit?” Hit “No” to continue working with the BigComm software.
BigStuff3 Pro SEFI System Hardware Configuration Table The Hardware Main Configuration table is relatively self-explanatory. Working from the top of the table, select the parameters in the screen print above as follows: Select the number of cylinders the engine has. Select whether system will operate using a speed density (engine speed and engine load) or Alpha N (throttle angle and engine speed) algorithm. The majority of the engine applications use the Speed-Density control algorithm.
BigStuff3 Pro SEFI System system was supplied with the correct firmware and MAP sensor. Return_to_Main_Configuration Select the type of fuel the engine will run on. The ECU firmware contains algorithms enabling the following fuel types to be used: o o o o Gasoline Ethanol (E98) Methanol E85 – Do not select this setting unless running BigStuff3’s E85 Flex-fuel system! Although E85 can be selected, it should not be used unless the optional E85 (Flex Fuel) system has been purchased.
BigStuff3 Pro SEFI System For setup detail go to Crank Trigger Configuration For setup detail go to Static_Test_Timing For setup detail go to Drivetrain_Configuration For setup detail go to TPS Configuration For setup detail go to Rev_Limiter_Configuration For setup detail go to Pickup Wheels For setup detail go to Two_Step_RPM For setup detail go to Coil-on-Plug (COP) Crank_Trigger_Configur i For setup detail go to Fuel_Pump_Configuration For setup detail go to Fueling_Parameters_Configuration For
BigStuff3 Pro SEFI System operating temperature and preferred idle speed, adjust the TPS so that the TPS % value shown in the Dash (see screen print directly below) reads between 1% to 2%. The dashboard can be configured to appear at the bottom of most of the BigComm software screens. An example of a dashboard is shown below. See Dashboard for more details (described later in this manual). How to Set Clear Flood TPS % TPS Signal in the Dash. Set the Clear Flood TPS % value to 80%.
BigStuff3 Pro SEFI System Note: The 2-step functionality is a base feature on all coil-on-plug systems. 3-step control is an option on the GEN3 coil-on-plug systems. If the GEN3 system is equipped with 2-Step control and 12 Volts is applied to Header Connector 1, pin B2, the ECU will begin rev limiting the engine to the user define 2-Step Lo RPM setting.
BigStuff3 Pro SEFI System Return_to_Crank_Trigger_Configuration COP - Setting the “Crank Reference” for Coil-on-Plug Engines (not distributor based engines) Crank Reference (deg) A good “Crank Reference starting point value, by engine type is as follows: GM LSx and Chrysler Hemi engines: 350o. Ford Mod Motors: 329. Start by inputting the Crank Reference starting point value from above into the COP “Crank Reference” cell (see screen print below).
BigStuff3 Pro SEFI System “Dash” Window Static Test Timing (This feature is not functional with all released firmware) Dash The “Static Test Timing” feature allows for a quick way to lock the entire spark map to a fixed value. This feature eliminates the need to enter a fixed spark value into all the cells in the spark map when setting the “Crank Reference” value. A “Test Timing” value of 40o is recommended.
BigStuff3 Pro SEFI System Fuel Pump The Fuel Pump Configuration section has two input cells. Both input cells assume that the GEN3 ECU will control one or two fuel pumps. If a mechanical pump is being used, or if the fuel pump(s) will be controlled via an independent switch, no inputs are need in this section.
BigStuff3 Pro SEFI System Input Shaft (Pulse/rev) – Assumes GEN3 system is equipped with the DAE option. Input options – 1, 2, 4 or 31 pulses per rev. No input required unless the GEN3 system is equipped with the DAE option. Call BigStuff3 for more details. Turbo Shaft (Pulse/rev) - Assumes GEN3 system is equipped with the DAE option. Input options – 1 pulse per rev – The turbo must have a tooth provisioned into the turbine shaft for this to work. Return_to_Pickup_Wheels 19.
BigStuff3 Pro SEFI System This is the same table as is shown above with the window maximized. 20. Load vs. RPM The BigStuff3 GEN3 SEFI system offers configurable Load & RPM axes! This feature allows the user to configure the X axis (RPM) and Y Axis (Load), so that a majority of the available16 cell by 16 cell fuel and spark map area is available for calibrating.
BigStuff3 Pro SEFI System This capability is extremely important if the engine is fuel or spark sensitive at a given load and/or RPM. For example, if the engine/transmission/rear gear combination makes the engine sensitive to throttle changes at 2,200 rpm, the user can configure the X-axis in 200 or 300-RPM increments at or around 2,200 RPM.
BigStuff3 Pro SEFI System The following table offers default Load schedules for 1, 2, 3, & 5 BAR MAP sensor applications.
BigStuff3 Pro SEFI System 21. Firing Order Once the Load and RPM axes have been configured, go back to the Configuration on the Tool Bar. Left click on the “Configuration” and the drop down screen will open. Keep the left mouse button depressed and slide the mouse pointer down until “Firing Order” is highlighted. Release the left mouse button. The screen below will open.
BigStuff3 Pro SEFI System At a given voltage, the minimum pulse width required to open an injector will vary based on injector size, injector type and manufacturer. This input screen allows the user the ability to fine tune flow rates (injector opening time) based on battery voltage. 23.
BigStuff3 Pro SEFI System You have now reached a milestone! The following necessary tasks have been completed: The BigComm software has been installed Communication with the ECU has been established. The hardware and operating parameters have been configured. The following sections of the manual will outline how to use the Air/Fuel Ratio table, O2 Correction tables and the Fuel Table. Calibrating the engine for steady state operation is an iterative process using these tables.
BigStuff3 Pro SEFI System 24. AIR FUEL RATIO (F11 – (“Quick Key”) Use the air/fuel icon to quickly access the air/fuel ratio table. The F11 “Quick Key” can also be used. 25. Air Fuel Ratio Table Note: In some cases, the ECU shipped with your system will come pre-configured with a table, which will closely match your engine configuration. The air fuel ratio table below allows the user to input desired air/fuel ratios for sixteen (16) engine speed (RPM) and 8 load (MAP or TPS) combinations.
BigStuff3 Pro SEFI System Fill – Choosing “Fill” will open a secondary drop down- screen which allows the selected cells to be changed to the value inputted into the window. Multiply – Choosing “Multiply” will open a secondary drop down-screen which allows the values of the selected cells to be changed by the ” Multiply” value inputted into the window. For example, if the values in the cells selected are 13 and the inputted “Multiply” value was 80, the new cell values would be 10.4.
BigStuff3 Pro SEFI System Cell Values Selected in a Column 13 13 14 13.9 Interpolated Result from Cell Values Selected Above 13 13.3 13.6 13.9 If a range of cells (multiple rows and columns) are selected and the “Interpolate” “cell-fill” option is selected the ECU will use the value in the cells at the bottom left and top left corners, bottom left and bottom right corners and the bottom left and top right corners of the entire range and interpolate the numbers in between so that the values are linear.
BigStuff3 Pro SEFI System LOAD Normally Aspirated Street Engine 13.1 13.1 13.1 13.1 13.1 13.1 13.1 13.1 13.1 13.1 13.1 13.1 13.1 13.1 13.1 13.1 13.5 13.5 13.5 13.5 13.5 13.5 13.5 13.5 13.5 13.5 13.5 13.5 13.5 13.5 13.5 13.5 14 14 14 14 14 14 14 14 14 14 14 14 14 14 14 14 14.5 14.5 14.5 14.5 14.5 14.5 14.5 14.5 14.5 14.5 14.5 14.5 14.5 14.5 14.5 14.5 14.5 14.5 14.5 14.6 14.7 14.7 14.7 14.7 14.7 14.7 14.7 14.7 14.7 14.7 14.7 14.
BigStuff3 Pro SEFI System LOAD Turbocharged Engine (30 PSI) 13.1 13.1 13.1 11.5 11.5 11.5 11.5 11.5 11.5 11.5 11.5 11.5 11.5 11.5 11.5 11.5 13.5 13.5 13.5 11.75 11.75 11.75 11.75 11.75 11.75 11.75 11.75 11.75 11.75 11.75 11.75 11.75 14 14 14 12 12 12 12 12 12 12 12 12 12 12 12 12 14.5 14.5 14.5 12.5 13.5 13.5 13.5 13.5 13.5 13.5 13.5 13.5 13.5 13.5 13.5 13.5 14.5 14.5 14.5 13 13 13 13 13 13 13 13 13 13 13 13 13 14.5 14.5 14.
BigStuff3 Pro SEFI System 27. Negative 02 Correction This table is configured and operates in the same way as the table above. The difference being that this table limits the amount of Negative O2 Correction. 28. View Lambda (F2 – “Quick Key”) The View Lambda allows the user to view the current Lambda status in a large LED-like format. The window can be expanded or contracted by locating the mouse cursor at the edge of the window.
BigStuff3 Pro SEFI System 29. AFR Parameters (F11 – “Quick Key”) The Air/Fuel Ratio (AFR) Parameters table allows the user to configure control parameters associated with closed loop fuel control, using the WBO2 sensor. The following paragraphs will describe the function of each control parameter. RPM On & RPM Off Inputs RPM On – Defines the RPM the engine needs to exceed before the ECU will allow the system to go into closed loop fuel control using the O2 sensor.
BigStuff3 Pro SEFI System 30. SPARK (F4 – “Quick Key”) There are several ways to access the base Spark table. The quickest methods are to hit the F4 “Quick Key” or left mouse click on the Spark Table icon, accessible from the main BigComm Screen. The Main Tool Bar can also be used to access the Spark table. From the Main BigComm software screen tool bar left click on Spark and the drop down screen will open. Spark Table Icon 31.
BigStuff3 Pro SEFI System The Spark table uses actual timing values in each of the 256 cells in the table. The Spark table allows the user to input Spark values for sixteen- (16) engine speed (RPM) and sixteen (16) load (MAP or TPS) combinations. The X-axis represents engine RPM and allows for 16 inputs and the Y-axis represents engine load and allows for sixteen (16) inputs as well. The X and Y-axes are configurable.
BigStuff3 Pro SEFI System Cell Values Selected in a Row Cell value to the left 30.5 27.8 27.8 27.8 Cell value to the left Interpolated Result from Cell Values Selected Above 30.5 29.5 28.5 27.8 If a series of cells in the same column are selected and the “Interpolate” “cell-fill” option is selected the ECU will use the value in the cell all the way at the bottom and the cell value all the way at the top and interpolate the numbers in between so that the values are linear.
BigStuff3 Pro SEFI System Cell Changes using the “Page Up” & “Page Down” Keys (Fuel and Spark Tables) Multiple cell values can also be changed simultaneously using the “Page Up” and “Page Down” keys. This approach offers a quick alternative to using the mouse. Use the keyboard arrow keys (up/down/left/right) to maneuver to area of the map where the desired cell changes will be made. Next, depress and hold the keyboard “Shift” key. Now, use the arrow keys, to maneuver through the cells to be changed.
BigStuff3 Pro SEFI System The Main Tool Bar can also be used to access the “Fuel” table. From the Main BigComm software screen tool bar left click on Fuel and the drop down screen will open. Fuel table drop down screen accessed from the Main Tool Bar Fuel Table Icon Using the PC’s mouse, keep the left mouse button depressed and slide the mouse pointer down until “Fuel Table” is highlighted. Release the left mouse button. The screen below will open. 33.
BigStuff3 Pro SEFI System The Fuel table allows the user to input desired (VE) values for sixteen (16) engine speed (RPM) and sixteen (16) load (MAP or TPS) combinations. The X-axis represents engine RPM and allows for 16 inputs and the Y-axis represents engine load and allows for sixteen (16) inputs as well. The X and Yaxes are configurable.
BigStuff3 Pro SEFI System Cell Values Selected in a Row Cell value to the left 70 70 70 80 Cell value to the left Interpolated Result from Cell Values Selected Above 70 73 77 80 If a series of cells in the same column are selected and the “Interpolate” “cell-fill” option is selected the ECU will use the value in the cell all the way at the bottom and the cell value all the way at the top and interpolate the numbers in between so that the values are linear.
BigStuff3 Pro SEFI System Next, depress and hold the keyboard “Shift” key. Now, use the arrow keys, to maneuver through the cells to be changed. As the cells are being selected they will become highlighted. Once the desired cell range has been highlighted, release the “Shift” key. Depress the “Page Up” key to increase the cell values and the “Page Down” key to decrease the cell values. The cell values will increase or decrease by a value of one (1) for every keystroke.
BigStuff3 Pro SEFI System To configure engine starting fuel, go to Starting on the Tool Bar. Left click on “Starting” and a drop down screen will open. Keep the left mouse button depressed and slide the mouse pointer down until the desired “Starting” fuel drop down is highlighted. The sequence of events the ECU steps through during an engine “start” are defined, in order, in the next four sections as follows: Cranking After Start Delay After Start Correction (adding fuel) After Start Decay 35.
BigStuff3 Pro SEFI System To change a value in the Cranking table, move the cursor using the PC’s mouse or arrow keys to the cell to be changed. Input the desired value and hit “Enter” to save the change. Once the engine starts (the ECU will detect the rapid change in engine speed) the ECU will ignore the Cranking table and begin using inputs from the After Start Delay (see section 37). 36.
BigStuff3 Pro SEFI System To change a value in the After Start Correction table, move the cursor using the PC’s mouse or arrow keys to the cell to be changed. Input the desired value and hit “Enter” to save the change. 38. AfterStart Decay The After Start Correction fuel, being added by the ECU during an engine starting routine, is only required for a very short period of time. The ECU pulls the fuel back out, or decays it, as a function of crankshaft interrupts and coolant temperature.
BigStuff3 Pro SEFI System 39. Idle The “Idle” drop down offers the user five tables to calibrate the engine idle quality. Each input table will be described in the paragraphs below. To get to the Idle drop down screen, go to the main Tool Bar and left click on Idle and the screen below will appear. Hold the left mouse down and drag it to the desired input screen and release the mouse button. 40.
BigStuff3 Pro SEFI System 41. Desired Idle RPM The Desired Idle Rpm table allows the user to set the desired engine RPM as a function of coolant temperature. To configure the table, input the desired engine RPM for the each temperature shown at the bottom of the table. The ECU controls the idle speed so transitions between temperature ranges are not noticeable. Note: The TPS needs to be set properly for this input to function properly. See TPS_Configuration for further assistance.
BigStuff3 Pro SEFI System While the engine is running, a “real-time Ellipse” will move within the Idle Spark table relative to the current RPM Delta “operating point”. Use the ellipse as a point of reference to help calibrate the Idle Spark table. To change a value in the Idle Spark table, move the cursor using the PC’s mouse or arrow keys to the cell to be changed. Input the desired value, and hit “Enter” to save the change. The values shown in the table below can be used as a baseline.
BigStuff3 Pro SEFI System 44. IAC Gain Terms This input table allows the user to set how quickly the IAC motor moves (in or out) in a given period of time. Use the default settings that come with the ECU unless it becomes necessary to control the IAC motor speed. The Proportional Gain setting should be from 4 to 16. The Derivative Gain should be ¼ to ½ of the Proportional Gain. Enter the desired value in the table and left mouse click OK to save the information.
BigStuff3 Pro SEFI System In this example, the area within the orange square is where the obelisk will be floating when the engine is idling at normal operating temperature. Working back-and-forth between the spark table and idle set screw, decrease the timing values in this area to about 10 degrees, while opening the throttle to maintain the desired idle RPM. The spark value in this cell should be set to about 22 to 24 degrees. This is the cold start timing.
BigStuff3 Pro SEFI System TPS % IAC 0 5 8 25 16 50 24 90 32 122 40 133 48 144 56 150 If the TPS is not adjustable, and the obelisk will not fit inside the first cell(s), input the values in the example table shown below, into your Throttle Follower Table. These values represent a good starting point. Some additional fine adjustments may be required.
BigStuff3 Pro SEFI System 45. Warm Up Before the engine reaches normal operating temperature, i.e. 180o additional fuel is required as a function of engine coolant temperature and manifold absolute pressure (for speed-density applications). To calibrate “warm up enrichment” fuel go to the Main Tool bar and highlight “Warm Up.” Keep the left mouse button depressed and slide the cursor down to select Coolant Correction or Air Temperature Correction, depending on the table to be accessed. 46.
BigStuff3 Pro SEFI System 47. MAP vs. Coolant The GEN3 ECU’s MAP vs. Coolant table offers an improved warm up routine. The table applies a fuel correction (a % increase or decrease to the base pulse width) as a function of both Load (MAP) and coolant temperature. The cells in the table represent ninety six (96) different MAP and coolant temperature combinations. The same calibration technique should be used with this table as was employed with the base fuel map.
BigStuff3 Pro SEFI System 48. TRANSIENT FUEL Transient Fuel is the fuel added to the engine during non-steady state conditions as a function of dTPSdt and dMAPdt. Transient Fuel is applied relative to a rate of throttle change (dTPS) and a rate of MAP change (dMAP). TPS transient fuel is added asynchronously. Asynchronously means fuel added between the regularly scheduled injector pulses. MAP transient fuel is added synchronously to increase or decrease the base fuel pulse width.
BigStuff3 Pro SEFI System 49. Power Valve Fuel (F10 – “Quick Key”) The first table is Power Valve Fuel. It is used to determine the percent fuel correction, either positive or negative, for a change in manifold pressure (dMAPdt). The ECU calculates the change in manifold pressure every 52 milliseconds (ms) as long as the throttle is moving. The ECU will increase or decrease the base pulse width relative to the dMAP Correction table’s % correction value (i.e. 100%).
BigStuff3 Pro SEFI System Same screen as above with the window maximized. 51. MAP AE Decay Rate The third table is MAP AE Decay rate. It is used to determine how quickly to decrease the Positive dMAP correction value after accelerating (throttle tip-in) the engine at a given coolant temperature. The ECU decrements the dMAP correction by the MAP AE Decay Rate. A MAP AE Decay Rate of 6 represents a decrease of the dMAP Correction by 6% every crank interrupt until it reaches zero.
BigStuff3 Pro SEFI System To change a value in the MAP AE Decay rate table, move the cursor using the PC’s mouse or arrow keys to the cell to be changed. Input the desired value and hit “Enter” to save the change. The inputs shown in the table below can be used as a baseline. 52. MAP AE Inc Rate The fourth table is MAP AE Inc Rate. It is used to determine how quickly to increase the Negative dMAP correction value after decelerating (throttle tip-out) the engine at a given coolant temperature.
BigStuff3 Pro SEFI System Correction table’s value is used to increase the positive dMAP Correction value. Therefore, if the current dMAP correction value is 200% and the Run Time Correction value is 25%, the ECU will increase the dMAP 200% correction value by 25%, relative to the time at which the acceleration event occurred. The amount of Run Time Correction fuel is decreased as time transpires and the engine warms up.
BigStuff3 Pro SEFI System The first entry of the dMAP Parameter Configuration table is Asynchronous Acceleration Enrichment (AAE). It is used to set the MAP transient fuel thresholds relative to MAP (kPa) and TPS (%) values. Below, is a brief description of each. MAP Limit: Establishes the MAP value in kPa at which the dMAP transient fuel is disabled. For example, if the MAP Limit value is set to 80 kPa, the dTPSdt transient fuel will be disabled above MAP values of 80 kPa.
BigStuff3 Pro SEFI System where the acceleration event occurred (AE Position Correction). Below, is a description of how the TPS Transient Fuel requirements are calibrated using the dTPSdt and AE Position Correction tables. 55. Accel Pump Shot The first TPS Transient Fuel control table is Accel Pump Shot and as the name insinuates it can be compared to a carburetor’s accelerator pump shot.
BigStuff3 Pro SEFI System 2.0 ms) at a 24% throttle position, the ECU would immediately look up the corresponding AE Position correction value of let’s say -13%. The ECU will then decrease the 2.0 ms pulse by 13% and output a 1.74 ms pulse. If the same 10o/second dTPSdt event occurred at a 48% throttle position and the corresponding AE Position Correction value was -31% the APW would then be 2.0 ms – 31% or 1.38 ms.
BigStuff3 Pro SEFI System 58. Individual Cylinder - Spark The fixed inputs in the table below represent the firing order configured during the firing order configuration process (Firing_Order_Config). The input cells allow the user to define the amount of timing retard (up to 10o) for or each cylinder in the table. Timing corrections are made to the values in the Spark Table.
BigStuff3 Pro SEFI System Individual Cylinder Fuel Correction Table – Base Systems Individual Cylinder Fuel Correction Table – Upgraded Systems with Advanced Firmware 60. Boost The GEN3 ECU allows the user to control boost parameters. Two boost strategies can be employed. 1. A Pulse Width Modulated (PWM) valve can be used to control boost as a function of engine RPM. The duty cycle of the valve can be changed as a function of engine speed. 2. A “staged” boost strategy can also be used.
BigStuff3 Pro SEFI System Keep the left mouse button depressed and slide the mouse pointer down until “Boost Parameters” is highlighted. Release the left mouse button. The screen below will open. 61. Boost Parameters .1-second resolution The GEN3 ECU allows the user to control boost parameters in two (2) modes: Staged or Pulse Width Modulated (PWM). Staged mode turns on boost stages (solenoid valves) in a user defined, time sequence.
BigStuff3 Pro SEFI System The Stage timer starts once the following criteria are satisfied: Minimum RPM – This input establishes the minimum RPM the engine must reach to initiate the boost timing sequence. Minimum Throttle Position Sensor (TPS) – This input establishes the minimum throttle position the TPS sensor must reach to initiate the boost timing sequence. Both the Minimum RPM and Minimum Throttle Position inputs must be satisfied before the boost timing is initiated. 62.
BigStuff3 Pro SEFI System 63. Boost Staged When “Staged” mode is selected the time intervals between the boost stages need to be configured. In the Boost Parameters table above, these inputs are defined as Stage 1, Stage 2 and Stage 3. Before the staged boost sequence can be enabled, 12 Volts needs to be present at the “Timer Enable” pin, which is Pin A of the 4-way Boost connector on the main wire harness Boost_Connector_Pin_Out.
BigStuff3 3 Stage Boost (Solenoid) Wiring Timer Enable Wire from Relay A Stage 1 Ground tex t Ground tex t 87 87 Stage 2 tex t D Relay 86 85 87 a 30 86 85 87 a 30 86 87 a C Relay 87 Relay B Stage 3 tex t Ground tex t 85 Switched 12V 30 12V Battery Boost Connector from Main Wire Harness tex t Wet Nitrous / Boost Solenoid Wet Nitrous / Boost Solenoid Wet Nitrous / Boost Solenoid
BigStuff3 Pro SEFI System Boost Spark Tables 1, 2 & 3 The Boost spark tables allow the user to set the spark retard (degrees) timing as a function of RPM for each stage. The retard timing for each stage is not additive. In other words, when the second stage comes on it replaces the timing values of the first stage and when the third stage comes on it replaces the timing values of the first and second stage.
BigStuff3 Pro SEFI System Note: The timing values, inputted into the Start Line Timing table, are the absolute values the ECU will use when the Boost Parameters minimum RPM and TPS are reached! If you enter zero (0) in the table, there will be no starting line timing. Boost Connector Pin-out Configuration Connector Pin A B C D Function Timer Enable Stage 1 / PWM Output Stage 2 Stage 3 65.
BigStuff3 Pro SEFI System Release the left mouse button. The screen below will open. Left Click on the “Pick Dash” drop down screen. Pick Dash drop down screen The screen below will appear. Version 2.
BigStuff3 Pro SEFI System This is the list of thirty-one (31) available Dashboards. Once configured, these Dashboards will show up at the bottom of the corresponding operating screens. After selecting a Dash to configure, “Signals” need to be selected and added to the Dash. After the Signals are selected, added and saved, they will be displayed in the Dash at the bottom of the relevant BigComm software screens. The left side of the drop down screen below shows the “Available Signals”.
BigStuff3 Pro SEFI System In the screen print below notice that the same “Signals” appear in the Dash at the bottom of the Cranking Fuel screen. 67. Save a Dash Again, the recommended way to configure the “Default Dash” is to configure each of available dash’s, or most frequently used dash’s, to your liking and then save them as the “Default Dash”. This way, every time you open the BigComm software, the dash’s will be open to the preferred configuration.
BigStuff3 Pro SEFI System Name the file “Default” and hit Save. By selecting “Default” as the file name, the Log Window dash becomes part of the compilation called “Default Dash”. Again, the file will be saved to C:/Program Files/BigStuff/BigComm directory. A unique file name can also be assigned by typing the name in the “File Name” subwindow and clicking on Save. 68. Load From File In addition to the “Default Dash” unique dash’s can be configured and used, e.g. Turbo Car dash.
BigStuff3 Pro SEFI System The next time the BigComm software is opened it will automatically load and run the “Default Dash” compilation, while retaining your unique dash in the C: Program Files/BigStuff/BigComm folder. 69. Save to File Section 69 above described how to configure the 31 available Dash’s. The steps for saving a reconfigured dash in the “Default Dash” or unique dash compilation are outlined below. To save a Dash, go to Dash on the Main Menu screen.
BigStuff3 Pro SEFI System 70. BigStuff3 Data Acquisition As an option, the GEN3 ECU is capable of supporting both internal (internal to the GEN3 ECU) and external (to a remote personal computer) data logging. The GEN3’s internal data logging eliminates the need for a PC in the car!! "Logging" files and "Replay" files are automatically saved to the BigComm folder. Logging files are saved with a .csv suffix. Replay files are saved with a .csv (replay) suffix.
BigStuff3 Pro SEFI System From this drop down screen, the following data Logging events can be configured: Configure Log – Instructs the ECU to: o Start logging when user defined TPS percent (%) is reached. o How long to Log data for. o Whether the display will update while data is being logged. o Set the default file name for the series of data to be logged. Record Log – Starts logging data. View Log From File - View logged data from a user defined file name.
BigStuff3 Pro SEFI System bar. Keep the left mouse button depressed, and move the slide bar left or right to achieve the desired data log time frame. Update Display While Logging – Determines whether or not the logged data will be displayed in the Log Window screen. Select Yes to display or No, not to display. Set Default File Name - The default file name for the data being logged. A default file name needs to established and saved.
BigStuff3 Pro SEFI System An example log screen is shown below. In this example, the Log Window Dashboard was setup to collect and display Scaled Load, Scaled RPM, TPS, V bat MAP, RPM, Spark Advance and Boost, as shown on the right side of the screen. The left and right arrow keys on the keyboard can be used to move horizontally across the logged data graph.
BigStuff3 Pro SEFI System Release the left mouse button and the selected graph area will fill the screen. Again, the left and right arrow keys on the keyboard can be used to display the actual engine operating parameters recorded at each point in the graph. Red “Zoom In” box created when left mouse button is depressed in the upper left hand corner and dragged down and across to create a box over the desired area.
BigStuff3 Pro SEFI System 75. Dash/Logging procedure to record Data Log session Select Dash from the Main Window tool bar. Select Configure Dash from the Dash drop down list. Select Log Window from the Pick Dash drop down selection window. Select the Available Signals that you want to appear in the Log Window dash. The selected signals will also be logged when Record Log, Record Log Icon or F8 quick key are selected.
BigStuff3 Pro SEFI System 16. Once the Record Log session has timed out, you can either view the Logged data file (see step 17) or initiate another Record Log session by hitting the R key. Once triggered, hitting the PC’s Space Bar or exceeding the TPS Threshold setting can initiate another Record Log session. 17. There are a couple of ways to access the Record Log data file. Below are the options. Option 1: Select the View Log File Icon from the Main Window tool bar.
BigStuff3 Pro SEFI System 77. Configure Replay To configure Replay, open the Configure Replay drop down screen as shown above. The following screen will open. Signals Displayed – Select the signals you would like logged and displayed by checking the box next to the desired signal. Check the “ALL OFF” or “ALL ON” toggles the bottom of the table to turn all the signals off or on respectively. Any signal checked will be logged and displayed.
BigStuff3 Pro SEFI System Sample Rate 20ms 40ms 60ms 80ms Record Time (seconds) 76 152 228 304 During a Logging event, the GEN3 ECU automatically logs fifty two (52) parameters (referred to as Signals). After an event has been logged, hitting the letter “C” on the keyboard will open the “Replay Configuration” screen above. Signals can be selected or de-selected then graphed. This feature allows the user to control the number of parameters (Signals) displayed in a graph.
BigStuff3 Pro SEFI System Once 100% of the data has been transferred, a file is automatically written to the folder hierarchy: C: Program Files/BigStuff/BigComm. Note: The Replay file must be down loaded from the GEN3 ECU to a PC within thirty (30) minutes from when the ignition switch is turned off. After thirty (30) minutes the “Replay” data will be lost. Note: The Replay data could be lost if the battery cut-off switch is turned off.
BigStuff3 Pro SEFI System EXTENED REPLAY FIRMWARE – IMPORTANT NOTICE! Please read carefully if your GEN3 system is being upgraded to the any of the following optional systems: This section does not apply if the GEN3 system was originally purchased with any of these optional systems. SR2 SR2 with ETM NTK WBO2 for methanol CAN EGT Prior to the above mentioned upgrades, the GEN3 ECU was configured with “Original Replay” internal data logging capability (it recorded for up to eighteen seconds).
BigStuff3 Pro SEFI System First, at the C:\Program Files\ BigStuff/BigComm, create a new folder inside the BigComm folder and name it SR2_BigComm. Save the zip file from BS3 Website or email attachment into the SR2_BigComm folder. New “BigComm” icon. Right click, rename and send it to the desktop Un-zip the file into the SR2_BigComm folder. All your future calibrations, replays, logs etc.
BigStuff3 Pro SEFI System Pan Vacuum – The oil pan vacuum or pressure can be logged using a GM 2 Bar MAP, which will read and record the pan vacuum/pressure in inches of mercury. A negative number represents vacuum and a positive number represents positive pressure in the crank case. Fuel, Oil and Turbo Back Pressure – Using a 1/8” pipe thread, 0 – 150-psi pressure transducer (available as an option from BigStuff3), the fuel, oil and turbo back pressure can be independently logged.
BigStuff3 Pro SEFI System Blue Ellipse represents the logged data file engine operating points. A Blue Ellipse will appear along the trace line highlighting the logged engine operating points. To navigate the ellipse along the trace line, depress and hold the “Alt” key while simultaneously depressing the left or right arrow keys. As the blue Ellipse moves along the trace line, the logged engine operating parameters will be displayed in the Dash.
BigStuff3 Pro SEFI System Fill – Choosing “Fill” will open a secondary drop down- screen which allows the selected cells to be changed to the value inputted into the window. Multiply – Choosing “Multiply” will open a secondary drop down-screen which allows the values of the selected cells to be changed by the ” Multiply” value inputted into the window. For example, if the values in the cells selected are 13 and the inputted “Multiply” value was 80%, the new cell values would be 10.4.
BigStuff3 Pro SEFI System 81. Loading and Saving Calibration Files Calibration files can be saved to a file folder or loaded from an existing file in one of two ways. In “off-line” mode, a calibration file can be saved to the PC so changes can be made “off-line” and saved to a disc (the hard drive or flopping disc). In “on-line” mode, calibration changes are made and sent directly to the GEN3 ECU while the ECU is “live”. 82.
BigStuff3 Pro SEFI System to the “On” position. The ECU cannot be programmed and changes will not be saved with the ignition switch is in the “Off” position. The best way to detect that the calibration changes have been saved from RAM to the GEN3’s Flash memory is to watch the green communication ball in the upper right corner of the BigComm software screen. After the ignition switch is turned off, the green sliding ball will continue to move back and forth for approximately fifteen (15) seconds.
BigStuff3 Pro SEFI System 83. Load a Calibration To load a calibration file, previously saved to the PC’s hard drive or external disc, go through the steps above except select Load Calibration from the drop down screen. Note: The GEN3 ECU must be powered ON to load a calibration file into it. The following screen will appear warning that loading a new calibration will overwrite the ECU’s current calibration. Left click on Yes to continue loading the selected calibration file.
BigStuff3 Pro SEFI System The following screen will open showing the status of the file loading. Once the file finishes loading, the selected calibration will be loaded into the GEN3 ECU. 84. Acronym Definition SEFI – Sequential Electronic Fuel Injection AFR – Air Fuel Ratio MPH – Mile Per Hour EMI – Electro-Magnetic Interference ROM – Read Only Memory WOT - Wide Open Throttle TCC - Torque Converter Clutch. APW – Asynchronous Pulse Width 85.
BigStuff3 Pro SEFI System 86. Function or “Quick Keys” F1 = Cranking Table F2 = View Lambda Screen F3 = Fuel Table F4 = Spark Table F5 = Operating Parameters Table (opens all operating parameter tables) F6 = Coolant Correction Table F7 = Open Key F8 = Record Log Window F9 = Upload Replay F10 = Power Valve Fuel Table and dMAP RPM Modifier Table F11 = Air/Fuel Ratio (AFR) and AFR Parameters Configuration Tables F12 = Save Calibration Folder 87.
BigStuff3 Pro SEFI System Note: A CD ROM disk is no longer supplied with a CD ROM software Disc, but one can be purchased from BigStuff3. Note: BigStuff3 recommends checking all of the settings in the configuration tables to ensure the system as supplied will operate correctly. Note: The air fuel ratio will still be displayed and recorded while in “Open Loop” mode. Note: It is important to have the TPS (%) setup correctly.
BigStuff3 Pro SEFI System Note: The inputs from this table are used by the ECU if “Alpha N” was the control algorithm selected during the Main Configuration set up. If the “Speed Density” the control algorithm was selected, the ECU ignores inputs from this table. Note: Before saving the Log Window dash for the first time, you need to navigate to the C: Program Files/BigStuff/BigComm directory. This step only occurs the very first time any Dash file is saved.
BigStuff3 Pro SEFI System GM LS1 (24x crank wheel) System Main Wire Harness - http://bigstuff3.com/pdf/JMI-006016-CC_REV_B_GEN3_PRO_SEFI_LS1_MWH.pdf. Ford Modular Motor Main Wire Harness - http://bigstuff3.com/pdf/JMI-006-031CC_REV_C_GEN3_PRO_SEFI_MOD_MWH.pdf. GM LS7 (58x crank wheel) Main Wire Harness - http://bigstuff3.com/pdf/JMI-006-034CC_REV_B_GEN3_PRO_SEFI_LS7_MWH.pdf The following additional system wire harnesses are also available in How To/Help section.
BigStuff3 Pro SEFI System Will the GEN3 ECU drive high and low impedance injectors? o Yes, it can drive both high and low impedance injectors. The GEN3 ECU can even drive both injector types of injectors simultaneously with the 16 or 24 injector options. The GEN3 ECU auto-detects the type of injector being used, so no set up is necessary.
BigStuff3 Pro SEFI System o For Ford Modular COP engines the UEGOR value in the Dash must read 28. If a number other than 28 is being reported, the cam pulse is occurring at the same time as the crank pulse. For more information on how to resolve this issue contact BigStuff3. o The ECU may be in Clear flood Mode. Make sure the TPS sensor reads near 1-2% when the throttle is closed and near 100% when fully opened.
BigStuff3 Pro SEFI System o The Timer Enable wire must be used. o If there is a zero (0) timing retard value in any of the cells in the 3 timing retard tables, the ECU will automatically revert to the base timing map. Can I use my three (3) stage Boost control feature to just retard the timing? o Yes, but the criteria directly above must be met. I can’t get my LSx engine started. I’m using an LS2 sensor in the front of the engine.
BigStuff3 Pro SEFI System I do not think my injectors are pulsing. What can I check? o Make sure the BS3 and MSD systems are grounded directly to the battery. o Plug a “noid” light into each injector position in the injector wire harness. Turn the engine over and see if the light pulses for each injector location. I do not think my COP coils are firing. What can I check? o Make sure the BS3 main wire harness ground is wired directly to the battery.
BigStuff3 Pro SEFI System Running rich at idle A combination of the above items Is there anything special about using the BigStuff3, GEN3 system with the three (3) valve Ford Modular Motor? o Yes, these engines have three (3) cam interrupt ribs. You must find the rib that lines up with cylinder # 1 TDC, and then modify (remove) the other two ribs so that they do not send cam pulses to the ECU. I already have DAE and want to add the ETM with 3-step option.
BigStuff3 Pro SEFI System After changing a Dash’s configuration, make sure to immediately save it. The Dash must be saved in the BigComm folder or a sub folder that the calibration is saved in. Subfolders inside the BigComm folder I cannot see 100% of the BigComm tables. What should I do? Make sure the screen is set to 96 dpi as shown below. Go to Windows Control Panel. Version 2.
BigStuff3 Pro SEFI System What dwell times should be used with the LS1 coils sold with my system? With a 12V charging system. From idle to approximately 4,000 RPM? Use about 3.0 milliseconds near idle and no more than about 4.0 milliseconds at approximately 4,000 RPM. From approximately 4,100 - Max RPM? Use no more than about 6 milliseconds of total dwell time at max RPM. With a 16V charging system. From idle to approximately 4,000 RPM? Use about 2.