
Use and Care Guide

5
PREPARATION
Before beginning assembly, installation or operation of the product, make sure all parts are present. Compare parts with the
package contents list and diagram. If any part is missing or damaged, do not attempt to assemble, install or operate the product.
Contact customer service for replacement parts.
Estimated Assembly Time: 20-30 minutes
Tools Required for Assembly:
Adjustable wrench or one 1/2 in. box end wrench
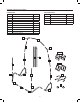
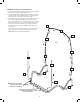
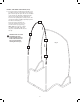
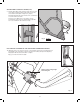
ATTACH THE MOUNTING BAR (FIGS. 2A AND 2B)
2. Position assembled mounting bars horizontally, slide
two U-bolts [M] from the backside of the snow thrower
(not the motor side) through the rear mounting plate [L]
and the front mounting plate [K] positioned on the front
side. Thread a Nylock nut [N] on each U-bolt stud. Snug
but do not fully tighten. Repeat on the other handlebar
upright. (Fig. 2a)
Please see the diagrams below for correct and incorrect
installation of the mounting plates. (Fig. 2b)
Note: The preferred mounting location for assembled
mounting bar is on the front (motor side) of the
handlebars. The mounting bar should be placed on the
handlebars a minimum of 24" and a maximum of 30"
from the ground (as measured from the bar end). This will
allow headroom of at least 6.5' in the peak of the
cab roof.
CAUTION: Position of the clamps may vary
depending on snow thrower manufacture.
Select the highest position possible that will
accommodate the clamps and not interfere with the
snow thrower controls and frame.
CAUTION: Make sure nothing interferes with the
safe operation of your snow thrower.
Fig. 1a
Fig. 1b
A
B1
B2
Correct
Incorrect
Fig. 2a
Snow thrower
handlebar
uprights
Fig. 2b
M
M
L
K
N
ASSEMBLY INSTRUCTIONS
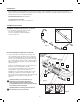
ASSEMBLE THE MOUNTING BAR (FIGS. 1A AND 1B)
1. Insert both side mounting bars [B1 & B2] into
the center mounting bar [A]. (Fig. 1a)
Secure by engaging the spring loaded pins
as shown. (Fig. 1b)