User’s Guide for Precise 100 A Precise 100 Logon 2.
Notice Electromagnetic Compatibility (EMC) Notices For Europe: This digital equipment fulfils the requirements for radiated emission according to limit B of EN55022: 1994 and the requirements for immunity according to EN55024: 1998 residential, commercial and light industry. For the U.S.A.: FCC For Precise 100 SC reader: This device complies with part 15 of the FCC Rules.
Content Chapter 1 Introduction 5 What’s New in Precise Logon 2.1 Precise 100 A – the Fingerprint Reader Why Use Fingerprint Technology? About Precise 100 Family 5 6 7 8 Possible configuration 8 Icons and Conventions 9 Chapter 2 Installation 10 Minimum System Requirements Preparing Installation Setting the Parallel Port Connecting the Fingerprint Reader to the Computer Installing the Fingerprint Identification Software Installing the Precise 100 Logon 2.
Chapter 5 NOTE: Chapter 5 is for administrators. Users without administrator rights do not have access to the BioManager.
Chapter 1 Introduction Congratulations on selecting Precise Biometrics’ Fingerprint Identification System! Using your fingerprint for identification is an easy and secure way to prove your identity. Please read this chapter before you install and use the system. This chapter includes the following information: • What’s new in Precise Logon 2.
Precise 100 A The Fingerprint Reader The fingerprint reader includes a sensor for reading fingerprints. When you place your finger on the fingerprint reader, the part of the finger that touches the sensor is read. The sensor measures the capacitance in the finger pad, which reveals the pattern of the fingerprint. Thus, a paper copy with a picture of a fingerprint can not grant access to the system.
Why Use Fingerprint Technology? In modern society, there is a vast need for secure identification, for instance when logging into computer network. An unauthorised person who obtains access to computer files constitutes a major risk to many companies. In order to prevent unauthorised access, network users have previously identified themselves with a password entered together with the username when logging into a network. The disadvantages of passwords: • Unreliable identification.
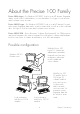
About the Precise 100 Family Precise 100 A Logon – For Windows NT/2000, local or in an NT domain. Fingerprint data is stored on the local hard drive, or server hard drive. For logon to local accounts and/or domain server accounts. Precise 100 SC Logon – For Windows NT/2000, local or in an NT domain. For maximum security, fingerprint data can be stored on smart cards, as well as on the local hard drive. For logon to local accounts and/or domain server accounts.
Icons and Conventions • Key names on the keyboard appear in italics, for example Caps Lock, Ctrl, Enter. • Names of fields, text boxes and buttons appear in bold type, for example Username, User, OK. • Keys that you should press and hold down together appear as the key names and the plus (+) sign, for example Ctrl + Alt + Delete. • An arrow is used to separate icons or menu options that should be selected in succession, for example Start > Settings > Control Panel.
Chapter 2 Installation The installation consists of two parts. Start by following the instructions in the Preparing Installation section. Then continue with the Installing the Fingerprint Identification Software section. NOTE: If you are using a Precise 100 A with parallel port connector, it is very important that the parallel port of the PC is set to ECP mode before using the fingerprint reader. Otherwise, the fingerprint reader will not function properly. See Setting the Parallel Port in this chapter.
Minimum System Requirements In order to install the software included on the enclosed CD-ROM, your computer must meet the following system requirements: • PC with 200 MHz Pentium processor or equivalent • 10 MB hard disk space available • USB port or Parallel port with ECP support and PS/2 keyboard/mouse port NOTE: If you wish to connect the Precise 100 A PAR reader to a secondary parallel port, this port has to be on the ISA-bus and not the PCI-bus. • One of the following operating systems: 1.
Preparing Installation The Precise 100 A fingerprint reader comes in two versions: Precise 100 A PAR and Precise 100 A USB. The Precise 100 A PAR communicates with the computer through the computer’s parallel port, and the keyboard port or mouse port is used to power the fingerprint reader. The Precise 100 A USB communicates with the computer through the computer’s USB port and does not need additional power.
Connecting the Fingerprint Reader to the Computer 1. Make sure that the parallel port is set to ECP mode. 2. Turn off the computer. fingerprint reader Precise 100 A pass through PS/2 connector parallel port connector 3. Connect the fingerprint reader to the parallel port at the back of the computer by using the connector. Make sure that the connector is secured, so that it can not be disconnected by mistake. 4.
5. Connect the keyboard/mouse PS/2 connector to the pass-through PS/2 connector. 6. Power on the computer. Continue with the next step – Installing the Fingerprint Identification Software. Installing the Fingerprint Identification Software NOTE: Only users with administrator rights can install the software. The fingerprint identification software, Precise 100 Logon 2.1, is needed to read your fingerprints and to save and retrieve information about your fingerprints, accessible domains, etc.
Installing the Precise 100 Logon 2.1 Software NOTE: If you have a previous release of Precise Biometrics fingerprint identification software installed on your computer, please do the following before you install the Precise 100 Logon 2.1 software: 1) Make sure you have a backup password (see the chapter BioManager). 2) To uninstall the old software, read carefully the chapter Uninstalling in your Precise Biometrics manual and follow the instructions.
4. If you are using Windows NT you must install the updated Microsoft Smart Card Base Components, if not previously installed. Do not install the Smart Card Base Components if you are using Windows 2000, the system may crash. To install the Smart Card Base Components a) Click the SC Base Components button, a submenu appears. b) Click the Base Components button in the submenu. You don’t need to reboot your computer after this step if you continue directly with the next step.
Port Configuration If you are using Windows NT (only) and your system is equipped with multiple parallel ports, you can specify which parallel port the fingerprint reader is connected to. This is done in the Precise Biometrics Registry Settings. In the rare case you should experience compatibility problems with other software, you may also need to turn interrupts on or off. 1. Click Start > Settings > Control Panel. The Control Panel screen appears. 2. Double-click on the Precise Biometrics logo.
Attaching the Fingerprint Reader If preferable, the fingerprint reader can be attached to, for example the side of your monitor. Simply use the adhesive tape at the back of the fingerprint reader. The adhesive tape is very durable and will keep the fingerprint reader attached for many years. The fingerprint reader can be removed and attached again. If the adhesive tape loses its stickiness, replace it with one of the enclosed adhesive tapes.
Chapter 3 Using the Fingerprint Reader As with most new technology, it might take some training to feel at home logging on using your fingerprint. When you log on and verify your fingerprint, it is important that you place your finger on the fingerprint reader in a proper way. The following chapter contains some examples of good and bad ways of placing your finger on the fingerprint reader.
Placing Your Finger Correctly on the Fingerprint Reader When you place your finger on the fingerprint reader sensor to identify yourself, please remember two things: 1. It is important that you use the correct finger. For example, if you place your left index finger on the sensor, you will not be granted access if the system expects you to use your left middle finger. When logging on, a screen shows you which finger you are expected to use – it is marked with a dot. 2.
Poor image: rotated fingerprint. Rotated finger Poor image: off-centre fingerprint. Skew finger – too far to the right.
Poor image: off-centre fingerprint. Finger placed too far down on the sensor Good image: fingerprint in the middle, medium pressure to the sensor.
If the placement is correct, but too much or too little pressure is used, the images will look like this: Poor image: faint fingerprint caused by insufficient pressure. The finger may also be very dry. Poor image: too dark fingerprint caused by excessive pressure. The finger may also be wet. When you are placing your finger on the fingerprint reader sensor, it is important that you use the finger marked in the Verify Fingerprint window.
Template stored in database Good image from the sensor Above is a good fingerprint, which will not result in a match since the fingerprint is not matched with its corresponding template. You may have placed the wrong finger on the sensor, or it could be an unauthorised person trying to log into your account. The system will deny access. To learn more about how to position your finger on the fingerprint reader, use the Precise Demo.
Fingerprint Reader Maintenance It is very important that the sensor surface is kept clean. If the sensor is dirty or scratched, there is an increased risk that a fingerprint can not be successfully matched with its corresponding template stored in the database. • Protect the fingerprint reader from any kind of physical damage. • If necessary, clean the surface with a clean cotton cloth. You can dampen the cloth slightly with a cleaner.
Chapter 4 Personal Enrolment – Administrating Your Own User Account This chapter addresses the process of remotely enrolling a user into the fingerprint database system and registering a user’s fingerprint data. This chapter includes the following information: • Administrating your own user account. • Biometric and non-biometric users. • Enrolment via the Windows Security screen. Administrating Your Own User Account A user can remotely administrate user accounts on a domain server.
Enrolment via the Windows Security Screen When the enrolment wizard is started via the Windows Security screen, the user account of the currently logged-on user is pre-selected. To start the enrolment wizard via the Windows Security screen: 1. Press Ctrl + Alt + Delete. The Windows Security screen appears. 2. Click Enrolment. If you are a biometric user the Verify Fingerprint screen appears (see 2.1 below). Otherwise the Verify Password screen appears (see 2.2 below). 2.1.
2.2. Enter your password and click OK. The enrolment wizard starts and the User information screen appears. 3. Here you can view your username, your full name and your description. 4. Click Next. The Reading fingerprints dialog appears.
In the Reading fingerprints dialog you can register your fingerprints. 6. To register a fingerprint, follow the instructions below: 6.1. Select the finger to register by clicking in one of the checkboxes. Follow the instructions on the screen. Make sure the selected finger is placed on the fingerprint reader sensor. NOTE: Place the middle of the finger pad on the sensor, to ensure an image rich in fingerprint information. 6.2.
7.1 If the administrator has turned off the possibility for users to change pass words in the Windows User Manager, the dialog will look like the one above and there will be no further choices. 7.2 If users are allowed to change passwords, you can enter your new pass word in the Password and Confirm Password fields.
7.3 If the checkbox Possibility to log on using password appears, you can leave it unchecked to get a random, auto-generated password, which will not be available to you. This means that the only way you can log on is to use your fingerprint. 7.4 If you check the Possibility to log on using password checkbox you will be able to choose your own new password which you will then have to enter twice. NOTE: Fore more information on passwords see section About Passwords in The BioManager for Domains chapter.
Chapter 5 The BioManager for Domains NOTE: Chapter 5 is for administrators. Users without administrator rights do not have access to the BioManager for Domains. The BioManager for Domains (henceforth referred to as the BioManager) is used for administrating biometric user accounts (see Biometric and Non-Biometric Users later in this chapter). This chapter addresses the process of enrolling a user into the fingerprint database system and registering a user’s fingerprint data.
Introduction to the BioManager for Domains Using the Biomanager Administrators can: • Choose which domain and user account to administrate • Add and delete users • Register fingerprints • Turn password users into biometric users • Decide whether a biometric user is allowed to use a password as backup • Change properties for users • Set the security level for the system Biometric and Non-Biometric Users There are two types of user.
Accessing the BioManager Click Start > Programs > Precise Biometrics > BioManager for Domains. The BioManager screen appears. Changing Domain When the BioManager is started, the domain of the local computer is selected. Change to another domain by clicking User > Select Domain. The Select Domain screen appears. Select the domain you wish to administer and click OK.
About Primary Logon Fingers The primary logon finger is the finger normally used to log on. The system assumes that the selected primary logon finger is placed on the fingerprint reader when a user logs into or unlocks a workstation. The fingerprint on the sensor is then compared to the primary logon fingerprint template in the database. The user can choose to verify another registered finger when logging on. The primary logon finger is chosen during enrolment, in the Fingerprint registration wizard.
Auto-generated Passwords You can specify whether or not users should be allowed to choose to use passwords. 1. Click Start > Programs > Precise Biometrics > BioManager for Domains. The BioManager screen appears. 2. Click Policies > Account. The Account Policy screen appears. If Allow users to use auto-generated passwords is checked (default) users will have the possibility to choose whether or not they want to have a random auto-generated password.
About the Security Level The security level is an important part of the identification system. A higher security level reduces the risk of an unauthorised person logging into an account. An administrator can set the security level for biometric users. The security level is set globally; i.e. the set security level affects all biometric users in the domain. The False Acceptance Rate, FAR, is a parameter used to indicate the probability that an unauthorised user is given access to an account.
Setting the Security Level The security level is accessed from the BioManager. 1. Click Start > Programs > Precise Biometrics > BioManager for Domains. The BioManager screen appears. 2. Click Policies > Account. The Account Policy screen appears. Set the security level and click OK. Security level 4 is recommended for most purposes. Passwords and Security Level If an administrator allows users to log on with a password, a high security level loses part of its function.
Fingerprint Registration In order for a user to use a fingerprint to log on, the fingerprint must be read and stored in a database – i.e. it has to be registered. The fingerprint data will be stored on a hard drive. Only an administrator can register fingerprints using the BioManager. To enrol a user, whose username is not on the username list, see Beginning Fingerprint Registration of a New User in this chapter.
2. Click User > New User. The User information screen appears. 3. Type the user’s name in the Username field. 4. Type the user’s complete name in the Full Name field. 5. Type the user description in the Description field. 6. Click Next. See Continue Fingerprint Registration in this chapter for information on how to continue.
Beginning Fingerprint Registration of an Existing User If a user has an account registered, his or her username is listed in the BioManager. An administrator can register, or re-register, the fingerprints of both password users and current biometric users. 1. Log on as administrator. 2. Click Start > Programs > Precise Biometrics > BioManager. The BioManager screen appears. 3. Double-click on a username. You can also click on a username and then click User > Properties. The User information screen appears.
Continue Fingerprint Registration When you click Next in the User information screen, the Reading fingerprints dialog appears: 1. Select the finger to register by clicking in one of the checkboxes. Let the user follow the instructions on the screen. Make sure the selected finger is placed on the fingerprint reader sensor. NOTE: Instruct the user to place the middle of the finger pad on the sensor, to ensure an image rich in fingerprint information. 2.
3. Click Next when as many fingers as desired have been registered. The Logon information screen appears. 4. Select the primary logon finger. The primary logon finger is the finger that usually will be used to log on or unlock a workstation. 5. If desired, select the Possibility to log on using password checkbox. This enables the user to log on using either a password or a fingerprint. Type the password in the Password field. Confirm the chosen password in the Confirm field.
NOTE: If a current password user is enrolled, the current password will no longer be valid. A new password must be typed, in order for the user to log on with a password as a backup. 7. Click Next. The saving screen appears. 8. Click Finish. Until you click Finish you can go back as far as the User information screen using the Back button. No changes will be saved until you click Finish. The information is encrypted and saved on the hard drive.
Checking and Changing a User’s Properties An administrator can check and change the set properties for an enrolled user: • Full name • Description • Register fingerprints • Primary logon finger • Possibility to log on using a password 1. Log on as administrator. 2. Click Start > Programs > Precise Biometrics > BioManager for Domains. The BioManager screen appears. 3. Double-click on a username. You can also click on a username and then click User > Properties. The User information screen appears. 4.
Deleting a User When a user is removed from the username list, he or she cannot log into the associated account anymore. 1. Click Start > Programs > Precise Biometrics > BioManager for Domains. The BioManager screen appears. 2. Click on the username that you want to delete from the list. 3. Click User > Delete. 4. Click OK to delete the user. 5. Click OK to confirm operation. The user is now deleted and can no longer log into the system.
Chapter 6 Logging on When you have registered your fingerprints, you can log into the system using the fingerprint reader. Fingerprint logon is a very secure and simple way to log on. If you want detailed information on how to place a finger on the fingerprint reader, please see Placing Your Finger Correctly on the Fingerprint Reader in the Using the Fingerprint Reader chapter.
Logging on with a Fingerprint NOTE: You can only log into a domain account using the fingerprint reader once you have enrolled your fingerprints on the domain server. You can only log on with a fingerprint that has been enrolled and stored on the hard disk or on a smart card. To log on from the Begin Logon screen: 1. Place your primary logon finger on the fingerprint reader sensor. The Verify Fingerprint screen appears. 2. Keep your finger placed on the sensor as long as the yellow light is flashing.
1. Click Cancel on the Verify Fingerprint screen. The Fingerprint Logon Information screen will appear. 2. Type your username in the Username field. 3. Select your domain from the Domain pull-down list. 4. Click Verify. The Verify Fingerprint screen appears. 5. Place your primary logon finger on the sensor. The yellow light starts flashing. NOTE: To use another finger on the sensor, select that finger on the Verify Fingerprint screen – assuming that the fingerprint is previously registered. 6.
Logging on with a Password NOTE: You can only log on using a password if you entered a password when you enrolled and registered your fingerprints. See the chapter Personal Enrolment for details. Once your fingerprints have been registered, any previous password vill no longer be valid. To begin logon from the Begin Logon screen: 1. Press Ctrl + Alt + Delete. The Logon Information screen appears. 2. Type your username in the Username field. 3. Type your password in the Password field. 4.
Chapter 7 Locking and Unlocking When you leave your workstation temporarily, it is recommended that you lock it to prevent others from using it and accessing your files. The screen saver function can be used to automatically lock the computer. See your Windows documentation for more information about screen savers.
Locking a Workstation To lock the workstation you are working on: 1. Press Ctrl + Alt + Delete. The Windows Security screen appears. 2. Click Lock Workstation. The system locks the workstation. You are the only one who can unlock your workstation. An administrator can log you off.
Unlocking a Workstation Unlocking with a Fingerprint To unlock a workstation from the Workstation Locked screen: 1. Place your primary logon finger on the fingerprint reader sensor. The Verify Fingerprint screen appears. Your primary logon finger will be selected. 2. Keep your finger placed on the sensor as long as the yellow light is flashing. The system verifies your fingerprint and displays the Windows desktop.
Unlocking with a Password NOTE: You can only unlock a workstation using a password if you entered a password when you enrolled and registered your fingerprints. See the chapter Personal Enrolment for details. To unlock a workstation from the Workstation Locked screen: 1. Press Ctrl + Alt + Delete. The Unlock Workstation screen appears. 2. Type your password in the Password field. Click OK and your Windows desktop will be displayed. If the unlocking fails, please check the spelling of the password.
Chapter 8 Troubleshooting This chapter includes the following information: • Fingerprint troubleshooting • Password troubleshooting Fingerprint Troubleshooting If the fingerprint verification fails, the red light on the fingerprint reader is turned on. • Lift your finger and put it back on the sensor. Try to slightly adjust the positioning of your finger. • Make sure you placed the right finger on the sensor, i.e. the finger marked with a dot on the Verify Fingerprint screen.
Password Troubleshooting NOTE: You can only log on using a password if you entered a password when you enrolled and registered your fingerprints. See the chapter Personal Enrolment for details. Once your fingerprints have been registered, any previous password will no longer be valid. 1. Make sure the username, domain and password are valid. 2. Make sure the spelling is correct and that Caps Lock is not active. Windows is case sensitive. If you are still unable to log on, please contact an administrator.
Chapter 9 Uninstalling Only users with administrator rights can uninstall the Precise Biometrics software. The consequences of uninstalling are: 1. No user accounts will be affected in any way. 2. Users without a backup password will have to get a password to access their user account. The password used before biometric conversion is no longer valid. 3. Backup passwords registered in the BioManager can be used as standard Windows passwords. 4.
Uninstalling the Precise 100 Logon 2.1 Software on Windows 2000 1. Click Start > Settings > Control Panel. The Control Panel screen appears. 2. Double-click Add/Remove Programs. The Add/Remove Programs screen appears. 3. Click Precise 100 Logon. 4. Click Remove. 5. Confirm by clicking Yes. 6. Click Yes to restart the computer. The Precise 100 Logon 2.1 software is uninstalled. Uninstalling the Precise 100 Parallel Drivers 1. Double-click uninstall.exe. This program can be found in the directory ..
Glossary Biometric A biometric is a measurable, unique, physical characteristic. For example, the patterns on your retinas and your fingerprints are biometrics. Biometric/Non-Biometric User There are two types of user. A biometric user is a user who has been enrolled into the system and who can log on using fingerprints. A non-biometric user is a user who has not been enrolled into the system and can not use fingerprint logon.
Fingerprint Reader The fingerprint reader is used to read a finger placed on the sensor. The sensor measures the capacitance of the finger pad, which reveals the pattern of the fingerprint. Thus, a paper copy with a picture of a fingerprint can not grant access to the system. Guiding bumps Diode Sensor The fingerprint reader is used both to enrol a fingerprint to store it in a database, and to verify a fingerprint during logon.
The fingerprints also include so-called minutiae points. Minutiae points are the points, where a ridge begins, ends or splits. Precise Biometrics’ system identifies a person by looking at loops, arches, whirls and minutiae points, and by measuring global features such as line thickness and curve. These features make every fingerprint unique. Plug-n-Play Plug and Play is a technology that supports automatic configuration of PC hardware and external devices.
Sensor The sensor is the black window on the fingerprint reader. The sensor is used to read your fingerprint. Do not “roll” your finger pad when you log on or register a fingerprint. Just press it flat to the sensor. Template See Fingerprint Template Verification When you register a fingerprint, log on or unlock a system, your fingerprint is verified. During verification, the finger on the sensor is compared to a template of a registered fingerprint from the fingerprint database.