
Installation Instructions
Shower Pans
Installation Instructions
Gelcoat & Solid Surface Bathware
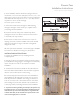
a drop cloth or card board on the oor of the shower pan
to protect the gelcoat surface.
Remember to install wood reinforcements to the framing
for grab bars and seat, should these bolt on accessories
be installed. A procedure for installing a fold up seat to a
ceramic tile wall is described.
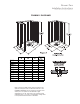
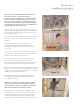
INSTALLATION INSTRUCTIONS FOR SHOWER
SEATS WITH SWING DOWN LEGS
(This style seat has four (4) adjustable height legs)
These primary instructions are for installing the seat
onto a CERAMIC TILED WALL. The tiles wall must be
properly constructed so as to be rigid. In addition, it is
MANDATORY that wood reinforcements be installed to
the framing studs behind the wall board and tile to provide
a solid mounting surface when fastening the seat to the
wall.
Your seat with swing down legs is fully assembled. Remove
it from the box and proceed as follows:
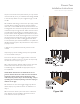
1. Choose the height of the seat you want. Barrier Free
style showers will typically have fold up seat installed at 17”
to 19” height.
2. After selecting the height you desire, adjust each of the
four legs to that height while maintaining the seat in a level
position. Lock each of the lock nuts.
3. Place the seat against the wall of the shower where you
want the seat to be located. Seat may be centered on the
wall for a Barrier Free installation.
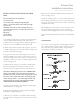
4. With the seat placed against the mounting wall, position
the two hinges to the wall. Using a pencil, mark the three
holes (3) holes in the ange onto the wall for each hinge.
Remove seat from wall.
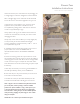
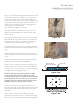
Note: When installing the seat onto a Ceramic Tiled wall, prior
to drilling the three (3) mounting holes for each ange that
you previously marked, use a center punch and lightly chip a
small hole in the center of each of the three hole locations.
(For drilling holes through tile, you require a 1/4” Carbide
tipped drill bit). Only drill through the tile and base materials.
DO NOT DRILL THROUGH THE BACKING.
5. Using a power drill with a 1/4” diameter Carbide bit, drill
through the wall tile the three (3) mounting holes for each
ange.
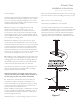
6. Apply silicone caulking around and inside each drilled
hole before installing the seat.
7. Place the seat against the mounting wall with each hinge
aligned to the mounting holes. Utilizing the six (6) #10 x 2”
Stainless Steel screws, place a Phillips screw driver into your
power drill and securely tighten each of the six (6) screws.
THIS COMPLETES THE INSTALLATION OF THE SEAT