
Installation Instructions

Shower Pans
Installation Instructions
Gelcoat & Solid Surface Bathware
into the adhesive.
Attach the pan to the studs by installing the screws through
the holes drilled into the ange. Snug the screws up tight
but not to the point of ange breakage. The screws must
be tight so they will not interfere when the wall board and
nshed walls materials are installed.
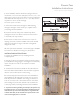
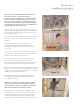
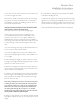
18. Before moving on to installing the shower wall
enclosure, level the pan as shown in Figure 15. The
shower pan has minimal slope to the drain, and must
be very level to drain properly. Use a long level along all
nished edges. If there is an out of level condition, remove
screws and adjust the shower pan. When satised with the
t, re-install the mounting screws.
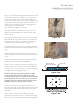
19. Before the adhesive cures, conrm the oor slope
to the drain has been maintained. To do this, remove the
cardboard protection from the oor and use a 2 foot level
at various points around the drain to the adjacent wall to
check for draft. Make sure there is a downward slope to
the drain in all directions around the drain. Visually inspect
the oor to be sure there are no humps or dips that could
cause improper drainage. See Figure 16A and 16B
20. Install the rubber caulking gasket around the drain pipe.
Trim the length of the pipe if necessary. Apply soap to the
caulking gasket to lubricate it. Place the caulking gasket on
the drain pipe and press it down into the drain assembly
until it seats. Snap the strainer plate onto the drain.
Pour water across the oor to conrm good draft to the
drain so the water drains completely with no puddling.
Make certain the drain does not leak.
Note: The manufacturer and supplier of this product is not
responsible for leaking drain conditions. Proper installation of
the drain tting and pipe is the installers responsibillity.
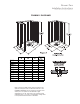
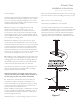
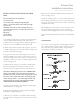
21. Since there is minimal oor slope to the drain it is
critical factory slope to the drain is maintained so the
shower drains well. To accomplish this, temporary bracing
must be put in place to assure the oor remains in the
proper position as the adhesives cures.
Before installing the bracing, place a padded piece of wood
on the top center of the threshold and directly on top of
the drain. Pad the wood with soft cloth or cardboard to
prevent damage to the nish.
Install temporary 2 x 4 stud bracing so they sit on top of
these wood pieces. Attach these studs to the room framing
above the shower, or pad to the ceiling as shown. See Figure
17
After 72 hours, remove the bracing.
The shower pan installation is now complete.
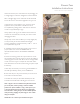
The water resistant wall enclosure is provided by others.
The installer must develop a plan to ensure the chosen wall
materails work with the berglass shower pan. The seam
between the shower pan and the nished wall materials
should be caulked when installation is complete. Before
beginning construction of the shower wall enclosure, place
9
21.
Since there is minimal floor slope to the drain it is critical
factory slope to the drain is maintained so the shower
drains well. To accomplish this, temporary bracing must be
put in place to assure the floor remains in the proper position
as the adhesives cures.
20.
Install the rubber caulking gasket around the drain pipe.
Trim the length of the pipe if necessary. Apply soap to the
caulking gasket to lubricate it. Place the caulking gasket on
the drain pipe and press it down into the drain assembly until
it seats. Snap the strainer plate onto the drain.
Before installing the bracing, place a padded piece of wood
on the top center of the threshold and directly on top of the
drain. Pad the wood with soft cloth or cardboard to prevent
damage to the finish.
The water resistant wall enclosure is provided by others. The installer must develop a plan to ensure the
chosen wall materails work with the fiberglass shower pan. The seam between the shower pan and the
finished wall materials should be caulked when installation is complete. Before beginning construction of
the shower wall enclosure, place a drop cloth or card board on the floor of the shower pan to protect the
gelcoat surface.
Install temporary 2 x 4 stud bracing so they sit on top of
these wood pieces. Attach these studs to the room framing
above the shower, or pad to the ceiling as shown.
(See Figure 17).
Pour water across the floor to confirm good draft to the
drain so the water drains completely with no puddling.
Make certain the drain does not leak.
Note: The manufacturer and supplier of this product is not
responsible for leaking drain conditions. Proper installation
of the drain fitting and pipe is the installers responsibillity.
After 72 hours, remove the bracing.
The shower pan installation is now complete.
Remember to install wood reinforcements to the framing for grab bars and seat, should these bolt on
accessories be installed. A procedure for installing a fold up seat to a ceramic tile wall is described on
Page 10.
Figure 17