
Installation Instructions

Shower Pans
Installation Instructions
Gelcoat & Solid Surface Bathware
Using a 1/2” notched trowel, apply adhesive evenly over the
pan contact area. Bring the adhesive up to the threshold
pencil mark and also make sure the adhesive will be in
contact with the back side of the pan. The long edge of the
trowel may be needed to get the adhesive to the far back
of the contact area where the pan is resting against the
framing studs in a vertical position.
(Pan not shown in Figures 13 A and B).
After the adhesive is troweled over the sub oor, use a
spatula to wipe the adhesive over the entire area where
the pan will sit.
The exception will be the drain box area. This area will be
lled with thin-set non shrink mortar. Do not ll this area
above the oor line and do not spill any of this thin-set
material onto the contact adhesive. See Figure 13B
Non shrink thin-set mortar can be purchased at the local
hardware store. Please follow the mixing directions on the
bag.
In this step, apply the adhesive to the at oor area and
ll the boxed area around the drain pipe with the Thin-Set
mortar.
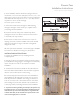
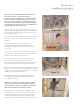
17. After the adhesive and thin-set materials are in place,
rotate the pan back into place for installation.
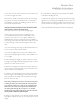
(Hint) In order to reach the pan without stepping on the
adhesive, place a short piece of wood over the drain area.
Use this to step on to remove the 2 x 4 that is holding the
pan against the back framing. See Figure 14
NOTE: The working life of the ooring adhesive is roughly
one hour. (Refer to the label on the adhesive for actual
working time). After step 16 is complete, the entire installation
process though step 21 must continue. If for any reason the
installation cannot be completed within the working time of
the adhesive, after step 16, jump ahead to step 21.
Rotate the pan back to the horizontal position. As you
lower the pan to the sub oor, align the drain pipe with the
drain tting, and with the pencil mark at the front of the
threshold.
When the pan is seated into the adhesive, place the
cardboard on the shower oor for protection. Thoroughly
walk around in the shower. This will assist in seating the pan
17.
After the adhesive and thin-set materials are in place, rotate
the pan back into place for installation.
(Hint) In order to reach the pan without stepping on the adhesive,
place a short piece of wood over the drain area. Use this to step
on to remove the 2 x 4 that is holding the pan against the back
framing. (See Figure 14).
18.
19.
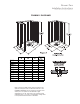
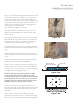
Before moving on to installing the shower wall
enclosure, level the pan as shown in Figure 15. The
shower pan has minimal slope to the drain, and must be
very level to drain properly. Use a long level along all
finished edges. If there is an out of level condition, remove
screws and adjust the shower pan. When satisfied with the fit,
re-install the mounting screws.
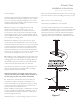
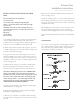
Before the adhesive cures, confirm the floor slope to the
drain has been maintained. To do this, remove the cardboard
protection from the floor and use a 2 foot level at various points
around the drain to the adjacent wall to check for draft. Make
sure there is a downward slope to the drain in all directions
around the drain. Visually inspect the floor to be sure there are
no humps or dips that could cause improper drainage.
See Figure 16A and 16B.
Rotate the pan back to the horizontal position. As you lower the
pan to the sub floor, align the drain pipe with the drain fitting,
and with the pencil mark at the front of the threshold.
NOTE: The working life of the flooring adhesive is roughly
one hour. (Refer to the label on the adhesive for actual
working time). After step 16 is complete, the entire
installation process though step 21 must continue. If for
any reason the installation cannot be completed within the
working time of the adhesive, after step 16, jump ahead to
step 21.
When the pan is seated into the adhesive, place the cardboard
on the shower floor for protection. Thoroughly walk around in
the shower. This will assist in seating the pan into the adhesive.
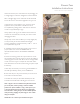
Attach the pan to the studs by installing the screws through
the holes drilled into the flange. Snug the screws up tight but
not to the point of flange breakage. The screws must be tight
so they will not interfere when the wall board and finshed
walls materials are installed.
Figure 14
Figure 15
8
Figure 16B
Figure 16A
2 Ft. Level
Floor Level To
Drain - No Humps
Wood