
Installation Instructions

Shower Pans
Installation Instructions
Gelcoat & Solid Surface Bathware
INSTALLATION INSTRUCTIONS FOR GRAB
BARS
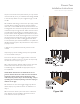
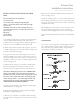
Recommended tools for installation:
1/4” Power Drill
1/8” drill bit when drilling through berglass
(Use a 1/4” Carbide drill bit when drilling through
ceramic tile)
#2 Phillips Screw Driver and/or Phillips drill insert
1/2” Open end wrench or a small Crescent wrench
Tape measure
Pencil/pen
Center Punch
Silicone Caulk
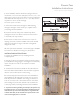
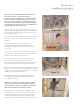
1. As indicated earlier in this manual, wood reinforcements
must be solidly installed behind the tile wall surface to
provide a secure mounting surface to attach the grab bars.
Grab bars must be installed at these locations only.
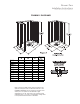
2. Select the particular size and style of grab bar you want
to install. Certain grab bars have snap in place ange covers,
and others have exposed anges.
3. For grab bars with snap in place ange covers, use the
handle of a Phillips screw driver to tap back the covers on
the bottom edge of the covers. It will be convenient in the
installation process if the covers are tapped together in the
center of the grab bar.
4. Determine the position you want the to install the bar.
Place the bar against the wall. Using a pencil, mark the
location of each mounting hole at both ends of the bar.
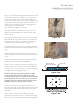
Note: When installing the grab bars onto a CERAMIC TILED
WALL, prior to drilling the mounting holes for each ange
previously marked, use a center punch and lightly chip a small
hole in the center of each hole location. (for drilling through
ceramic tile, you require a 1/4” carbide tipped drill bit. Only
drill through the tile and base materials. DO NOT DRILL
THROUGH THE WOOD REINFORCEMENTS
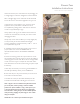
5. Using a power drill with a 1/4” diameter carbide tipped
drill bit, drill, each mounting hole.
6. Apply silicone caulking around and inside each drilled
hole before installing the grab bar.
7. Take two (2) of the #10 x 2” Stainless Steel screws. By
hand, start one mounting screw in each end of the bar into
the wall.
8. Use a power drill with a Phillips drill bit to fully install
these mounting screws.
9. Take the remaining #10 x 2” screws and place them into
the remaining open holes. Use care to snug up the screws,
but to not over-torque that the screws strip out the factory
installed backer board.
10. If installing a bar with snap-on covers, move the covers
into place at each ange. Twist the covers clockwise or
counter clockwise to tighten the covers onto the anges.
THIS COMPLETES THE INSTALLATION OF THE GRAB
BAR
CURTAIN ROD
The curtain rods are shipped at standard length. Measure
your opening width for proper length. Measure and mark
the curtain rod, using a skill saw with a cutting blade for
metal product, cut at the marked area.
12
Revised: 4-27-12