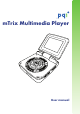
mTrix Multimedia Player User manual
PREFACE Congratulations on purchasing the PQI mTrix Multimedia Player. This user manual provides detailed instructions to set up and operate this device. Please refer to this manual to learn more about how to use the mTrix. Copyright information Information in this document has been carefully checked for accuracy; however, it is subject to change without notice. This document contains proprietary information protected by copyright. All rights are reserved.
TABLE OF CONTENTS INTRODUCING THE MTRIX Features ........................................................................................ 1 Package contents ....................................................................... 2 Product components ....................................................... 2 Front view ................................................................... 3 Left view ..................................................................... 5 Back view ...............................
Viewing file information ............................................... 19 Deleting audio files ......................................................... 19 Adjusting audio settings ............................................... 20 Mode ........................................................................... 20 Time ............................................................................ 20 Equalizer .................................................................... 21 Sound effect ..............
INTRODUCING THE MTRIX Thank you for buying the PQI mTrix Multimedia Player. The mTrix brings the powerful advantages and benefits of viewing and editing multimedia in various formats directly to your palm. The mTrix is portable, with a clamshell design that fits into your pocket allowing you to take your media wherever you go. It plays MP3 audio files or ASF video files and also displays your favorite pictures on the 2-inch TFT LCD screen.
Package contents Make sure that your package contains the following items. If any of the items is missing or damaged, contact customer service or your nearest vendor. PQI mTrix Multimedia Player Power adapter Earphones USB cable Battery pack Pouch Software CD containing USB driver, mTrixConverter for converting file formats, user manual Quick start guide Product components This section provides details about the mTrix Multimedia Player’s hardware components.
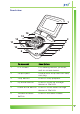
Front view 1 14 13 12 11 10 9 8 7 6 4 5 3 2 Component Description 1. LCD screen For viewing movies, pictures, and on-screen menus. 2. Strap eyelet Attach neck strap here for easy carrying. 3. Stop button Press to stop playback. 4. Up arrow button Press to scroll up through menus or file lists. 5. Down arrow button Press to scroll down through menus or file lists. 6. Volume increase button Press to increase volume.
4 Component Description 7. Volume decrease button Press to decrease volume. 8. Power indicator LED Indicates that the mTrix is powered on. Green: Power on Red: Charging Orange: Power on and charging 9. USB port Connects to a PC through a USB cable (provided). 10. Play/Pause button Press to play or pause a movie, music, or image. 11. ESC button Press to exit from a menu, mode, or playback. 12. 5-way button Use the arrow keys and OK button to navigate through menu items and files.
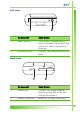
Left view 1 2 Component Description 1. Reset button Use a sharp, pointed object such as a paper-clip to reset the mTrix if it fails to respond or locks up. 2. Earphones jack Connect the supplied earphones here. Back view 1 2 Component Description 1. Power jack Connect the power adapter here to power the mTrix and charge the battery. 2. Memory card slot Insert an SD/MMC card here.
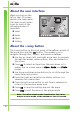
About the user interface When you turn on the mTrix, the LCD screen displays the main menu: The main screen shows icons for each of the following modes of operation: Video Audio Photo Setting About the 5-way button The 5-way button on the front panel of the mTrix consists of the arrow keys and the OK button.
GETTING STARTED Refer to this section to learn how to set up the mTrix, insert the battery and memory card, charge the battery, connect the power adapter, and connect to the PC. Inserting the memory card The mTrix is equipped with a memory card slot that can hold an SD or an MMC card. This enables you to transfer media files to the mTrix Multimedia Player and increases its storage space. Follow these steps while inserting the memory card: 1. Pull back the memory card cover to reveal the memory card slot.
Inserting the battery The mTrix has been provided with one rechargeable Li-ion batteries. Follow these steps to insert the battery: 1. Remove the battery cover on the back of the mTrix by pressing the notch in (A) and lifting the cover up (B). 2. Insert the battery into the battery compartment, ensuring that the metal contacts on the battery and the slot are aligned with each other. 3. Replace the battery cover by snapping it into place.
Using the power adapter The PQI mTrix can be powered using the AC to DC power adapter provided in your package. Connect the power connector to the power connector at the back of the player and connect the other end of the power adapter into a power outlet. The power indicator LED turns red while charging.
Connecting to a PC You can use the USB cable provided in your package to connect the mTrix to a PC and transfer data to it. When connected, you can copy media files to the player for playing. Connect the smaller end of the USB cable to the USB port on the mTrix. Connect the other end of the cable to a USB port on your PC. When connected, the player shows up as a removable disk in the PC’s file explorer. Copy or move data to it as you would for any other disk or folder.
Connecting earphones To listen to high quality MP3 music or hear the audio while watching a movie, insert earphones into the earphones jack as shown. Attaching the strap To easily carry the mTrix while traveling, use the neck strap. Attach the strap to the player as follows: 1. String the smaller end of the strap through the strap eyelet. 2. Loop the larger end of the strap through the smaller end and pull tight.
Turning on the mTrix Follow these steps to turn the mTrix on or off: 1. Press and hold the power button to turn on the device. The device starts up and displays the main menu. 2. Press and hold the power button again to turn the player off. Resetting the player Normally, you do not need to reset your mTrix. However, should the device fail to turn off or respond when pressing any button, you can perform a hardware reset. Use a small pointed object such as a paper clip to press the reset button at the back.
USING THE MTRIX Now that you have familiarized yourself with the mTrix Multimedia Player and set it up with a battery, memory card, and media files, you are ready to start using the player for playing and viewing media files. This section describes how to take maximum benefit of the player’s features. Note: When a memory card is inserted into the mTrix, the card is given priority over the player’s internal memory. Contents from the memory card are displayed in the player’s Video, Audio, and Photo modes.
4. Control the video playback in the following manner: Press Play/Pause to start playback of the selected file. During playback, press the up or down arrow buttons to skip to the previous or next media file. Press Stop to stop playback or Play/Pause to pause playback. Press OK to show the 00:00:00 video playback menu and select one of the On Repeat following options using Setting Off the arrow buttons: Speed − Select Repeat > On to enable repeat playback of the video files.
Viewing file information Do the following to see complete information regarding video files: 1. From the video menu, press 20:40 57% OK to display the video menu. DEI10.ASF File Info 00 : 01 : 13 2. Using the arrow keys, select Delete 320 240 .0 Repeat the File Info option and press 240 2135000 OK to confirm. Time: Res X: Kbps: Res Y: KHz: DEI10.ASF 18.73 MB Select The screen shows complete information about the video file including resolution, duration, audio codec, sample rate, and so on.
Enabling repeat playback To enable repeat playback of the video file, do the following: 1. From the video menu, press 20:40 57% OK to display the video menu. DEI10.ASF File Info 00 : 01 : 13 2. Using the arrow keys, select Delete 320 240 .0 Repeat On Repeat > On to enable 240 2135000 O f f repeated playback and press DEI10.ASF 18.73 MB OK to confirm. Time: Res X: Kbps: Res Y: KHz: Select Play Menu Note: The repeat playback can also be set during playback. See Watching movies on page 13.
Listening to music To listen to your favorite MP3 music tracks, do the following: 1. Turn on the mTrix Multimedia Player and select the Audio mode using the arrow keys. Press OK to confirm your selection. 2. The screen shows the first 57% 20:41 audio file on the memory 44.1 0.1 kbps khz card. Press the up or down (Elvis Costello).mp3 arrow keys to scroll through the files and select a file for 00:00 playback. You can also set the player to display a list of Stop Play/Pause audio files.
Repeating audio tracks When you are playing audio tracks, you can repeat all audio tracks or just repeat a portion of the track. Repeating partial audio tracks To repeat parts of audio tracks, do the following: 1. From the Audio mode, press 20:43 57% OK to display the audio menu. A - B 44.1 R e p e a0.1 t khz 2. Using the arrow keys, select A- R e pkbps eat F (Elvis i l e I n f o Costello).mp3 B Repeat to set the starting Setting 00:00 point of the section to be repeated. Press OK to confirm.
Viewing file information Do the following to see the complete file information about an audio file: 1. From the Audio mode, press 20:43 57% OK to display the audio menu. A - B 44.1 R e p e a0.1 t kbps khz Repeat 2. Using the arrow keys, select (Elvis F i l e I n f o Costello).mp3 the File Info option and press Setting 0 0:00 OK to confirm. Delete BASS The screen shows complete information about the audio file including title, artist, album, year, duration, and size.
Adjusting audio settings The Audio mode has a number of settings that you can configure to suit your preferences. Refer to the following sections to learn more about these options using the Setting option. Mode You can display a list of all audio files in Audio mode or display a single song being played back. To change the display mode, do the following: 1. From the Audio mode, press 20:44 57% OK to display the audio menu. A - B 44.1 R e p e a0.1 t kbps khz Repeat 2.
Equalizer To specify the equalizer preset mode according to the type of music you are listening to, do the following: 1. From the Audio mode, press 20:45 57% OK to display the audio menu. 44.1 0.1 A-B Repeat kbps khz Repeat 2. Using the arrow keys, select (Elvis F i l e I n f o Costello).mp3 Setting > Equalizer > ROCK to Setting 0 0 : 0 0 Mode choose the Rock preset for NORMAL Delete Time the equalizer. Choose an POP Equalizer option from NORMAL, POP, Sound Effect JAZZ Stop Play/Pause JAZZ, or ROCK.
Viewing photos To view digital images using the mTrix Multimedia Player, do the following: 1. Turn on the mTrix Multimedia Player and select the Photo mode using the arrow keys. Press OK to confirm your selection. 2. The screen shows a list of 20:46 PHOTO images on the memory card. 500M_1.JPG 3. Press Stop to switch between 500M_1.JPG thumbnail and list view for 400M_04.JPG the image files. Alternatively, 400M_06.JPG use the menu to do this as 400M_7.
5. Control the photo viewing in the following manner: Press Play/Pause to view the selected image in full screen mode. Press the up or down arrow buttons to skip to the previous or next image. When viewing images, press Play/Pause button to zoom in and magnify the image. Press Stop to zoom out. Use the arrow buttons to pan across the image while zoomed in. Press the right or left arrow buttons to rotate the image clockwise or counter clockwise by 90 degrees.
Viewing file information Do the following to see the complete file information about an image: 1. From the Photo mode, press 20:47 OK to display the photo menu. 500M_1.JPG 1/7 500M_1.JPG 2633KB 2. Using the arrow keys, select File Info 400M_04.JPG Delete the File Info option and press D i s p l a y M o d e 400M_06.JPG 1978KB OK to confirm. PHOTO Setting Play 300M_7.
Adjusting slide show settings To set up parameters for the slide show, do the following: 1. From the Photo mode, press 20:47 OK to display the photo menu. 500M_1.JPG 1/7 PHOTO File Info 500M_1.JPG Delete 400M_04.JPG 2633KB D i s p l a y M o d e400M_06.JPG Setting Play 2. Using the arrow keys, select 1978KB 300M_7.JPG 617KB Select OK Menu Thumbnail/List Switch 20:48 PHOTO Setting and press OK to Setting confirm. Slide show Random Sequence 3.
Changing display mode To change the display mode from thumbnail to list view, do the following: 1. From the Photo mode, press 20:47 PHOTO OK to display the photo menu. 500M_1.JPG 1/7 500M_1.JPG 2633KB 2. Using the arrow keys, select File Info 400M_04.JPG Delete Display Mode > Thumbnail to D i s p l a y M o d e ail 400M_06.JPG T h u m b n1978KB display thumbnails of the Setting List images and press OK to 300M_7.JPG 617KB confirm. Play Select 3.
Configuring the settings The Setting mode provides several menus that allow you to configure the mTrix Multimedia Player and customize its settings. Turn on the mTrix Multimedia Player and select the Setting mode using the arrow keys. Press OK to confirm your selection. 20:51 SETTING Equalizer Sound Effect System Info Power Use the arrow buttons to scroll Date & Time File Manager through the setting options and System Update Default press OK to select an item.
System information To display hardware information about the mTrix Multimedia Player, do the following: 1. Using the arrow buttons, SETTING 20:47 select System Info and press System Info OK to confirm. NAND The screen shows the free 8.0 MB / 16 MB space and the total disk space SD for the internal memory as 86.710 MB / 122 MB well as the external memory V 0.03 07/11 card. It also displays the curEsc rent firmware version and date. 2. Press ESC to exit from the menu.
Setting the date and time To set the date and time, do the following: 1. Using the arrow buttons, SETTING 20:50 Date & Time select Date & Time and press OK to display the options. Date 2003 05 03 Time 20 50 46 2. Use the left and right arrow buttons to select a field such year, month, hours, or minutes. Use the up and down arrow buttons to change the Select values for the fields.
Selecting a sound effect To adjust the bass, treble, and 3D effect for improving the audio quality, do the following: 1. Using the arrow buttons, 20:45 select Sound Effect and press Sound Effect OK to confirm. BASS (L) (H) 2. The screen shows Bass, TREBLE (L) (H) Treble and 3D effect. Adjust 3D: (L) (H) these parameters as described under Sound effect on page 21. Select Confirm SETTING OK Configuring the power settings To set the power settings in order to conserve power, do the following: 1.
Formatting the memory card To format the memory card in current use, do the following: 1. Using the arrow buttons, SETTING 20:52 select Card Format and press OK to confirm. Equalizer Sound Effect System Info Power 2. Use the left and right arrows Language C aYES rd Format NO to select Yes and press OK to Date & Time File Manager confirm that you want to System Update Default format the memory card. Select OK Enter Notes: When you format a memory card, all data is completely erased.
Setting factory defaults To restore all the device settings to their factory defaults, do the following: 1. Using the arrow buttons, SETTING 20:53 select Default and press OK to confirm. Equalizer Sound Effect System Info Power 2. Use the left and right arrows Language C aYES rd Format NO to select Yes and press OK to Date & Time File Manager confirm that you restore all System Update Default default settings.
APPENDIX Specifications Display 2-inch color LTPS TFT LCD, 320 x 240 resolution Storage Built-in 32MB NAND Flash SD/MMC supported I/O ports Earphone jack DC power jack SD/MMC combination slot USB port compatible with USB 2.0/ 1.1 PC utility mTrix file format converting application USB driver Battery Rechargeable Li-ion battery, 3.7V, 1050mA Playing time Maximum 4 hours for video, 6 hours for audio with LCD off mTrix with adapter: 1.5 hours mTrix with USB cable: 4.
34 Accessories Software CD with USB driver and user manual, quick start guide, AC/DC adapter, USB cable, earphones, pouch, battery pack Dimensions 68.38 x 68.01 x 25.
Troubleshooting Problem Solution 1. My mTrix will not power on Ensure rechargeable batteries are charged. 2. The adapter does not work Ensure that the adapter plug is securely connected to the proper jack on the mTrix. 3. My mTrix cannot see the files copied from a computer You may have transferred a file which the mTrix cannot play (for example a PDF, or DOC file). If a multimedia file cannot be viewed, use the bundled converting application to transfer the file into a compatible type. 4.
Regulatory information Federal Communications Commission (FCC) Statement for users in the United States This equipment complies with the limits for a Class B digital device, pursuant to Part 15 of the FCC Rules. Operation is subject to the following two conditions: (1) This device may not cause harmful interference, and (2) this device must accept any interference received, including interference that may cause undesired operation.
CE Notice for users in the European Union The CE symbol indicates compliance of this equipment to the EMC Directive and the Low Voltage Directive of the European Union. These markings indicate that this system meets the following technical standards: EN 55022 — “Limits and Methods of Measurement of Radio Interference Characteristics of Information Technology Equipment.” EN 55024 — “Information technology equipment Immunity characteristics - Limits and methods of measurement.
Warranty information PQI values your business and always attempts to provide you the very best of service. Note the following information when requesting assistance from the PQI customer service department. Warranty policy PQI warrants that the mTrix Multimedia Player, under normal circumstances of usage, is free from defects in material and workmanship for a one-year period from the date of purchase.
Disclaimer PQI is not liable for damage caused by fire, natural disaster (such as thunder, earthquake, etc.), use by third party, accidents, owner’s intentional misuse, damage caused by neglect of instructions described in this manual, or damage caused by misuse or malfunction through simultaneous use of this product and the connected equipment.
Safety instructions Always follow these basic safety precautions when using the PQI mTrix in order to reduce the risk of fire, electric shock, and injury. Use only the AC power adapter included in your package. Using any other power adapter might damage the mTrix and void your warranty. Do not open or disassemble the mTrix. There are no user-serviceable parts inside. Opening the mTrix will void the product warranty. Keep the mTrix away from direct sunlight or a heat source as this may cause damage.
Contact details Taiwan Headquarters Power Quotient International Co., Ltd. 14F, No. 16, Jian Ba Road Chung Ho City, Taipei, Taiwan Tel: 886 - 2 - 82265288 Fax: 886 - 2 - 82265268 Customer Service: service@pqi.com.tw Technical Support: support@pqi.com.tw Web: http://www.pqi.com.tw USA Branch PQI Corporation 46539 Fremont Blvd., Fremont, CA 94538, U.S.A. Tel: 1-510-651-7281 Web: http://www.pqimemory.com Hong Kong Branch PQI (H.K.) Co., Ltd. Flat F, 4/F, Yeung Yiu Chung (No.