ENG mPack user’s manual TM Portable Multimedia Player
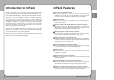
Introduction ENG Thank you for purchasing the mPack portable multimedia player, a state-of -the-art, portable hard disk, multimedia player by Power Quotient International. We hope you enjoy using your new mPack with various multimedia, anytime, anywhere. This manual is designed to help you to use the product safely and correctly. Please read it completely and carefully before using your new mPack player. Thank you.
[Copyrights] ● Power Quotient International has the rights of all patents, trademarks, copyrights and other intellectual property rights relating to this manual. No part of the manual may be copied or reproduced in any form by any means without a prior authorization of PQI. Unauthorized use of all or part of the manual may be subject to corresponding legal actions.
These guidelines are to protect you from potentially deadly electrical shock hazards as well as the equipment from accidental damage. Failure to comply may result in serious injury or death. ENG ❖ When a foreign object or liquid gets inside of the product, turn off the power immediately and disconnect the AC adaptor from the outlet to avoid fire or electric shock. DANGER! ❖ Keep the product and the AC adaptor out of the reach of children.
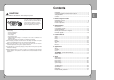
Contents If not handled as directed below, minor damage may result: Introduction ...................................................................................................1 Copyrights/Certification/Trademarks/Exemptions .......................................2 Safety Guidelines ........................................................................................3 Contents .......................................................................................................7 ENG CAUTION! 1.
mPack is the portable hard disk multimedia player developed by Power Quotient International (PQI). It's state-of-the-art features distinguishes it from other portable multimedia players, resulting in increasing worldwide demands. Because of its USB 2.0 compatibility, the mPack is capable of transferring data at high speeds to and from your computer as well as reading and transferring data to and from any inserted memory card (some cards require an adaptor).
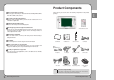
Product Components You can play a wide variety of video/audio formats including MPEG, WMV, ASF, MP3, WMA, OGG, and AC3. Please ensure you receive all of the following components in the product package: ENG Plays a wide variety of formats TV & Camcorder Recording/Saving Using the video recording feature, you can save the contents from a TV or camcorder as digital data. FM Radio Reception/Recording Listen to and record your favorite FM programs.
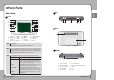
mPack Parts Top ENG Main Body Front (9) (3) (10) (5) (6) (8) (1) (7) (2) (11) (5) (1) (2) (3) (4) (6) (4) (15) (12) Rear (13) (16) (14) (7) (9) (2) ▼ Button (6) + Button (10) (H) Button (14) CHARGE LED - Button (11) RUN LED (15) IrDA Port (12) Power Button (16) MIC.In (3) ◀ Button (7) (4) ▶ Button (8) ■Button (13) Record/Copy Button NOTE Power on/off To turn the product on/off, press the power button once.
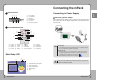
Connecting the mPack Remote Control (2) Connecting to Power Supply (1) Increase Button (3) (2) 3D Sound Button (3) Next Button (4) Decrease Button (5) Prev. Button (4) (5) ENG (1) (6) Start/Pause/Stop Button (6) Connecting the AC adaptor After connecting the AC adaptor to the DC IN 5V port on the product, plug it into a power outlet. The AC adaptor specifications for this product are 100250V, 50-60Hz.
Connecting the earphone with remote control The wired remote is used for audio control when wearing the ear buds. Complete the following steps to use the wired remote: Connect the wired remote control to the A/V OUT ( of the mPack. ) port on the top Connect the earphone to the port on the wired remote control.
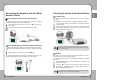
ENG Inserting a CompactFlash (CF) Card The mPack is built to accept CF cards directly (and other flash media cards through the optional 4-in-1 adaptor) without the need for a computer. To read data from a CF card, complete the following step: Insert the CF card into the card slot with the front, colored label facing toward the back of the mPack. To use the 4-in-1 adaptor, follow the steps included in its packaging.
Connecting the mPack to a PC By connecting the mPack to a PC with the USB cable included in the package, you can directly transfer data between the two. NOTE ENG Open "My Computer". You will see a new hard drive available, named "mPack". Drag and drop data to and from the mPack and the PC. • Even when the power is on, you still can connect the product to a PC for its use. • After connecting the product to a PC with its power off, it powers on automatically.
Disconnect the product from a PC safely after uploading/downloading is complete. CAUTION After selecting the large storage USB device in the Stop Hardware window, click the OK button. ENG Disconnecting the mPack from PC A message will appear above the System Tray that it is now safe to remove the mass storage device. Only after this message has appeared is it safe to remove the USB cable.
Software Installation The installer proceeds with installation automatically. ENG PC Program Installation The IPV PC program should be installed to use media files, downloads and address book. Insert the installation CD. The setup.exe file runs automatically and the PQI mPack program installation window appears on the screen. When the program installation is complete, click the Finish button. In the program installation window, click the Next button.
When installation is complete, click the Finish button. ENG Device Driver Installation In Windows 98 system, a device driver must be installed separately. NOTE In windows 2000 or XP systems, separate device driver installation is not needed because the required device driver is automatically detected and installed by the systems. After inserting the installation CD, run the setup.exe file in the "driver\win98" folder, and the installation wizard starts on the screen.
The PQI mPack PC program was created to help the user download and manage data on the mPack hard drive. NOTE To run the mPack PC program, the mPack must be connected to the PC. PQI recommends using the AC adaptor when connecting the mPack to your PC. To begin using the mPack PC Program, complete the following step: Click Start Program PQI mPack_PC. The PQI mPack PC Program window appears on the screen.
Click Edit in the top menu and choose Rename Playlist in the sub menu. NOTE Includes all the audio files included in sub folders. It may take a while to process it when there are a lot of files. Please be patient ENG Renaming a Playlist Add Media to Library Enter a new playlist name in the name field and click OK. To register a media file into the DB, select File in the top menu and choose Add media to Library in its sub menu. Select a file to register from the file selection window and click OK.
To save the changes, click OK. Click the Reload button to initialize the information. Delete Data ENG When the Edit Information window appears, make the desired changes. To apply the changes to all audio files within the same category in the DB, check the Apply to All check box. To Delete an audio file, complete the following steps: Select the audio file you wish to delete from the DB. Select the Delete button. A confirmation dialog screen will appear.
The mPack is contains a complete address book for easy access and transportation of all your contact information. Select Add address entry from the pop-up menu. The Modify Address Data window will appear. ENG Address Book Management Module Managing Contacts Modify the address information. Add a New Contact To add a contact: Click OK. Select the Address Book tab from the mPack PC Program window. Right-click on an existing group. Select Add address entry from the pop-up menu.
Create a New Group To create a new address group: Delete Group To delete a group: Select the Address Book tab from the mPack PC Program window. Select the Address Book tab from the mPack PC Program window. Right-click on the group you want to delete. Right-click on an existing group. Select Delete address group from the pop-up menu. A confirmation dialog window will appear. Select Create address group from the pop-up menu. The New Group Name window will appear.
Firmware Upgrade CAUTION Please make sure the AC adaptor is connected before upgrading. Interrupting power to the mPack while a firmware upgrade is in progress can cause serious damage to the product. NOTE To install firmware, the mPack must be connected to a PC via a USB port. For more information, refer to the "Connecting the Product" section 20p.).
Audio PlayList ENG The mPack can play audio files recorded in the following formats: MP3, WMA, AC3, AAC, WAV, and OGG. To play audio files, complete the following steps: Select PlayList in the Audio menu to create/manage a playlist or to play audio files in a playlist. Press the (M) button to bring up a pop-up menu in the list of playlists as shown in the following picture: Select Player from the Main window. Press the ▶ button. Select Audio from the Player menu. Press the ▶ button.
NOTE Macro Function When either Delete, Move Upward or Move Downward has been executed, the most recently executed function is set as the macro function. If a function has been cancelled while it was being executed, it is not set as the macro function. A function set as the macro function is initiated not through a pop-up menu but by pressing the ▶||| button. Once a function is set to the macro function, it remains so until the playlist is exited.
Audio DB When the "No List Available" message is displayed, the audio DB has not been created. The audio DB can be created either by creating a playlist within mPack or by configuring it with the program installed on your PC via USB cable. Audio Player ENG NOTE The mPack comes equipped with a built in, proprietary Audio Player. Audio files are played with Audio Player as shown in the following picture. Genre/Artist/Artist&Album/Album The mPack allows you to organize and play auto files by category.
Function Press the (M) button to open a pop-up menu in the Audio Player screen as shown in the following picture. Description Rewind/ Fast Forward To rewind or fast forward while playing audio, press the ◀/▶ button as desired. (Holding the button pressed accelerates rewinding/fast forwarding.) You can set the skip interval using the F/F Step value at the Audio Setup menu.
Video To play video, select Player in the main window. Video File List ENG The mPack can play video files recorded in the following formats: MPEG1/2/4, XviD, WMV, and ASF ( up to 720 x 576, 30fps). To play video files, complete the following steps: The video file list only shows the folders and video files within the "Video" folder on your hard drive. To play a video file located in another folder, use the browser to play it.
Video Player A video file is played with Video Player. The following picture shows Video Player playing a video file. Function ENG Video Player functions are shown below: Description Rewind/ Fast Forward To rewind or fast forward while playing video, press the ◀/▶ button. You can set the skip interval using the F/F step value in the video setup menu. Press and hold it down to display a slide bar and use the ◀/▶ button for navigation. Pause To pause video playing, press the ▶||| button.
Photo The mPack is a walking photo gallery, allowing you to share your digital pictures on the 3.5" TFT LCD screen or directly to your TV without the need of a computer. To view your digital photos, complete the following steps: ENG While playing video, press the (M) button to open a pop-up menu as shown in the following picture: Select Player from the Main Window.
The mPack is able to show digital photos in either Photo Preview (thumbnail) or list mode. Both of these modes require that the photo files, folders and albums be saved in the "Photo" folder on the mPack. Otherwise, the browser function must be used to view a photo or an album file saved elsewhere on the mPack. The following pictures show Photo Preview and the list of photo files with the pop-up menu opened. Press the (M) button to open the pop-up menu.
The button operations for Photo Viewer are provided below: You can view a photo file with Photo Viewer. Press the (M) button in Photo Viewer to open the pop-up menu as shown in the following picture. Joy Stick Button The pop-up menu functions for Photo Viewer are provided below: Function Info Press the (M) button in Photo Viewer and choose Info at the pop-up menu. Choose Exif to display the photo resolution author, file type and date & time information.
Album Editor Using Album Editor, you can create an album with your favorite photos and manage the photos by album. To use Album Editor, select an album file and press the (M) button. Then, choose Album-New or Album-Edit at the pop-up menu. Alternatively, select an album file and press the ▶ button and select Edit. The following picture shows the Album Editor screen. Photo Preview and the file info windows appear on the left and the list of photo files appears in top and bottom windows on the right.
Radio Select Player in the Main Window. FM Radio Player ENG The mPack contains an FM tuner for radio reception. Simply tune in to your favorite station and listen to current music, weather, sports or whatever you enjoy. To listen to the FM radio, complete the following procedure: At the top of FM Radio Player, a channel name, frequency (MHz), mute (On/Off), stereo/mono and volume level are displayed. A channel list appears at the bottom.
Recorder The mPack allows you to save your favorite radio station frequencies in the Preset Channel function so you can quickly move from one station to another. You can also give these stations a personalized name instead of relying on the radio frequency alone to tell which station is which. The pop-up menu functions for Preset Channel are described below: Function To make a recording, select Recorder at the Main Window.
Audio Recorder Record video and audio signals from an external input into a video/audio file. Record audio signals from an external input into an audio file. The Video & Audio Recorder functions are described below: Audio Recorder functions are described below: Function 64 Description Start To start video/audio recording, select Start. To play video/audio on the LCD screen during recording, set A/V Bypass to On. To make a recording without playing, set it to Off.
Function Record signals from the built-in microphone into an audio file. Mic Recorder functions are described below: Function To start Mic Recording, choose Start. Target Dir To change the path, choose Target Dir. Then select a new path in the folder selection window. The default target directory is /hdd/Backup/Voice. Target File To create a recording file, select Target File. Then create a new file in the Folder Management Window.
Text Function Description Start To backup a CF media card on a hard disk, choose Start. Target Dir To change the path, choose Target Dir. Then select a new path in the folder selection window. The default target directory is /hdd/Backup/MediaCard. You can create a new folder by selecting Make New Target Dir. Make New Target Dir To create a new backup folder, select Make New Target Dir. Then create a new folder in the folder management window.
Browser Play/Edit a File using Browser ENG Moving around the mPack hard drive is very similar to moving around a PC hard drive when you use the Browser function. To use the browser function: To play/view either an audio, video, photo, text or a game file, select the media you wish to play and press the ▶ button. Select Browser from the Main Window. Select an m3u file and press the ▶ button to display the pop-up menu as shown in the following picture.
Function New Description ENG Press the (M) button in the Browser to open the pop-up menu as shown in the following picture: To create a new folder, press the (M) button. At the pop-up menu, choose New and then select Folder. To create an album or an m3u, press the (M) button and choose New and then Edit New at the pop-up menu. The window where the newly created album or m3u can be edited appears on the screen.
Applications Select Application at the Main Window. Game ENG The mPack comes with many built in applications that just make life a little more convenient, such as Games, Address Book, Calendar, Clock, and Chinese Conversation. To use an application, complete the following steps: The mPack comes pre-loaded with games similar to the ones available on cell phones. To play a game, select Game and choose a game to play from the game list. Press the ▶ button to start the game.
Address Book The mPack contains a clock function to help keep track of time when a clock isn't available. To display the clock, select Clock and press the ▶ button. To exit the clock function and return to the previous menu, press the ■ button. The following screen is displayed when Clock is selected. Press the (M) button to display the pop-up menu. Choose Clock Setting to view setup details. Choose Quit to exit. Use ◀/▶/▲/▼ to adjust time and press the (M) button to apply the changed time.
Setup The mPack can be personalized to a configuration that best suits you. You can configure options for Audio, Video, Photo, Radio, and System functions. To configure the setup, complete the following steps: ENG Press the (M) button in an address list within a group list to display the pop-up menu as shown in the below: Select Setup from the Main Window. The pop-up menu functions are provided below: Function Description Add To add an address, press the (M) button and choose Add at the pop-up menu.
Video Setup The following picture shows the Audio Setup window with option items and their current settings. To change a setting, select an item and press the ▶ button. Then, use the ▲/▼ button to select the desired value. To apply the changed value, press the ▶ button again. To cancel your selection, press the ◀ or ■ button. The following picture shows the Video Setup window with option items and their current settings. To change a setting, select an item and press the ▶ button.
Radio Setup The following picture shows the Photo Setup window with option items and their current settings. To change a setting, select an item and press the ▶ button. Then, use the ▲/▼ button to select the desired value. To apply the changed value, press the ▶ button again. To cancel your selection, press the ◀ or ■ button. The following picture shows the Radio Setup window options and their current settings. To change a setting, select an item and press the ▶ button.
Option The following pictures shows the System Setup window options and their current settings. To change a setting, select an item and press the ▶ button. Then, use the ▲/▼ button to select the desired value. To apply the changed value, press the ▶ button again. To cancel your selection, press the ◀ or ■ button. Function Format Media Card To format a media card, select Format Now. Once it is formatted, previous files or folders cannot be recovered.
Troubleshooting The mPack won't detect my memory card. When I press the power button, the mPack does not turn on. Because memory cards from different manufacturers have different characteristics, certain cards may not be detected. You can check "www.mpack.com.tw" to see the list of memory cards that are compatible with the mPack. If a memory card on the list is not detected, test the mPack with a different memory card.
Specifications The previously configured system settings have been changed. External Appearances Display 3.5" 320 x 240 Full Color TFT LCD TV-Out NTSC/PAL Speaker Earphone Out 70mW (L/R 35mW) I cannot enter a key input. Microphone Internal Mono Microphone The software may malfunction for various reasons. Reboot the mPack and try again. If the symptoms persist, call customer service.
Limited Warranty Statement Taiwan Headquarters China Power Quotient International Co., Ltd. 14F, No. 16, Jian Ba Road Chung Ho City, Taipei, Taiwan Tel: +886-2-8226-5288 Fax: +886-2-8226-5268 www.pqi.com.tw E-Mail: sales@pqi.com.tw Shanghai No.100, Tong Yuan Rd, Suzhou Industrial Park 215021, China Tel: +86-21-6440-3280 Fax: +86-21-6440-3279 www.pqi.com.cn USA Shenzhen Tel: +86-755-8328-7509 Fax: +86-755-8327-7582 PQI Corporation 46661 Fremont Blvd. Fremont, CA 94538, U.S.A.
Disclaimer ● PQI is not liable for damage caused by fire, natural disaster (such as flood, thunder, lightning, earthquake, etc.), use by third party, accidents, improper temperature or humidity, or damage caused by misuse or malfunction through simultaneous use of the PQI product and the connected equipment. ● This warranty supersedes all other warranties or representations, oral or written.