WET/DRY VACUUM Models PF54 OPERATING INSTRUCTIONS Equipment must be operated, serviced and maintained in accordance with the manufacturer’s instructions.
SAVE THESE INSTRUCTIONS FOR FUTURE REFERENCE *When using a wet/dry vacuum, basic precautions should be followed. *Read all instructions before using your vacuum. IMPORTANT SAFETY ADVICE DRY OPERATION OF VACUUM When using electrical equipment basic safety precautions should be followed including the following: You must have training in the operation of this machine before using it. Read all instructions carefully before use. ● Keep children and unauthorized persons away from the machine when in use.
DRAINING When the tank is full. 1. Release drain hose from hose clamp. 2. Remove plug from hose end to start draining process. 3. When draining is complete, replace hose plug and snap hose back into clips on side of tank. NOTE: When the water level in the tank exceeds the safety level, the safety device will automatically block the inlet, and the motor turning sound will be changed, but power will remain ON. The power must be turned OFF before emptying the tank.
Model PF54 Parts 3 2 19 1 27 5 7 6 29 44 24 30 23 9 46 31 10 12 11 32 45 12 22 34 48 12 37 13 20 19 38 15 39 17 49 41 50 17 19 43 51 ref # item # 52 81 77 1 2 803 5 6 67 7 9 10 12 13 15 17 19 22 23 24 27 70 68 description ref # item # description WD20 WD66C WD66 78 79 WD34 WD65 HANDLE POWER CORD EXTENSION CORD CORD PROTECTOR TOP COVER 29 30 31 32 34 WD68 WD70 WD69 WD85 WD166 MOTOR GASKET SPONGE SQUARE SPONGE REAR WHEEL PLATE PLATE B WD15W WD17 WD16 WD82 WD83 WD14B WD84
31 12 Model PF54 Parts 22 34 48 90 12 32 45 37 20 89 19 38 88 87 39 86 49 41 50 19 85 43 84 83 51 82 52 81 80 76 79 77 78 75 74 70 73 59 72 71 60 61 64 66 68 62 69 67 107 91 ref # item # description ref # item # description 52 59 60 61 62 64 66 67 68 69 70 71 72 73 74 75 WD120 WD50 TANK RUBBER WASHER WD128 WD44 CLIP BASE 92 HEX NUT WD45 WD86 WD46 SUCTION COUPLER BUTTON BASE BUTTON WD202 WD77 WD133 WASHER 93 RUBBER WASHER COVER WD167 WD123M WD124M WHEEL MOUNT
Model PF54 Parts 52 81 80 76 79 77 78 75 74 70 73 59 72 71 60 61 64 109 66 68 110 62 69 111 67 112 107 91 113 114 92 93 94 95 101 100 96 115 97 115 102 106 98 99 103 116 117 104 118 105 119 ref # item # description ref # item # description 91 92 93 94 95 96 97 98 99 100 101 102 103 104 105 WD168 WD169 U-SHAFT BUTTON WD184 WD186 ADJUSTER LEVER ADJUSTER LEVER KNOB WD170 WD171 WD172 WD173 FIXED NUT ADJUSTED WHEEL BUTTON WHEEL WD191 WD24 WD25 WD26 GASKET CONNECTOR HOSE
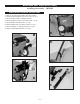
Model PF54 Parts -Squeegee Assembly Installing Instr uctions - FM100H FRONT MOUNT SQUEEGEE INSTRUCTIONS 1. 2. 3. 4. 5. 6. 7. Remove vacuum head and filters from the vacuum. Install axle mounting plate to bottom of unit. See fig 1 Attach Attach Attach Attach Attach handle bracket to squeegee bracket. squeegee bracket to the axle bracket. See fig 2 handle to handle bracket. See fig 3 handle holder to machine handle. See fig 4 squeegee to squeegee bracket. See fig 5 8.
TROUBLE SHOOTING GUIDE Loss of Suction CAUSE: 1) Tank full. 2) Dry filter assembly clogged. 3) Clogged hose or wand. 4) Tank rim is dented. 5) Loose or broken fan. 6) Motor not working. 7) Float not functioning. 8) Seal worn. SOLUTION: 1) Empty Tank 2) Clean cloth filter. 3) Remove obstruction. 4) Replace tank. 5) Contact manufacturer or service center. 6) Contact manufacturer or service center. 7) Check to see if float moves freely or tank is full. 8) Replace seal.