MICROWAVE AIR FRYER PLUS MERA-READY LOGOTYPE – UL MARK e Marks are registered by Underwriters Laboratories Inc. Owner’s Manual Save These Instructions – For Household Use Only MODEL: BDK02 When using electrical appliances, basic safety precautions should always be followed. Do not use the PowerXL Microwave Air Fryer Plus™ until you have read this manual thoroughly. Visit TristarCares.com for tutorial videos, product details, and more.
PowerXL Microwave Air Fryer Plus BEFORE YOU BEGIN The PowerXL Microwave Air Fryer Plus™ will provide you many years of delicious family meals and memories around the dinner table. But before you begin, it’s very important that you read this entire manual, making certain that you are totally familiar with this appliance’s operation and precautions.
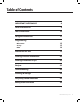
Table of Contents IMPORTANT SAFEGUARDS 4 Parts & Accessories 8 The Control Panel 10 Using the Accessories 11 Programming Microwave 12 Air Fry 13 Bake 14 Instructions for Use 15 Cooking Function Information 20 Cooking Guidelines & Tips 22 Recipes 23 Troubleshooting 26 Cleaning & Storage 28 Frequently Asked Questions 29 Money-Back Guarantee 30 PowerXL Microwave Air Fryer Plus 3
IMPORTANT SAFEGUARDS WARNING PREVENT INJURIES! CAREFULLY READ ALL INSTRUCTIONS BEFORE USE! When using electrical appliances basic safety precautions should be followed, including the following: To reduce the risk of burns, electric shock, fire, injury to persons, or exposure to excessive microwave energy: 1. Read all instructions before using the appliance. 2. Read and follow the specific warning in the “PRECAUTIONS TO AVOID POSSIBLE EXPOSURE TO EXCESSIVE MICROWAVE ENERGY” section. 3.
IMPORTANT SAFEGUARDS d. Do not use the interior for storage purposes. Do not leave paper products, cooking utensils, or food in the appliance when not in use. e. Do not use the microwave function without food in the appliance. 25. Liquids such as water, coffee, or tea can be overheated beyond the boiling point without appearing to be boiling. This is called delayed eruptive boiling. Visible bubbling or boiling when the container is removed from the microwave appliance is not always present.
IMPORTANT SAFEGUARDS Using the Power Cord GROUNDING INSTRUCTIONS • A short power-supply cord is provided to reduce the risk of becoming entangled or tripping over a longer cord. • This appliance has been designed for use with a 3-prong, 120V dedicated electrical outlet only. • Plug into a 3-prong wall outlet with no other appliances on the same outlet. Plugging other appliances into the outlet may cause the circuit to overload.
IMPORTANT SAFEGUARDS Countertop Use Remove all packing material and accessories. Examine the oven for any damage, such as dents or a broken door. Do not install if the appliance is damaged. Cabinet: Remove any protective film found on the microwave oven cabinet surface. Do not remove the light brown cover that is attached to the oven cavity to protect the magnetron. 1. Select a level surface that provides enough open space for the intake and/or outlet vents. A minimum clearance of 3.0 inches (7.
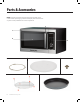
Parts & Accessories NOTE: Unpack all contents from the packaging. Contents vary by model. Check all packaging material carefully for parts. Please remove any clear or blue protective film on the components.
Parts & Accessories 1. MAIN UNIT: Features sturdy construction throughout. 2. GLASS DOOR: Sturdy, durable glass keeps heat in and helps ensure even heat distribution to food. NEVER cook with this door in the open position. 3. DOOR HANDLE: Always use the handle and avoid touching the Glass Door. The Door may become very hot during the cooking process and can cause injury. 4.
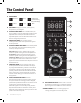
May 15, 2020 May 15, 2020 May 15, 2020 Panel Panel The Control Panel Panel Panel May 15, 2020 Panel May 15, 2020 May 15, 2020 Panel Panel A. INDICATORS Microwave Defrost Air Fry Lock Heating Element (used with the Air Fry, Bake, or Broil settings) A Menu B B. LED PANEL: Displays functions, cooking times, temperatures, and weights. C. FUNCTION BUTTONS: Use to set Microwave, Air Fryer, or Bake in manual mode. Bake and Air Fry have adjustable time and temperature.
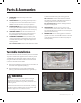
Using the Accessories Using the Air Fry Rack 1. Assemble the turntable (see the “Turntable Installation” section). 2. Place food on the Air Fry Rack. Place the Air Fry Rack on the Tray (see Fig. iii). The Air Fry Rack can be flipped so that food can be placed closer to or farther from the top heating element. 3. Choose a cooking mode, time, and temperature. Press the Control Knob to begin the cooking process. NOTE: Do not use the Air Fry Rack with the microwave function. FIG. iii Using the Baking Pan 1.
Microwave Programming Function Preset Default Power Power Range Weight/ Quantity Default Time Time Range Display on Panel Microwave Microwave 100% 10–100% N/A 30 secs. 30 secs.–95 mins. P100 Microwave Popcorn 100% 100% 2.75 oz 3.2 oz 3.5 oz 2 mins. 15 secs. 2 mins. 30 secs. 2 mins. 50 secs. N/A 2.75 oz Microwave Defrost Varies (see chart) Varies (see chart) Varies (see chart) N/A DEF1 Micro Menu Microwave Function Beverage 100% 100% 4 oz 8 oz 12 oz 1mins. 1 mins. 40 secs.
Air Fry Programming Function Preset Default Temperature Temperature Range Weight/ Quantity Default Time Time Range Air Fry Air Fry 400° F/204° C Air Fry French Fries Air Fry Display on Panel 300° F/149° C, 325° F/163° C, 350° F/177° C, 375° F/190° C, 400° F/204° C, 425° F/218° C N/A 20 mins. 30 secs. –95 mins. 425° F/218° C N/A N/A 22 mins. N/A Pizza 400° F/204° C N/A N/A 10 mins. N/A Air Fry Menu Frozen Steak Fries 425° F/218° C N/A 11 oz. 24 mins.
Bake Programming Function Preset Default Temperature Temperature Range Default Time Time Range 30 mins.. 30 secs.–95 mins. Bake Bake 350° F/177° C 100° F/38° C, 150° F/65° C, 250° F/121° C, 275° F/135° C, 300° F/149° C, 325° F/163° C, 350° F/177° C, 375° F/190° C, 400° F/204° C, 425° F/218° C Bake Broil 425° F/218° C 400° F/204° C, 425° F/218° C 10 mins. 30 secs.–95 mins. Bake Keep Warm 160°F/71° C NA or 160° F/71° C 2 hrs. 1–4 hrs.
Instructions for Use Before First Use 1. Read all material, warning stickers, and labels. 2. Remove all packing materials. 3. Hand-washing is recommended. Wash all parts and accessories used in the cooking process with warm, soapy water. 4. Never wash or submerge the cooking appliance in water. Wipe the inside and outside of the cooking appliance with a clean, moist cloth. Rinse with a warm, moist cloth. 5.
Instructions for Use Cookware in the Microwave It is not necessary to buy new cookware. Many pieces already in your kitchen can be used successfully in your new appliance. The charts below will help you decide Cookware which cookware and coverings should be used with each feature. Make sure the utensil does not touch the interior walls during the cooking process.
Instructions for Use Containers CAUTION PERSONAL INJURY HAZARD Tightly-closed containers could explode. Closed containers should be opened and plastic pouches should be pierced before cooking. See the instructions in the “Materials You Can Safely Use in a Microwave Oven” and “Materials To Be Avoided in a Microwave Oven” sections. There may be certain non-metallic materials that are not safe to use for microwaving.
Cooking Function Information Microwave Function 1. Press the Microwave Button to manually adjust the power and time of the Microwave function. 2. Press the Microwave Button or turn the Control Knob to select one of the ten power levels (see Fig. vi). Press the Control Knob to confirm the power level. 3. Turn the Control Knob to adjust the cooking time. Press the Control Knob to confirm the cooking settings and begin the cooking process.
Cooking Function Information Micro Menu Button 1. Press the Micro Menu button repeatedly or turn the Control Knob to select one of the preset weights, press the Control Knob to confirm the selected preset, and then turn the Control Knob to select a food weight (see Fig. vii). 2. Press the Control Knob to confirm the cooking settings. 3. When the cooking timer is complete, the appliance will beep five times and display “0:00.
Cooking Function Information French Fries Button 1. Press the “French Fries” Button to set the appliance to French Fry mode. 3. When the cooking timer is complete, the appliance will beep five times and display “0:00.” 2. The LED Display will show “22:00.” Press the Control Knob to begin the cooking timer. Open the door, insert your food and accessories, and close the door. Pizza Button 1. Press the Pizza Button to set the appliance to pizza mode. 2.
Cooking Function Information Air Fry Function 1. Press the Air Fry Button to set the appliance to air fry mode. “400” will flash on the LED Display. 2. Turn the Control Knob to cycle between the available cooking temperatures (300° F/149° C, 325° F/163° C, 350° F/177° C, 375° F/190° C, 400° F/204° C, 425° F/218° C). Press the Control Knob to confirm the cooking temperature. 3. Turn the Control Knob to adjust the cooking time. Press the Control Knob to confirm the cooking time and start the timer. 4.
Cooking Guidelines & Tips Internal Temperature Meat Chart Use this chart and a food thermometer to ensure that meat, poultry, seafood, and other cooked foods reach a safe minimum internal temperature. *For maximum food safety, the U.S. Department of Agriculture recommends 165° F for all poultry; 160° F for ground beef, lamb, and pork; and 145° F, with a 3-minute resting period, for all other types of beef, lamb, and pork. Also review the USDA Food Safety Standards.
Recipes HASH BROWN CASSEROLE HONEY-ROASTED SALMON 1 lb frozen hash browns 3 tbsp butter ¾ cup sour cream ¾ cup mayonnaise 1 ½ cups shredded cheddar cheese, plus more for topping shredded Parmesan cheese ½ tsp salt ½ tsp garlic powder ¼ tsp ground black pepper 2 4-oz salmon fillets ¾ cup honey ½ cup sweet soy sauce 2 tbsp light brown sugar ¼ cup orange juice 2 tbsp lemon juice 2 tbsp red wine vinegar 2 tsp olive oil 2 cloves garlic, minced 1 scallion, chopped finely salt & ground black pepper, to taste
Recipes WHITE PIZZA 1 thin-crust pizza dough 2 cloves garlic, sliced thinly ½ tsp red pepper flakes 9 slices fresh mozzarella ¼ cup ricotta cheese 2 tsp extra virgin olive oil ¼ tsp of sea salt ¼ tsp black pepper 1. In a bowl, mix the ricotta cheese, salt, pepper, and red pepper flakes 2. Roll the pizza dough in the Baking Pan. 3. Place the Baking Pan on the Air Fry Rack. Press the Air Fry button and set the cooking temperature to 375° F/191° C and the cooking time to 10 mins. Flip the dough after 5 mins.
Recipes to confirm. Transfer the wings to a clean bowl. Toss the wings with the onion powder and black pepper. 3. Place the wings in the Baking Pan and place the Baking Pan on the Air Fry Rack on the Glass Tray. 4. Press the Air Fry button and set the cooking temperature to 425° F/ 218° C and the cooking time to 25 mins. 5. When the cooking cycle is complete, toss the wings with the sauce. 6.
Troubleshooting Appliance not working as expected? Review the chart for possible causes and solutions. Go to www.Tristarcares.com or contact Customer Service for unanswered questions. Problem Possible Cause Solution Oven will not start Electrical cord for oven is not plugged in. Plug power cord into wall socket. Door is open Close the door and try again. Wrong operation is set. Check instructions. Materials to be avoided in microwave oven were used. Use microwave-safe cookware only.
Troubleshooting Problem Possible Cause Solution The appliance does not work The appliance is not plugged in. Plug power cord into wall socket. The appliance has not been turned on by setting the preparation time and temperature. Set the temperature and time. The appliance is plugged into an outlet that is shared with other devices. Plug the appliance into a dedicated power outlet. The appliance is overloaded. Use smaller batches for more even cooking. The temperature is set too low.
Cleaning & Storage Cleaning Clean the appliance after each use. Remove the power cord from the wall socket and be certain the appliance is thoroughly cooled before cleaning. 1. Wipe the outside of the appliance with a warm, moist cloth and mild detergent. 2. To clean the door, gently scrub both sides with warm, soapy water and a damp cloth. DO NOT soak or submerge the appliance in water or wash in the dishwasher. 3.
Frequently Asked Questions 1. Does the appliance need time to heat up? Preheating is needed when you are cooking from a cold start when using the Bake or Air Fry cooking function. Add 3 minutes to the cooking time to compensate when preheating is necessary (preheating is automatic with the Bake and Pizza cooking functions). 2. Can I check the food during the cooking process? You can check the cooking process at any time by looking through the glass door. 3.
MICROWAVE AIR FRYER PLUS 90-Day Money-Back Guarantee The PowerXL Microwave Air Fryer Plus is covered by a 90-day money-back guarantee. If you are not 100% satisfied with your product, return the product and request a replacement product or refund. Proof of purchase is required. Refunds will include the purchase price, less processing and handling. Follow the instructions in the Return Policy below to request a replacement or refund.
MICROWAVE AIR FRYER PLUS PowerXL Microwave Air Fryer™ 31
MICROWAVE AIR FRYER PLUS We are very proud of the design and quality of our TM . PowerXL– Microwave Air Fryer Plus CAMERA-READY LOGOTYPE UL MARK hese Marks are registered by Underwriters Laboratories Inc. This product has been manufactured to the highest standards. Should you have any questions, our friendly customer service staff is here to help you. Visit us at www.TristarCares.com, email us at customerservice@tristarproductsinc.com, or call us at 973-287-5126 Distributed by: Tristar Products, Inc.