
User Manual
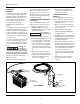
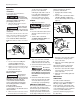

7. Attach the 3/16” ring terminal to the end
of the red wire and crimp together.
Connect the
positive wire before
grounding the black wire to the vehicle
frame to prevent electrical arcing.
8. Connect the red wire with the 3/16”
ring terminal to the circuit breaker.
9. Connect the circuit breaker to the
battery terminal.
10. Attach the black wire with the 5/16”
ring terminal to the vehicle frame.
Never attach the
red wire with
the circuit breaker to the negative (-) or
ground battery terminal. Incorrect
4
Operating Instructions
wiring will short circuit and damage the
circuit breaker and/or motor which
could cause damage to the vehicle and
winch.
11. Insert the plug into the power socket
on the winch.
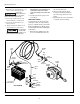
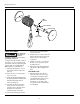
TEMPORARY WIRING
To temporary wire the winch, follow the
outlined procedures. A complete wiring
harness is available from the dealer (Part
Number P7866000AJ) for Models 712A
and 912. Order part number P7865900AJ
for Model 315.
1. Attach two large "alligator" type clips,
one to the circuit breaker and one to
the end of the black wire.
2. Run the red wire (with the circuit
breaker) to the battery and clip the
wire to the hot (positive) side of the
battery.
3. Clip the black wire to the vehicle frame
or negative side of the battery.
Battery
Terminal*
Bolt*
Lock Washer*
Nut *
12 Volt Car
Or Truck Battery
Vehicle
Frame
Red
Wire
Black
Wire
Gold
Terminal
Silver
Terminal
Red
Wire
Black
Wire
Rubber
Boot
3/16
Ring
Terminal
5/16
Ring
Terminal
Circuit
Breaker
Power
Socket
Toggle
Switch
*
NOT SUPPLIED
Figure 2 - Permanent Wiring For Model 315