
User's Manual
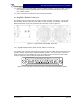


Table Of Contents

G3S-800-180-029 Installation & Service Manual
Copyright Powerwave Technologies, Inc., April 2002. All rights reserved
044-05112 Rev. A 2-3 April 2002
Visually inspect the amplifier module for damage that may have occurred during shipment. Check
for evidence of water damage, bent or warped chassis, loose screws or nuts, or extraneous
packing material in the connector or fans. Inspect the rear panel connector for bent connector
pins. If the equipment is damaged, a claim should be filed with the carrier once the extent of any
damage is assessed. We cannot stress too strongly the importance of IMMEDIATE careful in-
spection of the equipment and the subsequent IMMEDIATE filing of the necessary claims against
the carrier if necessary. If possible, inspect the equipment in the presence of the delivery person.
If the equipment is damaged, the carrier is your first area of recourse. If the equipment is dam-
aged and must be returned to the factory, write or phone for a return authorization. Powerwave
may not accept returns without a return authorization. Claims for loss or damage may not be
withheld from any payment to Powerwave, nor may any payment due be withheld pending the
outcome thereof. WE CANNOT GUARANTEE THE FREIGHT CARRIER'S PERFORMANCE.
2-5 Installation Instructions (refer to figures 1-1 and 2-1)
The G3S-800-180-029 amplifier module is designed for installation in a subrack for connection of
DC power, RF, and monitor cables.
To install the amplifier proceed as follows:
1. Install the subrack in an equipment rack and secure in place, based on the installation in-
structions from the appropriate manual for the subrack being installed.
2. Connect the subrack RF output to a high quality transmit filter. Powerwave recommends that
a 800W average power / 14KW instantaneous peak power rated filter be used in most appli-
cations.
3. Connect the combined transceiver output(s) to the RF Input port of subrack.
4. Connect the alarm cable(s) to the alarm port of subrack.
WARNING
Verify that all circuit breaker switches on the power distribution panel are in the OFF
position. Turn off external primary DC power before connecting DC power cables.
5. Connect positive primary power and negative primary power to the subrack. Tighten the
subrack power connections.
6. Verify that the plug-in amplifier’s front panel On/Off switch is in the Off position.
7. Inspect the 21-pin D-Sub male combo connector on the rear of each amplifier before install-
ing the amplifier in the amplifier subrack. Verify that all pins are straight, no pins are re-
cessed, that the alignment shield is not bent, and no packing material is embedded in the
connector.
CAUTION
Forcing the amplifier into the subrack at too fast a rate may cause the pins on the 21-pin
D-sub connector of the amplifier to become recessed or broken.
8. Install the plug-in amplifier module(s) in the subrack. Tighten left and right thumbscrews until
finger tight. Tighten the thumbscrews with a slotted screw driver about 1/8 of a turn past fin-
ger tight.
9. Check your work before applying DC voltage to the system. Make certain all connections are
tight and correct.
10. Turn the power distribution circuit breakers back on.