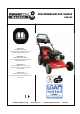
BIG WHEELER 508 VARI-S #05162 Deutsch D - 4 Originalbetriebsanleitung Betreiben Sie das Gerät nicht bevor Sie die Betriebsanleitung gelesen haben. English GB - 14 Original Operating Instructions Do not use the machine without reading the Operating Instructions Čeština CZ - 23 Překlad originálního návodu k obsluze Přístroj nepoužívejte, aniž byste si přečetli návod k obsluze. Français F - 32 Traduction de la notice originale Ne pas faire fonctionner l'appareil sans lire les instructions.
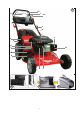
1 12 13 1 16 3 10 4 8 9 11 7 14 15 2 6 2 3 2 5 4
5 6 7 8 9 10 11 12 3
Einleitung Technische Daten Damit Sie an Ihrem neuen Gerät möglichst lange Freude haben, bitten wir Sie, die Betriebsanweisung und die beiliegenden Sicherheitshinweise vor Inbetriebnahme sorgfältig durchzulesen. Ferner wird empfohlen, die Gebrauchsanweisung für den Fall aufzubewahren, dass Sie sich die Funktionen des Artikels später nochmals ins Gedächtnis rufen möchten. Motor: Hubraum: Leerlaufdrehzahl: Max.
Montage Fangsack (Abb. 2-4) 1. Nehmen Sie den Fangsack, den zugehörigen Rahmen sowie die Kunststoffeinlage aus der Verpackung. 2. Positionieren Sie den Rahmen im Fangsack, achten Sie darauf, dass sich die Lasche am Rahmen außerhalb des Fangsackes befindet. (Abb. 2, 3) 3. Fixieren Sie nun den Fangsack am Rahmen. (Abb. 4) WARNUNG: Abgase und einzelne Komponenten davon enthalten bzw. emittieren krebserregende oder Fruchtschädigende sowie Fortpflanzungsstörende Chemikalien.
• • • • • • • • • • • • • • • • • • • • Beachten Sie, dass der Besitzer oder Benutzer für Unfälle oder die Gefährdung anderer Personen sowie für Sachbeschädigungen verantwortlich ist. Seien Sie aufmerksam, und schalten Sie den Mäher aus, wenn Kinder in der Nähe sind. Mähen Sie quer zum Hang, niemals auf- oder abwärts. Gestatten Sie niemals Kindern oder Personen, die mit dieser Bedienungsanleitung nicht vertraut sind, das Gerät zu betreiben.
gegen den Handgriff und parallel dazu den Antriebshebel (Abb. 1/13) gegen den Handgriff. Die Vorwärtsbewegung wird durch Loslassen des Antriebhebels (Abb. 1/13) gestoppt. Mähen und sammeln Gras wird im Grasfangsack gesammelt (feuchtes und Nasses Gras reduziert die Füllleistung in dem Grasfangsack.). Zur Befestigung des Fangkorbes am Mäher, heben Sie die Abdeckplatte an und hängen Sie den Fangkorb ein. Mähen (ohne Grasfangsack) Gemähtes Gras wird in Streifen abgelegt.
Instandhaltung ist für die Sicherheit und für den störungsfreien Betrieb unvermeidlich. WARNUNG: Mit Alkohol angereicherte Kraftstoffe (Gasohol genannt) oder Kraftstoffe mit Ethanol bzw. Methanolbeimischungen können Feuchtigkeit anziehen, die Säure entstehen lassen kann. Ein sauberes Benzin kann während der Lagerung das Kraftstoffsystem des Motors beschädigen. Um Motorprobleme zu vermeiden, sollten Sie das Kraftstoffsystem vor einer Lagerung für mehr als 30 Tagen entleeren.
Umweltschutz: Restrisiken Auch bei sachgemäßer Verwendung des Werkzeuges bleibt immer ein gewisses Restrisiko, das nicht ausgeschlossen werden kann. Aus der Art und Konstruktion des Werkzeuges können die folgenden potentiellen Gefährdungen abgeleitet werden: • Unbeabsichtiges Inbetriebsetzen des Produktes. • Wegschleudern von Gegenständen durch das Messer. • Schädigung des Gehöres, wenn kein vorgeschriebener Gehörschutz getragen wird. Abfall nicht in die Umwelt sondern fachgerecht entsorgen.
Verhalten im Notfall EG-KONFORMITÄTSERKLÄRUNG Leiten Sie die der Verletzung entsprechend notwendigen Erste Hilfe Maßnahmen ein und fordern Sie schnellst möglich qualifizierte ärztliche Hilfe an. Bewahren Sie den Verletzten vor weiteren Schädigungen und stellen Sie diesen ruhig. Hiermit erklären wir, Für einen eventuell eintretenden Unfall sollte immer ein Verbandskasten nach DIN 13164 am Arbeitsplatz griffbereit vorhanden sein. Dem Verbandskasten entnommenes Material ist sofort wieder aufzufüllen.
ÖLWECHSEL Service Sie haben technische Fragen? Eine Reklamation? Benötigen Ersatzteile oder eine Bedienungsanleitung? Auf unserer Homepage www.guede.com im Bereich Service helfen wir Ihnen schnell und unbürokratisch weiter. Bitte helfen Sie uns Ihnen zu helfen. Um Ihr Gerät im Reklamationsfall identifizieren zu können benötigen wir die Seriennummer sowie Artikelnummer und Baujahr. Alle diese Daten finden Sie auf dem Typenschild. Um diese Daten stets zur Hand zu haben, tragen Sie diese bitte unten ein.
Luftfilter Den Filterdeckel lösen und das schaumige Filterelement demontieren. Um zu vermeiden, dass Fremdkörper in die Saugöffnung geraten, ist der Filterdeckel wieder aufzusetzen. PAPIEREINSATZ DECKEL DES LUFTFILTERS SCHAUMELEMENT ENTLEEREN DES KRAFTSTOFFTANKS UND DES VERGASERS Einen für Benzinlagerung zugelassenen Behälter unter den Vergaser stellen. Um Verschütten des Benzins zu vermeiden, arbeiten sie mit einem Trichter.
WARTUNGSPLAN REGELMÄSSIGE WARTUNGSPERIODE (1) Die entsprechende Wartung im angegebenen Monat oder nach dem Ablauf der vorgegebenen Betriebsstunden durchführen – je nach dem, was früher eintritt. Motoröl Kontrollieren (SAE 30) Ersetzen Luftfilter Vor jedem Einsatz Jeden Monat oder Alle 3 Monate oder Alle 6 Monate oder Jedes Jahr oder Alle 2 Jahre oder 5 Std. 25 Std. 50 Std. 100 Std. 250 Std. O O(2) Kontrollieren O Ersetzen Zündkerze 1. 2.
Introduction Technical specifications To enjoy your new machine as long as possible, please read carefully the Operating Instructions and the attached safety instructions before using it. Further, we recommend keeping the Operating Instructions to recall the product features in the future. Engine: 2.7 kW/3.7 PS -1 at max. 3,600 per min Capacity: 140 ccm -1 Idle speed: 2,850 per min Max. cutting width: 508 mm Collection box capacity: 65 l Height adjustment, 6 degrees: 25-75 mm Amount of oil: 0.
Fitting the handle IMPORTANT: Fit the handle carefully to prevent any cable squeezing or damage. 1. Raise the handle until it snaps in the operating position. 2. Remove the protective packaging, raise the upper part of the handle and fit it together with the bottom part. Tighten the lock screws on both sides of the handle. 3. Remove the protective packaging of the operating handle in the upper part.
• • • • • • • • • • • • • • • Before using the mower, always check whether the blade, blade screws and cutting mechanism are not damaged or worn out. Any worn out or damaged blades and screws to be always replaced in the entire set to prevent any machine imbalance. Do not make any changes to the protective equipment. Check the protective equipment at regular intervals if working properly. Keep the machine clean, with no pollution by grass, leaves or other dirt.
ADDING FUEL (unleaded petrol) • Fuel is added using the filling hole in the tank. Make sure petrol does not get spilt. Use common clean unleaded petrol. Do not mix petrol with oil. Buy always a reasonable amount of petrol so that it can be consumed in 30 days. 3. Please make sure the mulching wedge is mounted firmly after the changeover. 4. Caution!!! Original spare parts from the manufacturer to be used only. 5.
• • • • Residual risks The vents in the collection box may get blocked if the box is not cleaned regularly. At regular intervals, clean the collection box with water and let it dry out before using the machine. Keep the upper part of the engine in the place of the starter clean. This will improve the air flow and increase the engine life. Cut in dry weather only. Keep the blades sharp at all times. Even if the machine is used professionally, there is still some risk that cannot be eliminated.
Environment protection: If help is needed, please provide the following details: Dispose waste professionally so as not harm the environment. 1. 2. 3. 4. Packing cardboard material may be delivered to collecting centres for recycling. Place of accident Accident nature Number of injured persons Injury type Operation Please comply with the statutory provisions for regulations regarding protection against noise that may differ in various locations.
Warranty BLADE DISMANTLING The warranty exclusively applies to material or manufacturing defects. The original proof of purchase including the date of purchase must be submitted when applying a claim in the warranty period. The warranty does not cover any unauthorised use such as machine overload, violent use, damage by a foreign person or an undesirable item. The failure to follow the Operating Instructions and assembly instructions and common wear and tear are also excluded from the warranty.
Air filter Loosen the filter cover and remove the foam filter element. Refit the filter cover to prevent an undesirable item from getting to the suction hole. PAPER INSERT AIR FILTER COVER FOAM ELEMENT EMPTYING THE FUEL TANK AND CARBURRETOR Put a container where petrol can be kept under the carburettor. Use a funnel to prevent petrol spilling. Remove the drain plug and put the fuel valve rod to ON. After emptying the fuel tank, refit the drain plug with the gasket ring. Tighten the plug.
SERVICING PLAN REGULAR SERVICING PERIODS (1) Perform adequate servicing in the given month or upon the specified hours of operation, whichever happens first. Motor oil Check (SAE 30) Before each use Each month or Every 3 months or Every 6 months or Each year or Each 2 years or 5 hours 25 hours 50 hours 100 hours 250 hours O O(2) Air filter Check O Change Spark plug O Cleaning check O Change 1. 2. O Keep records of the working time to better determine the servicing intervals.
Úvod Technické údaje Abyste ze svého nového přístroje měli co možná nejdéle radost, přečtěte si prosím před uvedením do provozu pečlivě návod k obsluze a přiložené bezpečnostní pokyny. Dále doporučujeme, abyste si návod k použití uschovali pro případ, že byste si později chtěli znovu připomenout funkce výrobku. Motor: Obsah: Volnoběžné otáčky: Max. záběr: Obsah sběrného koše: Nastavení výšky 6 stupňů: Množství oleje: Obsah nádrže: Hladina akust. tlaku dB (A): Garantovaná hladina akust.
Montáž rukojeti DŮLEŽITÉ: Rukojeť rozebírejte opatrně, aby nedošlo k sevření či poškození kabelů. 1. Rukojeť zvedejte tak dlouho, až zaklapne v pracovním postavení. 2. Odstraňte ochranný obal, zdvihněte horní části rukojeti a smontujte ji se spodní částí. Dotáhněte pojistné šrouby na obou stranách rukojeti. 3. Odstraňte ochranný obal obslužného madla v horní části. • • • • • • • • • • Obr. podobný Informace ke snížení hlučnosti Určitému zatížení hlukem se nelze u tohoto přístroje vyhnout.
• • • • • • • • • • • • • • nevyváženosti stroje. Na ochranných zařízeních neprovádějte žádné změny. Pravidelně kontrolujte jejich řádnou funkci. Přístroj udržujte čistý, bez znečištění travou, listím nebo jinými nečistotami. Vyteklý olej nebo benzín vždy odstraňte. Před uložením sekačky do uzavřených prostor nechte vychladnout motor. Nikdy nenastavujte výšku kol při běžícím motoru. Zařízení na sběr trávy může vlivem opotřebení nebo poškození ztratit svou funkčnost a může docházet k odhazování předmětů.
DOPLŇOVÁNÍ PALIVA (bezolovnatý benzín) • Palivo se dolévá plnicím otvorem v nádrži. Dbejte, abyste benzín nerozlili. Používejte obvyklý čistý bezolovnatý benzín. Benzín nemíchejte s olejem. Kupujte vždy jen přiměřené množství benzínu tak, abyste jej spotřebovali do 30 dnů 4. Pozor!!! Používejte pouze originální vybavení od výrobce. 5. Demontáž Uprostřed stiskněte palcem (3), poté pusťte a mulčovací klín vytáhněte směrem dolů. VÝSTRAHA: Rozlitý olej nebo benzín setřete.
• • • čistěte pravidelně vodou a před použitím jej nechte vyschnout. Horní část motoru v místě startéru udržujte v čistotě. Tím se zlepší proudění vzduchu a zvýší životnost motoru. Sekejte pouze při suchém počasí. Nože udržujte neustále ostré. Zbytková rizika I při odborném použití přístroje zůstává vždy určité riziko, které nelze vyloučit.
Ochrana životního prostředí: Odpad zlikvidujte odborně tak, abyste neškodili životnímu prostředí. Chování v případě nouze Zaveďte úrazu odpovídající potřebnou první pomoc a vyzvěte co možná nejrychleji kvalifikovanou lékařskou pomoc. Chraňte zraněného před dalšími úrazy a uklidněte jej. Kvůli případné nehodě musí být na pracovišti vždy po ruce lékárnička první pomoci dle DIN 13164. Materiál, který si z lékárničky vezmete, je třeba ihned doplnit.
DEMONTÁŽ NOŽE Záruka Za účelem čištění/ostření/výměny Záruka se vztahuje výlučně na vady materiálu nebo výrobní vady. Při uplatňování reklamace v záruční době přiložte originální doklad o koupi s datem koupě. Ze záruky je vyloučeno neodborné použití jako např. přetížení přístroje, násilné použití, poškození cizí osobou nebo cizím předmětem. Nedodržení návodu k použití a návodu k montáži a normální opotřebení je rovněž vyloučeno ze záruky.
Vzduchový filtr Povolte víko filtru a odmontujte pěnový filtrační prvek. Abyste zabránili vniknutí cizího předmětu do sacího otvoru, víko filtru opět nasaďte. PAPÍROVÁ VLOŽKA VÍKO VZDUCHOVÉHO FILTRU PĚNOVÝ PRVEK VYPRÁZDNĚNÍ PALIVOVÉ NÁDRŽE A KARBURÁTORU Pod karburátor dejte nádobu, v níž lze skladovat benzín. Aby se zabránilo rozlití benzínu, pracujte s nálevkou. Odmontujte vypouštěcí šroub, poté dejte táhlo palivového ventilu do polohy ON.
PLÁN ÚDRŽBY PRAVIDELNÉ ÚDRŽBOVÉ OBDOBÍ (1) Odpovídající údržbu proveďte v uvedeném měsíci nebo po uplynutí předepsaných provozních hodin podle toho, co nastane dřív. Motorový olej Kontrola (SAE 30) Výměna Vzduchový filtr Před každým použitím Kontrola Každý měsíc nebo Každé 3 měsíce nebo Každých 6 měsíců nebo Každý rok nebo Každé 2 roky nebo 5 hod. 25 hod. 50 hod. 100 hod. 250 hod. O O(2) O Výměna Zapalovací svíčka O Kontrola čištění O Výměna 1. 2.
Introduction Caractéristiques techniques Afin de pouvoir profiter le plus longtemps possible de votre nouvel appareil, veuillez lire attentivement le mode d’emploi et les consignes de sécurité jointes. Nous vous recommandons également de conserver le mode d’emploi pour une consultation ultérieure éventuelle.
Montage du bac de ramassage (fig. 2-4) 1. Sortez le bac de ramassage, le cadre correspondant et la pièce en plastique de l’emballage. 2. Insérez le cadre dans le bac de ramassage et veillez à ce que le raccord sur le cadre se trouve hors de bac de ramassage. (fig. 2, 3) 3. Fixez le bac de ramassage sur le cadre. (fig. 4) produits chimiques cancérogènes pouvant provoquer des lésions du foetus ou des problèmes de fécondité.
• Ne laissez jamais les enfants ou d’autres personnes ignorant le mode d’emploi utiliser l’appareil. L’âge de l’utilisateur peut être limité par les règlements locaux. • AVERTISSEMENT — l’essence est très inflammable. Stockez l’essence dans des récipients prévus à cet effet. Remplissez le réservoir uniquement à l’extérieur et ne fumez pas. Ravitaillez en essence avant de démarrer le moteur. Ne retirez jamais le bouchon et ne ravitaillez jamais lorsque le moteur est en marche ou chaud.
COUVERCLE DE L’ENTONNOIR/JAUGE D‘HUILE Limite supérieure Limite inférieure Votre tondeuse est livrée sans huile dans le moteur. AVERTISSEMENT: Veillez à ne pas surcharger le moteur en huile, ceci provoquerait la formation de fumée lors du démarrage. 1. Assurez-vous que la tondeuse repose sur une surface droite. 2. Retirez le bouchon du réservoir d’huile. 3. Insérez la jauge d’huile et fixez-la. Transformation en « mulchage » 1.
DÉMARRAGE DU MOTEUR Assurez-vous avant le démarrage que la bougie d’allumage se trouve à sa place et que l’appareil contient une quantité suffisante d’huile et d’essence. AVERTISSEMENT: Le moteur peut fumer lors du premier démarrage en raison de la pellicule d’huile de protection sur la surface du moteur. Ceci est tout à fait normal. 1. 2. 3. 6) 7) Appuyez 3 x sur la pompe Primer (fig. 1/14) !!! Poussez la manette de fonctionnement (étrier d’arrêt automatique) (fig. 1/12) vers la poignée coulissante (fig.
Caractéristiques techniques: Symboles: Moteur Cylindrée Tours à vide Largeur de travail maximale Volume du bac de ramassage Réglage de la hauteur Poids Niveau sonore Autres: B1: Attention ! Avant de mettre l’appareil en marche, lisez attentivement le mode d’emploi et les consignes de sécurité et respectez-les. B2: Danger d’éjection d’objets lorsque le moteur est en marche – respectez absolument une distance de sécurité.
l’environnement et de liquidation des déchets, par conséquent, il peut être recyclé. La remise de l’emballage dans le circuit de matières permet d’économiser des matières premières et de réduire les déchets. Des parties de l’emballage (telles que films, styropore) peuvent être dangereux pour les enfants. Danger d’étouffement! Rangez les parties de l’emballage hors de portée des enfants et liquidez-les le plus rapidement possible. Entraînement Lisez attentivement le mode d’emploi et d’entretien.
DÉMONTAGE DE LA LAME Filtre à air Pour nettoyage / affûtage / remplacement Desserrez le couvercle du filtre et démontez l’élément de filtration en mousse. Pour éviter le passage d’un objet étranger dans l’orifice d’aspiration, replacez le couvercle du filtre. Attention !!! Avant le démontage, il est nécessaire de débrancher d’abord l’antiparasite de la bougie d’allumage. Pour démonter les lames, desserrez la vis. COUVERCLE PIÈCE EN PAPIER DU FILTRE A AIR Rassemblez les éléments selon l’image.
PLAN D‘ENTRETIEN INTERVALLE D’ENTRETIEN RÉGULIER (1) Entretien nécessaire le mois indiqué ou à la fin des heures de fonctionnement indiquées – en fonction de la situation. Huile de contrôler moteur (SAE 30) remplacer Filtre à air Avant chaque utilisatio n Une fois par mois ou Tous les 3 mois ou 1x tous les 6 mois ou Une fois par an ou Une fois tous les deux ans ou 5h 25 h 50 h 100 h 250 h O O(2) contrôler O remplacer Bougie d‘allumage O contrôler nettoyer O remplacer 1. 2.
GÜDE GmbH & Co. KG Birkichstrasse 6 74549 Wolpertshausen Deutschland Tel.: +49-(0)7904/700-0 Fax.: +49-(0)7904/700-250 eMail: info@guede.