INSTRUCTION MANUAL 6 Ton Electric Log Splitter Model # PS90 Have product questions or need technical support? Please feel free to contact us! Website: www.Amerisuninc.com Toll free: 1-800-791-9458 M-F 9-5 EST Email: support@amerisuninc.
CONTENTS Technical data…...………………………………………………………... General safety rules…….………………………………………………... Specific safety rules for log splitter……...………………………………. Electrical information…………………………………………………...... Knowing your log splitter……...………………………………………… Assembly and adjustments……………………………………………… Operation………………………………………………………………... Maintenance.…………………………………………………………… Troubleshooting.………………………………………………………...
GENERAL SAFETY RULES Safety is a combination of common sense, staying alert, and knowing how your log splitter works. SAVE THESE SAFETY INSTRUCTIONS. WARNING: To avoid mistakes that could cause serious injury, do not plug in log splitter until the following steps have been read and understood. WARNING: This appliance is not intended for use by children or by unassisted, unsupervised persons whose physical, sensory or mental capabilities prevent them from using it safely.
SPECIFIC SAFETY RULES FOR LOG SPLITTER WARNING: Do not operate your log splitter until it is completely assembled and installed according to the instructions. 1. IF YOU ARE NOT thoroughly familiar with the operation of the log splitter, obtain instruction from a qualified person. 2. MAKE SURE wiring codes and recommended electrical connections are followed. When servicing, use only identical replacement parts. Disconnect log splitter from the power source before making adjustments or repairs. 3.
ELECTRICAL INFORMATION Grounding instructions IN THE EVENT OF A MALFUNCTION OR BREAKDOWN, grounding provides the path of least resistance for electric current and reduces the risk of electric shock. This tool is equipped with an electric cord that has an equipment grounding conductor and a grounding plug. The plug MUST be plugged into a matching outlet that is properly installed and grounded in accordance with ALL local codes and ordinances. DO NOT MODIFY THE PLUG PROVIDED.
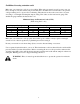
Guidelines for using extension cords Make sure your extension cord is in good condition. When using an extension cord, be sure to use one heavy enough to carry the current your product will draw. An undersized cord will cause a drop in line voltage resulting in loss of power and overheating. The table below shows the correct size to be used according to cord length and nameplate ampere rating. If in doubt, use the next heavier gauge. The smaller the gauge number, the heavier the cord.
KNOWING YOUR LOG SPLITTER A Hydraulic control lever I B C D E F G H Push rod Worktable Worktable guard Splitting wedge Rear of wedge Handle Bleed screw J K L M N O 8 Fluid fill & drain location with dipstick Front leg Motor Power cord Circuit breaker ON/OFF push switch Wheel
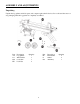
ASSEMBLY AND ADJUSTMENTS Unpacking Unpack the log splitter and all its parts, and compare against the list below. Do not discard the carton or any packaging until the log splitter is completely assembled.
Wheel assembly 1. Unscrew the lock nuts (EE) and flat washers (FF) from the wheel shaft (CC). 2. Insert the wheel shaft (CC) into the frame of the log splitter (AA) (Figure 2) and secure with the cotter pin (DD) (Figure 3). 3. Secure the wheels (O) to the wheel shaft (CC) using the lock nuts (EE) and flat washers (FF) (Figure 4). 4. Log splitter is fully assembled (Figure 5).
OPERATION WARNING: Read and thoroughly understand all instructions and safety information before operating this log splitter. Failure to do so may cause serious injury or death. Do not allow anyone to operate this log splitter who has not read this manual. As with all power equipment, a log splitter can be dangerous if assembled or used improperly. Do not operate this log splitter if you have doubts or questions concerning safe operation.
WARNING: ALWAYS LOOSEN THE BLEED SCREW PRIOR TO OPERATION. THIS WILL REMOVE ANY AIR TRAPPED IN THE HYDRAULIC SYSTEM. FAILURE TO RELEASE AIR FROM THE HYDRAULIC SYSTEM MAY DAMAGE THE SEALS AND PERMANENTLY DAMAGE THE LOG SPLITTER. 1. Loosen the bleed screw (H) Counter-clockwise one or two turns to allow air to be released from the hydraulic system. Note: A flow of air through the bleed screw should be detectable while the log splitter is in use. 2. Close the bleed screw (H) after operation.
Warning: If the log does not begin to split after 5seconds of operation, release both controls. The motor or hydraulic fluid may overheat and damage the machine. Remove a jammed log Warning: Do not attempt to remove a jammed log with your hand or try to knock it off the worktable. Doing so may cause injury and may also damage the splitting wedge. 1. Release the ON/OFF push button (N) and the hydraulic lever (A) to turn off the power and retract the push rod (B). 2.
MAINTENANCE Check the level of hydraulic fluid before each use. Replace the hydraulic fluid at the beginning of each season or if the fluid level is low. Use an AW32 hydraulic fluid for operation over 40°F and automatic transmission fluid for operation below 40°F. Check the hydraulic fluid level Warning: Lifting the log splitter is a two person operation. Once raised, make sure the log splitter is stable before performing any maintenance. 1. Make sure the bleed screw (H) is closed. 2.
Replace hydraulic fluid Warning: Lifting the log splitter is a two person operation. Once raised, make sure the log splitter is stable before performing any maintenance. 1. Place a 1 gallon (or larger) pan (NN, not included) under the motor end of the log splitter. 2. Use the hex wrench to loosen the fluid drain bolt (I) and remove the bolt with attached dipstick. 3. Raise the splitting wedge end of the log splitter to allow the fluid to drain into the pan. Lower the splitter when it is empty.
TROUBLESHOOTING Problem Logs will not split Hydraulic fluid leaks Push rod movement is jerky, makes unfamiliar noise or vibration. Cause Action Extension cord is too long or gauge is too low. Check extension cord to ensure the gauge of the cord is 10 or 12 AWG and that the cord length does not exceed 25 ft. Incorrect positioning of the log. Make sure the log is properly positioned on the worktable. The size or hardness or density of the log may exceed the capacity of the log splitter.
EXPLODED VIEW & PARTS LIST 17
Item 1 Stock # PS90-001 Description Motor Qty 1 Item 50 Stock # PS90-050 Description Shaft Qty 1 2 PS90-002 Rubber washer B 1 51 PS90-051 Bush for shaft 1 3 PS90-003 Nut M5 1 52 PS90-052 Hex nut 1 4 PS90-004 Column pin 2.
Item 99 Stock # PS90-099 Description Dustproof seal 100 PS90-100 Oil seal 30×2.65G 2 101 PS90-101 Oil seal 11.8×2.
TWO (2) YEARS LIMITED WARRANTY PowerSmart® is committed to building tools that are dependable for years. Our warranties are consistent with our commitment and dedication to quality. TWO (2) YEARS LIMITED WARRANTY OF POWER SMART PRODUCTS FOR HOME USE. PowerSmart (“Seller") warrants to the original purchaser only, that all PowerSmart consumer power tools will be free from defects in material or workmanship for a period of two (2) years from date of purchase.