
Operation Manual


POWXG2061 EN
Copyright © 2015 VARO P a g e | 8 www.varo.com
10 OPERATING INSTRUCTIONS
10.1 Prepare the machine
10.1.1 Assembling the Front handle
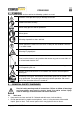
Fit the front handle absorber (A) on the rear tube (C). While aligning the hole (B) on the front
handle absorber、the position pin (F) on the barrier (E) and one position hole (D) of three on
the rear handle, fit the barrier on the rear handle and insert the position pin into the position
hole on the rear handle. Make sure the barrier is on the left side of the machine. (Fig. 8)
Push down the front handle (G), and then turn four screws (H) clockwise to tighten the front
handle securely. (Fig. 9)
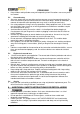
10.1.2 Connecting the tube (Fig. 10)
Align the hole (A1) on the front tube (A) and the lock pin (B). Then, Pull out the Lock pin, and
while inserting the front tube in the connector (D) to the end. After loosened the lock pin, it will
return to its original position automatically, and insert into the hole on the front tube.
Make sure the front tube can’t be rotated after the lock pin came back to its original position.
Turn the lock knob (C) clockwise to tighten the front tube securely.
10.1.3 Fitting blades
When fitting the cutting attachment it is extremely important that the raised
section on the top clamping plate/support flange engages correctly in the
centre hole of the cutting attachment. If the cutting attachment is fitted
incorrectly it can result in serious and/or fatal personal injury.
Never use a cutting attachment without an approved guard. See the chapter
on Technical data. If an incorrect or faulty guard is fitted this can cause
serious personal injury.
If a grass blade are to be used the machine must be equipped with the correct handlebar,
blade guard and harness.
10.1.4 Fitting cutting head (Hedge trimmer)
Fit the cutting head (B) on the shaft tube (A) so that the screw hole on the cutting head is
aligned with the position hole (A1) on the shaft tube as shown. Then, tighten the lock screw (D)
and the position screw (C) securely. (Fig. 11)
Changing the hedge trimmer angle
Press the safety lever (E). Then press the lock lever (F), at the same time hold the grip (G)
and turn the cutting head to a desired angle (α). (Fig. 12)
10.1.5 Adjusting the harness (Fig. 13)
WARNING! When using the machine it must always be hooked securely to
the harness. Otherwise you will be unable to control the brush cutter safely
and this can result in injury to yourself or others. Never use a harness with
a defective quick release.
Single shoulder harness: Put on the harness. Hook the machine onto the harness support
hook. Adjust the length of the harness so that the support hook is roughly level with your right
hip.