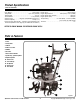
Operator’s Manual Front Tine Rotary Tiller Look inside for: Safety Definitions Important Safety Information Product Specifications Parts & Features Safety Decals Assembly Engine Preparation Operation Maintenance Technical Service Troubleshooting Warranty Español MODEL No. P-FTT-160MD-[E] P-FTT-160MD Page 1 2-4 5 5 6-7 7-9 10 11-14 15-16 17 18 19-22 24-26 IMPORTANT: Thank you for purchasing this Powermate® Tiller.
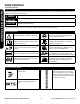
Safety Definitions • Save these instructions Important Safety Information Safety Alert Symbols The following symbols are used on the product and in this manual to alert the operator of potential safety hazards. Read them carefully, and understand their meaning. Indicates an imminently hazardous situation which, if not avoided, will result in death or serious injury. DANGER Indicates a potentially hazardous situation which, if not avoided, could result in death or serious injury.
Important Safety Information • Save all instructions 1. Carefully read and follow these safety instructions. Failure to do so can result in serious injury. 2. Know your product. Read and understand this manual before use. Compare the illustrations to unit. Learn location and function of all controls. Thoroughly understanding the unit before use will result in the best performance and safety. 3. Follow all instructions when assembling the unit.
Important Safety Information (Continued) • Save all instructions Important Safety Information OPERATION SAFETY (Continued) • Wear appropriate clothing such as a long sleeved shirt or jacket. Also wear long trousers or slacks. Do NOT wear shorts. Do NOT wear loose clothing, which could get caught in this equipment. • Always wear work gloves and sturdy footwear such as leather work shoes or short boots.
Important Safety Information (Continued) • Save all instructions • Always refer to the operator’s manual instructions for important details if the tiller is to be stored for an extended period. • Never store the tiller with fuel in the fuel tank inside a building where ignition sources are present such as water heaters, space heaters, clothes dryers, etc. • To reduce fire hazard, keep tiller free of grass, leaves, or other debris build-up. • Allow the engine to cool before storing in any enclosure.
Product Specifications • Save all instructions Unit Weight . . . . . . . . . . . . . . . . . . . . . . . . . . . . . . 110 lb (50kg) Tilling Width . . . . . . . . . . . . . . . . . . . . . . . . up to 21in (533mm) Tilling Depths . . . . . . . . . . . . . . . . . . . . . . . . . . . . . . . . . up to 8” Tine Diameter . . . . . . . . . . . . . . . . . . . . . . . . . . . 11 in (279mm) Gasoline Type . . . . . . . . . . Regular Unleaded/88 Octane (min.) Gasoline Capacity . . . . . . . . . . . . . . . . . . .
Safety Decals • Save all instructions This tiller has been designed and manufactured to provide you with the safety and reliability you would expect from an industry leader in outdoor power equipment manufacturing.
Assembly • Save all instructions If you need assistance or find any parts missing, CALL TOLL FREE: 1-800-737-2112. Read and follow the assembly instructions. Do not discard any parts or materials until the unit is assembled. References to the right or left side of the tiller are from the viewpoint of the operator’s position behind the tiller. WARNING Do not operate tiller if it is damaged or not completely and correctly assembled.
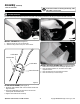
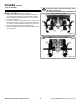
Assembly (Continued) • Save all instructions B If you need assistance or find any parts missing, CALL TOLL FREE: 1-800-737-2112. Assembly Instructions The tiller comes fully assembled except for a few parts. The following instructions will help you complete the tiller assembly. Figure 2 Figure 4a INSTALL THE WHEELS (See Figure 2) 1. Slide the wheel hub onto the wheel axle. 2. Add the locking washer and pin to secure wheel.
Assembly (Continued) • Save all instructions If you need assistance or find any parts missing, CALL TOLL FREE: 1-800-737-2112. INSTALL THE TINES (See Figure 5a and 5b) Sharp edge of tine should face down to the ground. 1. Slide the tines onto the tine axle. Install the internal tines first. Sharp edge of the tines should face down to till the ground. Tighten the M10x50 bolt with lock nut provided to secure the inside tines. 2.
Engine Preparation (Continued) • Save all instructions A Engine Oil SAE CAUTION Frequently check oil level while filling. DO NOT OVERFILL. DO NOT UNDERFILL. Running engine at improper oil level will seriously damage engine. SAE 10W-30 6. Replace and tighten dipstick. 7. Clean up any spilled oil. SAE 30 NOTE: THE TRANSMISSION CASE COMES FROM THE FACTORY WITH THE PROPER AMOUNT AND TYPE OF GEAR OIL.
Operation • Save all instructions A Pre-Start Inspection 1. Make sure all safety guards are in place and all nuts and bolts are secure. 2. Check oil level in engine crankcase. See your engine manual for procedure and specifications. 3. Inspect air cleaner for cleanliness. See your engine manual for procedure. 4. Check the fuel supply. Fill the fuel tank no closer than 1 inch from top of tank to provide space for expansion. See your engine manual for fuel recommendations. 5.
Operation (Continued) • Save all instructions C WARNING Stop the Engine 1. Move choke lever to “OFF” position. (Figure 10) TEMPERATURE OF MUFFLER AND NEAR BY AREAS MAY EXCEED 150˚F. AVOID THESE AREAS. DO NOT MOVE CHOkE CONTROL TO CHOkE TO STOP ENGINE, BACKFIRE OR ENGINE DAMAGE MAY OCCUR. TO STOP TINES AT ANY TIME, RELEASE CLUTCH LEVER TO NEUTRAL POSITION. ALWAYS RELEASE CLUTCH LEVER TO NEUTRAL POSITION AND STOP THE ENGINE bEFORE ADJUSTING THE DEPTH OF THE REGULATOR LEVER.
Operation (Continued) • Save all instructions H I Clutch Lever CAUTION Adjustments WARNING This information is provided here only to introduce the controls. Do not start the engine at this time. Starting and operating instructions are given on page 11. Please read this section and all operating and safety instructions before starting your tiller. WARNING DO NOT FIX THE CLUTCH LEVER IN DRIVE POSITION BY ANY OTHER MEANS THAN MANUALLY USING YOUR RIGHT HAND.
Operation (Continued) • Save all instructions I Adjustments (Cont.) BELT TENSION ADJUSTMENT (See Figure 14) Proper belt tension is critical to good performance. After 1/2 hour of operation, all cables may have to be adjusted due to initial stretch. Thereafter, check tension after every 2 hours of operation. To increase belt tension 1. Loosen upper jam nut. Turn nut up cable in 1/8” increments. 2. Tighten lower jam nut. 3. Check adjustment. Forward Cable TO DECREASE BELT TENSION 1.
Maintenance • Save all instructions A Maintenance Schedule WARNING Before performing any maintenance, turn engine off and remove the wire from the spark plug to prevent accidental starting and serious injury. IMPORTANT: The warranty on this tiller does not cover items that have been subjected to operator abuse or negligence. To receive full value from the warranty, the operator must maintain the tiller as instructed in this manual, and only use genuine replacement parts.
Maintenance (Continued) • Save all instructions B C Servicing the Tiller The following information will help you make the necessary checks and perform the procedures required to follow the normal care recommendations made for your tiller unit. If you prefer, your local authorized dealer can make these checks and perform the required procedures for you.
Maintenance (Continued) • Save all instructions D How to Prepare for Storage WARNING Never store the tiller indoors with fuel in the fuel tank. Never store in an enclosed, poorly ventilated area where fumes could reach an open flame, a spark or a pilot light as on a furnace, water heater or clothes dryer. Allow engine to cool before storing unit. WARNING Do not remove gasoline while inside a building, near a fire, or while you smoke. Gasoline fumes can cause an explosion or a fire.
Maintenance (Continued) • Save all instructions PROBLEM POSSIBLE CAUSE(S) SOLUTION(S) Engine difficult to start 1. Out of fuel 2. Engine Switch Off 3. Engine is not primed. 1. Add fresh fuel 2. Turn engine switch on 3. Turn choke on 4. Attach spark plug wire to spark plug 5. Remove spark plug. Inspect. Replace if necessary 6. Take unit to an authorized service center for Carburetor cleaning 7. Remove and clean air filter 8. Remove fuel filter. Inspect. Replace if necessary 9. Drain fuel tank.
Warranty • Save all instructions A Powermate® ROTARY TILLER Limited Warranty Always specify model number when contacting the factory. We reserve the right to amend these specifications at any time without notice. The only warranty applicable is our standard written warranty. We make no other warranty, expressed or implied.
Warranty (Continued) • Save all instructions B Emisson Control System Warranty This MAT Engine Technologies, LLC (METL) outdoor power equipment engine complies with the emissions regulations of: Powermate® Model No. Regulatory Agency P-FTT-160MD-[E] United States Environmental Protection Agency (“U.S. EPA”) P-FTT-160MD United States Environmental Protection Agency (“U.S.
Warranty (Continued) • Save all instructions Warranty Coverage: METL warrants that the product engine is free from defects in materials and workmanship which cause such engine to fail to conform with the U.S. EPA or State of California emissions standards for small spark-ignited nonroad (off-road) engines – as applicable to your METL product. Small spark-ignited off-road engines manufactured after January 1, 1995 and sold in the State of California and U.S.
Warranty (Continued) • Save all instructions Limitation of Liability (cont.
Manual de operación Motocultivadora rotativa con tren de azadas frontal MODELO N.
Definiciones de seguridad • Guardar estas instrucciones Información importante sobre seguridad Símbolos de alerta sobre seguridad Los símbolos siguientes se utilizan en el producto y en este manual para alertar al operador sobre riesgos potenciales de seguridad. Leerlos detenidamente y entender su significado. PELIGRO Indica una situación inminentemente peligrosa que, de no evitarse, producirá la muerte o lesiones graves.
Información importante sobre seguridad • Conserve todas las instrucciones 1. Leer detenidamente y seguir estas instrucciones de seguridad. El hacer caso omiso de éstas puede conducir a lesiones graves. 2. Conózcase el producto. Leer y entender este manual antes de utilizar la unidad. Comparar las ilustraciones con la unidad. Aprenderse la ubicación y función de todos los controles. Un entendimiento exhaustivo de la unidad antes de utilizarla redundará en rendimiento y seguridad óptimos. 3.
Información importante sobre seguridad (Continuación) • Conserve todas las instrucciones Información importante sobre seguridad SEGURIDAD DURANTE LA OPERACIÓN (Continuación) • Siempre usar guantes de trabajo y calzado robusto tal como zapatos de cuero para trabajo o botas cortas. Éstos protegen los tobillos y la tibia contra palos pequeños, astillas y otros despojos lanzados. Asimismo, éstos mejoran la tracción.
Información importante sobre seguridad (Continuación) • Conserve todas las instrucciones • Siempre consultar las instrucciones del Manual del operador para obtener información importante pormenorizada si se va a guardar la motocultivadora durante un período de tiempo prolongado. • Jamás almacenar la motocultivadora con combustible en el tanque dentro de un edificio donde haya fuentes de ignición tales como calentadores de agua, calentadores unitarios, secadoras de ropa, etc.
Especificaciones del producto • Conserve todas las instrucciones Peso de la unidad . . . . . . . . . . . . . . . . . . . . . . . . . 50kg (110 lb) Anchura de labranza . . . . . . . . . . . . . . . . hasta 533mm (21 in) Profundidad de labranza . . . . . . . . . . . . . . . hasta 203mm (8 in) Diámetro de azada . . . . . . . . . . . . . . . . . . . . . . . 279mm (11 in) Tipo de gasolina . . . . . . Regular, sin plomo, 88 octanos (mín.) Capacidad de gasolina . . . . . . . . . . . . . . . . . . . . . 1 L (1.
Marbetes de seguridad • Conserve todas las instrucciones Esta motocultivadora se ha diseñado y fabricado para brindar la seguridad y confiabilidad que se debería esperar de un líder de la industria en la fabricación de equipo motorizado para espacios exteriores.
Montaje • Conserve todas las instrucciones Si se necesita ayuda o falta alguna pieza, LLAMAR GRATUITAMENTE AL: 1-800-737-2112. Leer y seguir las instrucciones de montaje. No descartar ninguna pieza o materiales sino hasta que la unidad esté montada. Las referencias al lado derecho o izquierdo de la motocultivadora toman como base el punto de vista desde la posición del operador detrás de la motocultivadora.
Montaje (Continuación) • Conserve todas las instrucciones B Si se necesita ayuda o falta alguna pieza, LLAMAR GRATUITAMENTE AL: 1-800-737-2112. Instrucciones de montaje Excepto por unas cuantas piezas, la motocultivadora viene completamente montada. Las instrucciones siguientes ayudan a completar el montaje de la motocultivadora. Figura 2 Figura 4a INSTALAR LAS RUEDAS (véase la figura 2) 1. Deslizar el cubo de la rueda sobre el eje de las ruedas. 2.
Montaje (Continuación) • Conserve todas las instrucciones Si se necesita ayuda o falta alguna pieza, LLAMAR GRATUITAMENTE AL: 1-800-737-2112. INSTALAR LAS AZADAS (véase las figuras 5a y 5b) El borde afilado de las azadas debe estar orientado hacia abajo para labrar el terreno. 1. Deslizar las azadas sobre el eje del tren de azadas. Instalar las azadas internas primero. El borde afilado de las azadas debe estar orientado hacia abajo para labrar el terreno.
Preparación del motor • Conserve todas las instrucciones A Aceite para motor al límite superior de la varilla medidora. Si el nivel de aceite está cerca del límite inferior o por debajo del mismo, se ha de agregar aceite. (Véase la figura 7) 5. Agregar aceite lentamente hasta que el nivel del aceite llegue al límite superior de la varilla medidora. Utilizar un embudo o boquilla para evitar derrames.
Operación • Conserve todas las instrucciones A B Inspección prearranque 1. Asegurarse que todas las protecciones de seguridad estén en posición y que todas las tuercas y pernos estén seguros. 2. Verificar el nivel del aceite en el cárter del cigüeñal. Consultar el procedimiento y las especificaciones en el manual del motor. 3. Inspeccionar el estado del filtro de aire. Consultar el procedimiento en el manual del motor. 4. Revisar el nivel de combustible.
Operación (Continuación) • Conserve todas las instrucciones D Velocidad de operación Para labrado normal, colocar la palanca del regulador en «fast» («rápida»). E Apagado Para parar el motor en cualquier momento, mover la palanca del embrague a la posición de apagado («OFF»). Para detener las azadas en cualquier momento, soltar la palanca del embrague. F Modo de transporte y modo de labranza Modo de transporte (véase la figura 11) Plegar la rueda bajo el motor para facilitar el transporte.
Operación (Continuación) • Conserve todas las instrucciones H I Palanca del embrague CUIDADO Esta información se proporciona aquí solo para introducir los controles. No arrancar el motor todavía. Las instrucciones de arranque y operación aparecen en la página 11. Léase esta sección y todas las instrucciones sobre operación y seguridad antes de arrancar la motocultivadora.
Operación (Continuación) • Conserve todas las instrucciones I Ajustes (continuación) AJUSTE DE LA TENSIÓN DE LA CORREA (véase la figura 14) La tensión correcta de la correa es crítica para un buen rendimiento. Después de media hora de funcionamiento, se podría tener que ajustar todos los cables debido al estiramiento inicial. Sucesivamente, revisar la tensión después de cada 2 horas de operación. Para aumentar la tensión de la correa Cable de marcha de avance 1.
Mantenimiento • Conserve todas las instrucciones A Programa de mantenimiento ADVERTENCIA Antes de cualquier tarea de mantenimiento, apagar el motor y retirar de la bujía el cable de ésta para evitar un arranque accidental y lesiones graves. IMPORTANTE: La garantía de esta motocultivadora no cubre elementos que se han visto sujetos a uso indebido o negligencia del operador.
Mantenimiento (Continuación) • Conserve todas las instrucciones B C Mantenimiento menor de la motocultivadora La información siguiente ayudará a efectuar las revisiones necesarias y llevar a cabo los procedimientos requeridos para seguir las recomendaciones del cuidado normal provistas para la motocultivadora. Si se prefiere, el concesionario local autorizado puede efectuar estas revisiones y llevar a cabo los Mantenimiento del motor Mantenimiento del motor ajustarse el motor o el equipo.
Mantenimiento (Continuación) • Conserve todas las instrucciones D Cómo preparar la motocultivadora para almacenamiento ADVERTENCIA Jamás almacenar la motocultivadora en espacios interiores con combustible en el tanque. Jamás almacenarla en un área encerrada, con ventilación deficiente donde los vapores podrían llegar a una llama abierta, una chispa o una luz piloto como la de un horno, calentador de agua o secadora de ropa. Dejar que el motor enfríe antes de almacenarse la unidad.
Diagnóstico y resolución de problemas • Conserve todas las instrucciones PROBLEMA CAUSA/S POSIBLE/S SOLUCIÓN / SOLUCIONES Dificultad para arrancar el motor 1. Sin combustible 2. Interruptor del motor apagado 1. Agregar combustible fresco 2. Colocar el interruptor del motor en la posición de encendido 3. Activar el estrangulador 4. Conectar el cable de la bujía a la bujía 5. Retirar la bujía. Inspeccionarla. Reemplazarla si fuera necesario. 6.
Garantía • Conserve todas las instrucciones A Garantía limitada de la Motocultivadora rotativa con tren de azada posterio Powermate® Al contactar la fábrica, siempre especificar el número del modelo. Nos reservamos el derecho de enmendar estas especificaciones en cualquier momento y sin aviso previo. La única garantía pertinente es nuestra garantía estándar por escrito. No ofrecemos ninguna otra garantía, expresa o implícita.
Garantía (Continuación) • Conserve todas las instrucciones B Garantía del sistema pro control de emisiones contaminantes Este motor de MAT Engine Technologies, LLC (METL, por sus siglas en inglés) para equipo mecánico para espacios exteriores cumple el reglamento sobre emisiones contaminantes de: Modelo Powermate® n.º Entidad normativa P-FTT-160MD-[E] Agencia de Protección Ambiental de Estados Unidos (“U.S.
Garantía (Continuación) • Conserve todas las instrucciones Cobertura de la garantía: METL garantiza que el motor del producto carece de defectos en materiales y mano de obra que causen que dicho motor no observe las normas de la U.S. EPA o el Estado de California sobre emisiones contaminantes de motores pequeños para uso no vial y encendido por chispa, según sea pertinente al producto de METL.
Garantía (Continuación) • Conserve todas las instrucciones Limitación de responsabilidad: SISTEMAS CUBIERTOS POR ESTA GARANTÍA: DESCRIPCIÓN DE LAS PIEZAS: Sistema de medida del combustible Unidad del carburador (si está provisto) y sus componentes internos; filtro de combustible (si está provisto), empaques del carburador, bomba del combustible (si está provista) Sistema de inducción de aire Tubo / múltiple de admisión, limpiador de aire Sistema de ignición Bujía1, módulo / bobina de encendido Sist