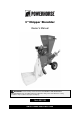
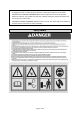
3" Chipper Shredder Owner’s Manual WARNING: Read carefully and understand all ASSEMBLY AND OPERATION INSTRUCTIONS before operating. Failure to follow the safety rules and other basic safety precautions may result in serious personal injury.
Thank you very much for choosing a Powerhorse™ product! For future reference, please complete the owner’s record below: Serial Number/Lot Date Code: ________________________________ Purchase Date: ____________________________________________ Save the receipt, warranty, and this manual. It is important that you read the entire manual to become familiar with this product before you begin using it. This Chipper Shredder is designed for certain applications only.
Table of Contents Intended Use .......................................................................................................................................... 4 Technical Specifications ...................................................................................................................... 4 Important Safety Information ............................................................................................................... 4 Specific Operation Warnings .......................
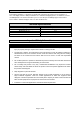
Intended Use This Chipper Shredder is a great way to quickly turn yard waste into ground cover for gardens or trees. The highly effective cutting mechanism uses 2 hardened chipping knives, 10 hammers, and 10 shredding blades. The dual feed enables you to use the drop-in shredding hopper for brush and leaves and the dedicated chipper chute for sticks and branches. Technical Specifications Property Max. Cutting Thickness (in.) Displacement (cc) Maximum RPM HP Specification 3 212 3600 6.
⚠CAUTION HIGH ALTITUDE OPERATION Operating at an altitude of greater than 2000 feet (610 meters) may affect your engines performance, fuel consumption, and emissions. To remain emissions compliant and improve engine performance at higher altitudes, a high-altitude kit is required. A high altitude kit includes a carburetor jet resized to help correct air / fuel mixture at altitude. To order a high altitude kit or if you have additional questions, go to www.northerntool.com or contact us at 1-866-443-2576.
Stay alert, watch what you are doing, and use common sense when operating the tool. Do not use the tool while you are tired or under the influence of drugs, alcohol, or medication. A moment of inattention while operating the tool may result in serious personal injury. Dress properly. Do not wear loose clothing, dangling objects, or jewelry. Keep your hair, clothing and gloves secure. Loose clothes, jewelry, or long hair can be caught in branches and pulled into the shredder.
operate the Chipper Shredder with a damaged part. Store the Chipper Shredder when it is not in use. Store it in a dry, secure place out of the reach of children. Inspect the tool for good working condition prior to storage and before re-use. Use only accessories that are recommended by the manufacturer for use with your Chipper Shredder. Accessories that may be suitable for one product may create a risk of injury when used with another tool.
complete stop, and disconnect the spark plug wire before moving the machine, emptying the bag, unclogging the inlets or outlets, filling the gas tank, or performing maintenance and repairs. STARTING THE CHIPPER SHREDDER: Make sure the hopper and funnel are empty when starting the machine. The pull start cord may stop suddenly causing the Chipper Shredder to fall over or injure your hand or arm.
Page 9 of 28
Page 10 of 28
Page 11 of 28
Main Parts of Chipper Shredder Chipper Shredder Identification Reference A B C D E F G H I J K L Subassembly Hopper Motor Chip Outlet Chipper Funnel Choke Fuel Cock ON/OFF Switch Throttle Fuel Tank Cap Air Cleaner Exhaust Pull Start Handle Site Considerations Location The Chipper Shredder must be placed on a firm, flat, grass or dirt surface to prevent the machine from tipping. DO NOT place the machine on concrete, asphalt, or other hard surfaces.
Working Clearances Consider the length of the material to be processed through the machine and make sure that there is enough height above the Chipper Shredder to accommodate the material. Make sure the unit is located close to the area where the chips are going to be used to reduce carrying. Stay clear of the discharge area. Make sure all bystanders, children, pets, or objects that you do not want damaged or covered in chips, are clear of the discharge area.
2. 3. 4. Attach the wheel assembly and the leg with the bolts that were removed in Step 1. Attach the tow bar to the wheel assembly with the tow bar bolt that is attached. Place the handle on the hopper and line up all of the holes. Secure it with the flat washer (Ø8, 4pcs), the spring washer (Ø8, 4pcs), and the bolt (M8x20, 4pcs). See Pic.3. Pic.3 Installing the Handle 5.
Filling the Engine Oil ⚠WARNING Never open oil fill port while engine is running. Hot oil can spray over face and body. Place the machine on a level surface and remove the oil filler cap (Pic.5, 5.1). Add the engine oil up to the upper level of the dipstick (Pic.6, 6.1). Filling the Fuel Tank The Chipper Shredder is powered by a four-stroke engine, which uses unleaded gasoline fuel.
any projects. This Chipper Shredder does not have oil in the motor when shipped. Add oil before operating the Chipper Shredder, or the motor will seize. Chipping/Shredding Understand and follow all of the safety precautions listed in the safety warnings and cautions before operation. This Chipper Shredder is intended for mulching garden and pruning waste such as green branches, twigs, brush, vines, and long grasses.
3. Turn the engine ON/OFF switch to the ON position (Pic.10, 10.1). 4. Hold down the engine firmly with one hand on the frame. With the other hand, grip the recoil starter cord handle and pull slowly until resistance is felt indicating that the recoil starter is engaged. When resistance is felt, pull the cord sharply (Pic.11). Continue this procedure until the engine starts. 5. When the engine has been successfully started and is running smoothly, return the choke lever to the OFF position (Pic.12, 12.1).
To Stop the Chipper Shredder To stop the engine, turn the engine ON/OFF switch to the OFF position. See Pic.14, 14.1. When the engine has stopped and before storage, turn the fuel lever to the OFF position as shown in Pic.15, 15.1. To Shred Twigs, Leave, and Brush 1. 2. Slowly pour the material into the hopper. DO NOT try to stuff too much material in at one time or the machine will jam. Use a 1" diameter branch to push the material into the hopper if necessary. See Pic.16. DO NOT use your hands! Pic.
To Chip Branches 1. 2. 3. Stand to the side of the hopper and make sure you have a stable stance and firm footing. Remove twigs and smaller branches from the branch in case they catch on the edges of the funnel and prevent the branch from going in. Place branches into the funnel, thick end first, and allow the blades to draw the branch into the funnel. See Pic.17. Pic.17 Chipping branches Chipping Tips DO NOT feed material larger than the diameter indicated on the funnel cover into the funnel.
Visual Inspection Before and after using the Chipper Shredder, closely inspect the machine for loose parts and damage. Check the hopper, hopper guard, and funnel for cracks, holes, and loose bolts. Check the box frame for cracks or damage. Check the entire machine for loose bolts or screws. Check the blades and hammers for cracks and dings. Check the engine oil level. Cleaning Clean the machine after each use. Allow the motor to cool and remove the spark plug wire.
Air Filter After every 100 hours of running or every month, the air filter (Pic.19, 19.1) should be removed, examined for deterioration, and cleaned. Clean the air filter thoroughly using environmentally friendly water based degreasing agent. Allow to dry fully then replace the air filter. Warning! Never run the engine without the air filter fitted. Fuel Tank Filter After every 150 hours of running or every three months the fuel tank filter (Pic.20, 20.1) should be removed and cleaned.
Replacing V-Belt Replace or tighten the V-belt if you notice the motor running and the chipper blades are not spinning. 1. 2. TURN OFF THE MACHINE, ALLOW ALL MOVING PARTS TO COME TO A COMPLETE STOP, AND DISCONNECT THE SPARK PLUG WIRE! Remove the V-belt cover as shown in Pic.22. 3. 4. Roll the belt off of the pulleys and install the new belt. Replace the V-belt cover and re-attach the spark plug wire. Storage Follow these guidelines when storing your Chipper Shredder.
Troubleshooting ⚠WARNING Turn OFF the machine, allow all moving parts to come to a complete stop, and disconnect the spark plug wire before moving the machine, emptying the bag, unclogging the inlets or outlets, filling the gas tank, or performing maintenance and repairs. Review the troubleshooting and procedures in this section to fix your machine if a problem develops. Failure Possible Cause Corrective Action Engine will not start. 1. Control levers are not in correct positions for starting. 1.
Failure Possible Cause Corrective Action chute or come out slowly. 2. Insufficient motor RPMs. 2. Move the throttle to FAST.
Parts List Reference Name Qty Reference Name Qty 1 2 3 4 5 6 7 8 9 10 11 12 13 14 15 16 17 6 56 3 1 57 1 1 6 29 1 1 1 1 1 1 1 2 42 43 44 45 46 47 48 49 50 51 52 53 54 55 56 57 58 4*16 Rivet 8*24*2 Flat Washer 13" pneumatic wheel Stand bar Axle Screw M8*40 Dishing Nut M6 Gasket 6 Engine Plate Taper Gasket 8 Pothook Guard 7 HP Engine Hopper Gasket Belt Cover Protecting Plate 4.
Replacement Parts For replacement parts and technical questions, please call Customer Service at 1-800-222-5381. Not all product components are available for replacement. The illustrations provided are a convenient reference to the location and position of parts in the assembly sequence. When ordering parts, the following information will be required: item description, item model number, item serial number/item lot date code, and the replacement part reference number.
Limited Warranty Northern Tool and Equipment Company, Inc. ("We'' or "Us'') warrants to the original purchaser only ("You'' or “Your”) that the Powerhorse product purchased will be free from material defects in both materials and workmanship, normal wear and tear excepted, for a period of two year from date of purchase. The foregoing warranty is valid only if the installation and use of the product is strictly in accordance with product instructions.
Distributed by: Northern Tool & Equipment Company, Inc. Burnsville, Minnesota 55306 www.northerntool.