PowerHome™2 Quick Start Guide Now with Quick SetUp Wizards Empower Your Home™ With PowerHome Copyright © 1999,2008 PowerHome Automation, LLC PowerHome™ and Empower Your Home™ are Trademarks of PowerHome Automation, LLC Web: http://www.Power-Home.com Email: support@Power-Home.
TABLE OF CONTENTS TABLE OF CONTENTS ................................................................................................... 2 Special Notice..................................................................................................................... 3 Introduction........................................................................................................................ 4 A Brief Message for Beginners ...........................................................................
Special Notice Please see the WHATS NEW section of the README.RTF file included in the PowerHome2 software for the latest information about PowerHome2.
Introduction PowerHome2 is an extremely powerful and flexible Windows based software package that will give you full control over your home’s lighting, appliances, infrared, audio and video devices when used in conjunction with the appropriate control hardware.
Installation 2.1 Installing PowerHome2 PowerHome2 can be downloaded from http://www.power-home.com and is fully functional with a 30 day evaluation period. After the evaluation period has expired, PowerHome2 will not send commands to hardware controllers and will have to be registered. You may purchase an unlock key from the above website. If you are installing PowerHome2 for the first time, just run the setup.exe file and follow the instructions on the screen.
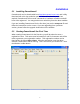
2.2 The Wizards PowerHome2 includes four Wizards that help you get PowerHome2 up and running quickly. The Controller Wizard guides you through setting up your Insteon, UPB or X-10 controller. The Device Wizard guides you through setting up your Insteon, UPB or X-10 Devices (e.g. lighting switches). The Timed Event Wizard helps you set up basic control of your automation devices based upon time. For example, setting an outside light to turn on at Dusk.
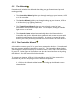
2. Click on the radio button next to “Controllers (Tell PowerHome what lighting controllers you have)”. 3. Click Next.
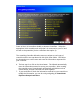
4. Click on the appropriate radio button. 5. Click Next. If you chose Insteon, you will see this screen: There are six different Insteon Controllers available. Check your controller and make sure it’s connected to both your PC and power and choose the correct radio button.
PowerHome2 does not recreate the functionality of the free UpStart program that comes with UPB. First, setup your PIM via UpStart. Then import those settings into PowerHome using the wizard. PowerHome then can control your UPB devices in many sophisticated ways.
Some of the X-10 controllers double as Insteon Controllers. Select the appropriate X-10 controller and verify that it is connected to your PC and as well as the powerline (for the controllers that require it). The remaining Controller Wizard screens are unique to each type of controller and are not reproduced in this Quick Start Guide. Just follow the instructions on each screen and enter the information requested for your controller. 6. The last step is to click on the Next button.
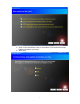
2.2.2 The Device Wizard The Device Wizard lets you tell PowerHome2 what Devices (eg. light switches) you have in your home. This is done automatically if possible, manually if automatic is not available, or a combination of both methods. 1. Click on the Wizard toolbar button 2. Click on the Devices radio button. 3. Click Next. 11 to bring up the Wizard screen.
3. Choose the type of Device you have. If you have more than one type of device you can run the Device Wizard a second and third time later. 4. Click Next. 2.2.2.1 Insteon Devices For Insteon Devices you have three ways of telling PowerHome2 about those devices. a. You can manually add each device. To add the device manually you have to know the address of each Insteon device. The address of an insteon device is a 6 digit hexadecimal number usually found on the front of the device.
link mode, you visit the next device to continue the Auto Discovery process. 5. Click on the appropriate radio button. 6. Click Next. The remaining Device Wizard screens for Insteon Devices are unique to each type of discovery method and are not reproduced in this Quick Start Guide. Just follow the instruction on each screen and enter any information requested for your device. 7. After you have gone through each screen Click Next and then Click Exit.
To enter this information navigate to PowerHome Explorer>Devices>Insteon>Units or click the Insteon Explorer toolbar button and go to the Devices tab. You can enter the information in either screen. Make sure to press F5 (PowerHome Explorer) or the Save/Refresh (Insteon Explorer) after you have entered the name, description and location to save the information. 2.2.2.
2. Enter the file name and path of your UPStart export file. Or follow the directions on the screen to start UPStart and create an export file.
3. Click Next. The import process is fairly quick and when complete, will give you the following screen: 2.2.2.3 X-10 Devices X-10 Devices can be added manually to PowerHome through the wizard and is relatively simple.
Enter the housecode, unitcode, description, and a location. Click Next.
As with the other Device wizard screens, PowerHome will automatically generate a device ID for you which you can accept or change. You’ll also need to select the appropriate X-10 device type. Click Next and your X-10 device will be created. 2.2.3 The Timed Events Wizard Timed Events is a powerful feature of PowerHome2. It allows you to control a home automation device at a certain day, date and time and to repeat that event at a frequency you choose.
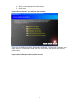
5. Choose the date and time to start the Timed Event. 6. Click Next. 7. On the following screen either click on Next or chose an Offset type to the Timed Event such as Sunrise, Sunset, Dawn or Dusk and then an offset amount. Click Next.
8. Choose the type of device you want to control from the dropdown list (e.g. Insteon, X-10, UPB). 9. Choose the actual device you want to control from the dropdown list (e.g. Kitchen Light). 10. Choose the action you want to be performed at the specified time (e.g. on, off, dim). 11. Add additional information that might be necessary for the particular action you chose (e.g. if you chose Dim, you must enter a value like 50 to indicate the dim level.) 12. Click Next.
The following screen summarizes the Timed Event you have just created. 13. Click Next.
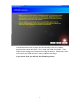
To check or modify the Timed Event you just created, navigate to the PowerHome Explorer>Timed Event. 2.2.4 The Control Center Wizard Using the Control Center you can create varied graphical screens depicting and controlling your home automation devices.
automation devices it finds entered in PowerHome2 either through the Device Wizard or manually. If you later add (or remove) devices you can rerun the Control Center Wizard and it will delete the old screens and create new ones. The screens added by the Control Center Wizard can also be changed by you at any time by right clicking on a blank space on a Control Center screen and clicking on Open Design View.
The Control Center is one of the many ways you can control your home automation devices using PowerHome2. The Control Center screen the Control Center Wizard has created for you is a beginner’s version with basic functionality and graphics. One of the great things about PowerHome2 is that you can create as many Control Center screens as you want. You can make each Control Center screen a specific size to fit a touch screen or phone (for web access), have simple graphics or complex graphics.
Appendix Key Features of PowerHome Insteon and X-10 Control via PowerLinc Controller V2 (Serial and USB) or the Powerline Modem (PLM) UPB support via any PIM after configuration of UPB devices with the free UPSTART program Supports all Insteon Devices, auto discovery, software linking and spidering Full KPL (Keypad), Remotelinc, IRLinc, and Insteon Thermostat support Supports Elk M1 Gold (Serial and Ethernet) Fully programmable interface via your choice of languages.
Remote Access Server Dialup control licensed from SocketWrench System Requirements Windows NT/2000/XP/Vista Pentium 233 MHZ with 128 megs of RAM recommended minimum for voice recognition.