PowerFile TM C D/ D V D Cha n g e r U s e r Gui d e For Models: C200S C200 Studio R200
T a b l e o f C o n t e n t s Introduction ...........................................................................................................................................3 Systems Requirements ......................................................................................................................3 Unpacking the Changer......................................................................................................................4 Instructions for Windows PC Users .........
Instructions for Macintosh Users.....................................................................................................35 Installing the PowerFile software on the host Macintosh computer ...............................................35 Installing the PowerFile software on client Macintosh computers ..................................................36 Connecting PowerFile Changers to the host Macintosh computer ................................................36 PowerFile Changer back panel ...
Introduction Introduction Thank you for purchasing this PowerFile CD/DVD Changer. PowerFile offers a broad spectrum of innovative and cost-effective solutions for archiving, storing, retrieving, and sharing digital media on CDs and DVDs. Utilizing CD/DVD-ROM drives (C200 and C200S) or CD/DVD-RAM drives (R200) and a 3-port IEEE 1394 interface, PowerFile Changers provide fast data access in a single or multi-user environment.
Introduction Unpacking the Changer Make sure that you have the following items: • • • • • • • • • Changer Power cord 2-meter IEEE 1394 cable Documentation pack containing: QuickStart Guide Software Install and Documentation CD PowerFile Cumulus Software CD PowerFile Cumulus Software Install instructions card Registration card Note: Keep all packaging materials in case you need to move or ship the Changer at a later time.
Instructions for Windows Instructions for Windows PC Users Note: it is VERY IMPORTANT that you follow certain procedures prior to connecting and configuring your PowerFile Changer. These procedures include disabling the System Standby Mode, loading the PowerFile MediaFinder software, and checking for proper installation of the PowerFile drivers. These procedures are outlined below.
Instructions for Windows Page 6
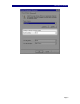
Instructions for Windows Disabling System Standby feature - Windows 2000 Go to Control Panel, and select Power Options You will see the following window: Set system standby to never.
Instructions for Windows PowerFile MediaFinder software PowerFile MediaExplorer software for the PC has been tightly integrated into Windows Explorer by adding shell extensions that enhance Explorer with Changer functionality. In this way, controlling PowerFile Changers is a seamless experience for users familiar with the Explorer interface. Installing PowerFile MediaFinder software on the host PC 1 2 3 Load the PowerFile software CD into the CD drive of the host PC.
Instructions for Windows PowerFile Changer back panel Once the Changer has been connected to the host system, go the appropriate driver installation check procedure below for your operating system. Checking for proper driver installation - Windows 98SE / Windows Me Once the PowerFile MediaFinder software has been installed and the Changer has been connected to the host system as outlined above, you can check for proper driver installation.
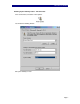
Instructions for Windows Highlight the "STARMATIX..." or "PowerFile..." item in the "Other Devices" folder and click on the "Properties" button near the bottom of this window.
Instructions for Windows In this window, click on the "Reinstall Driver" button, which will bring up the following Update Device Driver Wizard dialog box: The default selection in this box should be the CD-ROM drive - be sure this is checked, and click Next> to bring up the next Update Device Driver Wizard dialog box: Page 11
Instructions for Windows This screen shows that the driver has been located on the PowerFile software CD. Click Next> to have the driver installed. You will see the last Update Device Driver Wizard Dialog box: Click Finish to finish the driver installation.
Instructions for Windows Checking for proper driver installation - Windows 2000 Once the PowerFile MediaFinder software has been installed and the Changer has been connected to the host system as outlined above, you can check for proper driver installation. With the MediaFinder software install disc still in the CD drive of the host system, depress the power button on the Changer to power up the unit.
Instructions for Windows Right click on the "STARMATIX INC...", or "PowerFile...
Instructions for Windows In this window, click on the Reinstall Driver button.
Instructions for Windows click next > to have the Device Driver Wizard search for the driver.
Instructions for Windows Be sure to check CD-ROM drives, and uncheck any other boxes in this window, so that only the PowerFile software install CD (which should still be in the host PC drive) is searched. The Device Driver Wizard will find the appropriate drivers on the PowerFile install disc, and will display the following window: Click Next > to have the driver installed. When the driver has been loaded, you will see a window indicating that the driver has been successfully installed.
Instructions for Windows Installing the PowerFile software on client PCs Any PCs that share the network with the host system can become clients, with access to the Changers that are connected to the host PC and are shared. Once the PowerFile software has been loaded on the host PC, the client software can be loaded on the client PCs. The client software must be loaded from the PowerFile Software Install disc.
Instructions for Windows PowerFile Changer front panel The buttons and features on the front panel of the PowerFile Changer are described below. Load/unload slot This is the front slot where discs are loaded into and unloaded from the Changer. Discs must be loaded with the “data” side on the left and the “label” side on the right. Display window This two-line LCD readout displays unit status and messages. Power button This is the button that powers on and turns off the Changer.
Instructions for Windows Mode The Mode button provides administrative functions on the Changer. By pressing this button, you can scroll through a series of functions. These functions appear in the display window in the following sequence: Library, listed by CD title This window lists alphabetically the discs currently in the Changer. Use the scroll buttons to scroll through the list. The window identifies which carousel slot the disc is in and the name of the disc.
Instructions for Windows Terms used in this guide Throughout this guide, several terms are used in reference to the moving of discs into and out of the Changer, and into and out of the drives within the Changer. The following are definitions of these commonly used terms: PowerFile MediaFinder Software PowerFile Monitor Part of the PowerFile software is the PowerFile Monitor. When the Monitor software is running, it monitors the host PC, detecting when PowerFile Changers are connected to the system.
Instructions for Windows PowerFile Changer files and directory structure When the PowerFile software is installed on the host PC, it creates a "PowerFile" folder. The folder name will indicate the PowerFile Changer model number. This folder will be created within the Program Files directory. The PowerFile Monitor software is also installed. This software monitors and detects when Changers are connected to the host. (Refer to the “PowerFile Monitor software” section of this guide.
Instructions for Windows Accessing Changers from PC desktops PowerFile Changers can be accessed from the host and from client PCs that have PowerFile software installed. The process for accessing PowerFile Changers through the PC desktop is the same for either host or clients; however, access to Changers and discs from a client is subject to these conditions: • • The master Changer folders on the host PC must be shared (using standard Windows sharing function).
Instructions for Windows Option B—Loading discs from the host PC desktop To load discs into the Changer, there are two ways to gain access from the desktop: Through the Changer icon on the desktop Go to directory views within Explorer From the desktop icon: Right-click on the Changer icon for the Changer you wish to access, and select Changer Load or Changer Bulk-Load, then follow the instructions below.
Instructions for Windows Identifying and naming discs When discs are loaded into the Changer, a file is created for each disc. These files are initially listed as UnknownDisc, followed by a number (for example, UnknownDisc_002). The identify process moves each of the selected discs into a drive, the drive reads the disc, and if there is a volume name associated with that disc, that name replaces UnknownDisc.
Instructions for Windows Accessing/playing discs (host or client) To access/play a disc from the Changer, the disc must be mounted into one of the Changer drives. Mounting discs from the host PC To mount a disc into a Changer drive from the host PC desktop, navigate to the appropriate Changer folder to view a list of the discs in that Changer. Right-click on the desired disc, choose Mount from the submenu, then select an available drive to mount the disc into.
Instructions for Windows Writing to DVD-RAM Discs (R200 only) Handling DVD-RAM media DVD media is sensitive to dust and fingerprints. Carefully handle media by its edges only. If a DVD movie skips or hangs during playback, clean the media. Most DVD video playback issues are media-related and can be remedied by proper handling and care of media. Cleaning Media Try to avoid touching the read area (underside) of the disc as dirt and smears will degrade the disc accessing speed.
Instructions for Windows To format media You can format one disc, or multiple discs, as shown below: To format a single disc, right-click on the disc and select 'Format DVD-RAM Disc..." from the submenu. To format multiple discs, control-click to select multiple discs, and select 'Format DVD-RAM Discs..." from the submenu. Either of the options above will bring up the following format dialog box: At the top of this box, you may give the media a name.
Instructions for Windows Once you click the 'Format' button, you will see a progress bar along the bottom, indicating the progress of the disc being formatted. Recording data onto DVD-RAM disc To record data onto a DVD-RAM disc once it has been formatted, mount the disc in a Changer drive. (see Accessing/playing discs (host or client) above). When a disc has been mounted in a Changer drive, a drive letter is assigned to that disc (Such as Drive E:).
Instructions for Windows Disc organization When PowerFile Monitor is running on the host PC (see the “PowerFile Monitor” section of this guide), the Changers connected to the host PC are detected, and folders are created for each Changer. The folders are named with sequential numbers (Changer 1, Changer 2, Changer 3, etc.). These folders are considered to be the master folders for the Changer contents, containing a list of all the discs in that Changer.
Instructions for Windows Subfolders Creating a new subfolder To create a new subfolder in a Changer folder, use standard PC folder-creation functions (right-click, choose New, then select Folder) Renaming a subfolder Click on the subfolder to highlight it and use standard PC file-renaming functions (rightclick, then select Rename). Moving a subfolder To move a subfolder, simply click on it and drag it to a new location within the Changer folder.
Instructions for Windows Unmounting discs from Changer drives Note: Because discs can be accessed by multiple users in a networked environment, the PowerFile software will not allow a disc to be unmounted if it is being accessed by another user. In the event a user tries to unmount a disc that another user is accessing, the following message appears: There are open files on this volume. The disc cannot be unmounted until all files on that volume are closed.
Instructions for Windows Disconnecting / removing Changers Disconnecting / removing R200S Studio Writer Changers All PowerFile Changer's are 1394 devices. The 1394 standard theoretically allows you to “hot unplug” them — that is, there is usually no need to power down or reboot your PC for installation or removal of the Changers. However, because the R200S can write as well as read discs, PowerFile recommends that you shut down the host system prior to disconnecting the Changer.
Instructions for Windows Unsafe Removal notification When you disconnect or power off a Changer without 'Stopping the Device", you will get an 'Unsafe Removal of Device' message on your PC screen. This is normal. Although the notification that appears on your screen suggests disconnecting the devices by using either the hotplug icon in the status bar (Windows 98SE and Windows Me) or the Hardware Wizard in the Control Panel (Windows NT), there is no need to follow this direction.
Instructions for Macintosh Instructions for Macintosh Users Installing the PowerFile software on the host Macintosh computer Determine which Macintosh system the Changer will be connected to; this will be the host system, and the user of this system will be designated as the Administrator. On the host system: 1. Load the PowerFile software CD into the CD drive of the host computer. 2. Double-click on the CD icon on the desktop to view the contents of the CD. 3.
Instructions for Macintosh Installing the PowerFile software on client Macintosh computers To access PowerFile Changers from other Macintosh systems (clients) on your network, the PowerFile client software has to be loaded on each of those systems. • • • Load the PowerFile software CD into the CD drive of any network-connected Macintosh computer. Double-click on the CD icon on the desktop to view the contents of the CD. Locate and double-click on the Installer icon.
Instructions for Macintosh PowerFile Changer front panel The buttons and features on the front panel of the PowerFile Changer are described below. Load/unload slot This is the front slot where discs are loaded into and unloaded from the Changer. Discs must be loaded with the “data” side on the left and the “label” side on the right. Display window This two-line LCD readout displays unit status and messages. Power button This is the button that powers on and turns off the Changer.
Instructions for Macintosh Mode The Mode button provides administrative functions on the Changer. By pressing this button, you can scroll through a series of functions. These functions appear in the display window in the following sequence: Library, listed by CD title This window lists alphabetically the discs currently in the Changer. Use the scroll buttons to scroll through the list. The window identifies which carousel slot the disc is in and the name of the disc.
Instructions for Macintosh Terms used in this guide Throughout this guide, several terms are used in reference to the moving of discs into and out of the Changer, and into and out of the drives within the Changer. The following are definitions of these commonly used terms: These terms, used throughout this guide, are also seen as menu items in the software interface. On the Changer front panel, the button labeled Eject performs the Unload function of ejecting a disc from the Changer.
Instructions for Macintosh The MediaFinder window is divided into two areas: The top area displays drive icons, which represent the drives in the PowerFile Changer. These drives are identified as Drive 1 (for single drive models C200S Solo and R200 Studio Writer) and Drive 1 and Drive 2 (for the dual drive C200 Studio) The lower portion of the MediaFinder window lists all of the discs in the Changer.
Instructions for Macintosh Option B—Loading discs using the MediaFinder software Step 1. Launch MediaFinder If the MediaFinder window is not on the desktop, navigate to the PowerFile folder and double-click on the MediaFinder icon to launch MediaFinder. Step 2. Select Load Disc From the Browser menu, go to Changer Admin. If Admin Mode is unchecked, select it to activate Admin Mode. Once you are in Admin Mode, select either Load One Disc or Load Many Discs. Step 3.
Instructions for Macintosh Identifying discs The Changer automatically identifies new discs. When discs are loaded into the Changer, they are initially listed as Unidentified disc in the lower portion of the MediaFinder window. The Changer automatically identifies newly loaded discs during idle time, when a drive is available. It does this by placing each Unidentified disc into a drive and reading the contents of that disc.
Instructions for Macintosh When a disc is mounted in a drive, the disc icon will appear on the desktop, and you can double-click on it to launch the disc. Note: The name of the disc that appears on the desktop will be the original volume tag name, even if the name of the disc has been changed in the MediaFinder window. (see Renaming a disc elsewhere in this manual).
Instructions for Macintosh Initializing (Formatting) media DVD-RAM media must be initialized (formatted) before data can be written onto the disc. There are three types of formatting that are available when formatting DVD-RAM media for the Macintosh: MacOS Standard, MacOS Extended, and Universal Disc Format.
Instructions for Macintosh The formatting process The formatting process is an automated multi-step process. The first step mounts the disc as mount exclusive. This is necessary for the formatting to be done. Once the disc is formatted, the disc is unmounted from the drive, and then immediately mounted back into the drive, but this time it is not mounted exclusive. This second mounting allows the volume name tag to be read (which will now be Untitled DVD-RAM), and listed in the MediaFinder window.
Instructions for Macintosh Disc organization The MediaFinder window is the master window for the Changer: It displays all of the discs in that Changer. The administrator has control over the name of the MediaFinder window, as well as the names of the discs and the file structure within the MediaFinder window.
Instructions for Macintosh Renaming a disc Initially, discs that are loaded into the Changer are listed in the MediaFinder window either as Unidentified disc (if the Changer has not yet loaded the disc into a drive and read it) or as named discs (if the Changer has read the disc and found an associated volume name tag for it). To rename any of the named discs, highlight the desired disc in the lower portion of the MediaFinder window by clicking on it, then type the new name and hit Return.
Instructions for Macintosh Renaming a subfolder Click to highlight the subfolder, then type in the new name and hit Enter. Moving a disc to a folder Once folders and subfolders have been created within the MediaFinder window, discs can be organized by simply dragging the disc names into the desired folders. Deleting a folder A subfolder within the MediaFinder window cannot be deleted unless it is empty.
Instructions for Macintosh Option B—From the MediaFinder window 1 2 3 4 Select the disc you wish to unload by single-clicking on the disc name in the lower portion of the MediaFinder window. Go to the Browser menu, then to the Changer Admin submenu, and select Unload Disc. The carousel rotates to place the disc at the load/unload slot, and the disc is lifted up and out for removal. (If the disc is not removed from the slot within approximately 10 seconds, it will be lowered back down into the carousel.
Instructions for Macintosh MediaFinder window menus When the MediaFinder window is open, many functions of the Changer can be accessed through the pull-down menus: File menu New Favorites File The New Favorites File option allows you to create a custom directory on your local system that contains selected media from any Changers connected to the network. You can then select any of the media you want from your Favorites folder, without having to locate the actual Changer folder that the disc resides in.
Instructions for Macintosh Edit menu Under the Edit menu, the Undo, Cut, Copy, Paste, Clear, and Select All functions operate as standard Macintosh Edit menu items. New Folder The New Folder menu item creates a new subfolder in a Changer folder (if a Changer folder is active when New Folder is selected), or in a Favorites folder (if a Favorites folder is active when New Folder is selected). Browser menu Add Remote... This feature allows a client to access a remote Changer.
Instructions for Macintosh Changer Info Displays info for the open Changer, including Changer name, number of drives, number of slots in the carousel, IP address, Admin Mode (enabled/disabled), and description. This window also allows you to rename the Changer. To rename a Changer, type a new name in the Changer name box in the Changer Info window. You can also enter information about the Changer in the description text box.
Instructions for Macintosh closes (to prevent any other discs from being inserted before the Changer is ready). After the disc has been loaded, the carousel rotates and the gate reopens to allow the loading of the next disc. The gate will remain open for approximately 10 seconds. If no discs are inserted within that time, the gate closes, and the disc-loading session is ended. Unload disc Directs the selected disc to Unload from the Changer.
Networking Networking Networking/daisy-chaining multiple Changers PowerFile DVD/CD Changers are IEEE 1394 (FireWire) devices. All 1394 devices are hotswappable and can be daisy-chained, up to a theoretical maximum of 63 devices (in a tree configuration), and with a maximum of no more than 6 'hops' from the host system.
Networking PowerFile 718 University Ave., Suite 100 Los Gatos, CA 95032 Phone: 1.877.8 DVD NOW (1.877.838.3669) techinfo@powerfile.com www.powerfile.