ATI Radeon™ HD 5750/5770 User Guide Part Number: 137-41688-10
ii © 2009 Advanced Micro Devices Inc. All rights reserved. The contents of this document are provided in connection with Advanced Micro Devices, Inc. (“AMD”) products. AMD makes no representations or warranties with respect to the accuracy or completeness of the contents of this publication and reserves the right to discontinue or make changes to products, specifications, product descriptions, and documentation at any time without notice.
iii Important Safety Instructions Note: This product is for use only with compatible UL-listed personal computers that have installation instructions detailing user installation of this class of product. Read all instructions before beginning installation. All safety and installation instructions should be read before the product is installed or operated. Retain all instructions. Safety, installation, and operating instructions should be retained for future reference. Heed all warnings.
iv ATI Radeon™ HD 5750/5770 © 2009 Advanced Micro Devices, Inc.
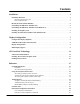
Contents Installation . . . . . . . . . . . . . . . . . . . . . . . . . . . . . . . . . . . . . . . . . . . . . . . . . . . . . .1 Installation Overview . . . . . . . . . . . . . . . . . . . . . . . . . . . . . . . . . . . . . . . . . . . . . . . . . . . . . . . . . . 1 Replacing an Existing Card . . . . . . . . . . . . . . . . . . . . . . . . . . . . . . . . . . . . . . . . . . . . . . . . . . . . . . . . . . . . . . . . . . . 1 First Card for this PC . . . . . . . . . . . . . . . . . . . . . . . . . . . .
vi CE Compliance Information . . . . . . . . . . . . . . . . . . . . . . . . . . . . . . . . . . . . . . . . . . . . . . . . . . . . . . . . . . . . . . . . . 25 Electrical Safety . . . . . . . . . . . . . . . . . . . . . . . . . . . . . . . . . . . . . . . . . . . . . . . . . . . . . . . . . . . . . . . . . . . . . . . . . . . . . 25 Waste Electrical and Electronic Equipment (WEEE) Directive Compliance . . . . . . . . . . . . . . . . . . . 26 VCCI Class B ITE Compliance Information . . . . . . . . . . . .
Chapter 1 Installation For support, you will need to record the serial number and the part number for the card before installation. Installation Overview The installation of the card has slightly different procedures depending on whether you are replacing an existing card or installing a graphics card in a PC for the first time. This section briefly describes the high-level steps for both cases. Replacing an Existing Card If you are replacing an existing graphics card, you need to: 1.
2 Installation Record the Serial and Part Numbers Write down the serial number and part number before installing. The serial number and 102 part number on the graphics card are required for registration and free support. They are located on a sticker on the back of the card. The emphasized numbers in bold are required for registration and free support.
First Card for this PC 3 Uninstalling the Old Driver (Windows Vista®/ Windows 7™) Follow these steps to uninstall the existing graphics card driver in preparation for installation of a new card. 1. With the current graphics card still in the computer, close all open applications. 2. Click Start ▷ Control Panel. 3. Double-click Hardware and Sound and then double-click Device Manager. 4. Expand Display Adapter and then right-click the driver for the graphics card you are replacing. 5.
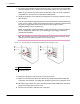
4 Installation 5. Locate the appropriate bus slot and, if necessary, remove the corresponding metal backplate cover(s). Make sure all internal cables are clear of the slot. Note: If you cannot find a bus slot to match the card, you need a graphics card with the correct bus to match the motherboard. 6. Align the graphics card with the slot and press it in firmly until the card is fully seated. 7.
First Card for this PC 5 If you have properly installed the graphics card, the computer should start normally. Proceed to install the software and drivers for your ATI Radeon HD 5750/5770 graphics card. Installing the ATI Catalyst™ Software Suite (Windows OS) To install or remove software, you must have administrator rights or be logged on as a user with administrator rights. Note: The installation dialog displays in English if the operating system’s language is not supported.
6 Installation ATI Radeon™ HD 5750/5770 © 2009 Advanced Micro Devices, Inc.
Chapter 2 Display Configuration This section describes how to configure the display and lists the available display connections. Configure the Display (Optional) To change the display configuration or if you are experiencing an issue with the display, do the following: Note: If you are not experiencing any troubles with the display, no adjustments are necessary. 1. Right-click on the desktop and, in the shortcut that appears, click Properties. The Display Properties dialog appears. 2.
8 Display Configuration 6. To configure another display, do the following: a. Right-click on the desktop and, in the shortcut that appears, click Properties. Note: The ATI Catalyst Control Center software can also enable and configure multiple monitors. b. To access the basic multi-monitor configuration settings, click the Settings tab. c. Select the monitor icon identified by the number 2.
9 Display Configurations The following table lists options for connecting displays that are indirectly supported by the connection types available on the graphics card. For best graphics performance and quality, always use native connections, if available, when connecting displays. Note: Only display configurations using the DVI-to-VGA adapter included with your graphics card are mentioned here.
10 Display Configuration ATI Radeon™ HD 5750/5770 © 2009 Advanced Micro Devices, Inc.
Chapter 3 ATI CrossFireX™ Technology Note: These features are only available for ATI Radeon HD 5750/5770 graphics cards with ATI CrossFireX connections. ATI CrossFireX Introduction ATI CrossFireX is a multi-GPU (graphics processing unit) performance gaming platform. It enables multiple graphics processors installed in a single computer to work together to improve system performance, creating a high-performance gaming platform.
12 ATI CrossFireX™ Technology 2. Unplug the computer power cord and disconnect the monitor cable from the back panel of the computer. Caution: To avoid possible damage to the motherboard, wait approximately 20 seconds after unplugging the power cord before disconnecting a peripheral or removing a component from the motherboard. 3. Remove the computer cover. If necessary, consult the computer manual for help removing the cover.
13 Figure 3–1 Connecting the Power Cables 1 Power supply 2 Existing card 3 New card 8. Remove protection tags from the ends of the ATI CrossFireX interconnect and connect the cards. Caution: Always handle the ATI CrossFireX bridge interconnect by the connector only. Do not push or pull on the flexible cable. © 2009 Advanced Micro Devices, Inc.
14 ATI CrossFireX™ Technology Figure 3–2 ATI CrossFireX Bridge Interconnect Protection Tag Figure 3–3 ATI CrossFireX Installation 1 ATI CrossFireX graphics cards 2 Interconnect 9. Fasten the graphics cards securely to the back panel. 10. Make sure the cables are not interfering with anything inside the computer (for example, a cooling fan) and then replace the computer cover. ATI Radeon™ HD 5750/5770 © 2009 Advanced Micro Devices, Inc.
15 11. Reconnect any cables you have disconnected and plug in the computer power cord. 12. Turn on the monitor and then the computer. ATI CrossFireX must now be enabled using ATI Catalyst Control Center. Enabling ATI CrossFireX When ATI CrossFireX support is enabled, the best possible GPU combination is selected based on the current hardware configuration. If necessary, you can change the existing ATI CrossFireX configuration using the following procedure.
16 ATI CrossFireX™ Technology ATI Radeon™ HD 5750/5770 © 2009 Advanced Micro Devices, Inc.
Chapter 4 Reference The following section offers troubleshooting tips and provides customer care, warranty, and compliance information. System Requirements Hardware Minimum requirements are: • Motherboard with one PCIe ×16 lane graphics slot. • AMD Athlon™ or Intel® Pentium® 4 CPU. • 1 GB RAM. • CD-ROM or DVD-ROM drive for installing software. • A 450 watt or better power supply with one 75 watt 6-pin PCIe power connector.
18 Reference • One ATI CrossFireX internal bridge interconnect per additional board (included). • A 600 watt or better power supply with two 6-pin PCIe power connectors. • For an up-to-date listing of certified power supplies, see ati.amd.com/ certifiedpsu. • Certified system cases with good airflow and cooling are recommended. For list of certified cases, see ati.amd.com/certifiedcases.
Accessing ATI Catalyst Control Center Help 19 Table 4–1 ATI Catalyst Control Center Access Routes Access Route Instructions Windows Desktop 1. Right-click anywhere on the desktop. 2. From the shortcut menu that appears, click ATI CATALYST(TM) Control Center. Windows Start Menu 1. Click Start on the Windows task bar. 2. Select All Programs ▷ Catalyst Control Center. Windows Notification Area 1. Right-click the ATI icon in the Windows Notification Area. 2.
20 Reference The computer beeps and the boot process stops. Make certain that the graphics card is properly connected to the internal power supply and the motherboard. No display on power up. This may be an SBIOS issue. Replace the old card and then try these possible solutions: 1. Check the motherboard manufacturer's Web site for an SBIOS update. 2. Turn off the on-board video. The computer does not boot up properly. Verify that the installation instructions were followed correctly.
Troubleshooting ATI CrossFireX 21 Change Motherboard BIOS Settings Some motherboards may have a system BIOS option to switch between single and dual PCIe slot support. The default setting may be single slot support. Refer to the motherboard’s manual for information to enable dual PCIe slot support. For more information see the ATI CrossFireX Web page at ati.amd.com/ crossfire.
22 Reference Screen Rotation is Unavailable or Does Not Work Screen rotation is not an available feature on ATI CrossFireX systems. Video Displays Flicker During System Startup This is normal during ATI CrossFireX startup. ATI CrossFireX Disabled After Swapping/Moving Cards If you change the ATI CrossFireX configuration by moving the graphics cards to different slots on the motherboard, disable ATI CrossFireX and restore factory default settings in ATI Catalyst Control Center first.
HDTV/HDTV Adapter Troubleshooting 23 The display appears tilted. Consult the HDTV documentation. The CRT display is green. The system is in component output mode. Restart the computer with only the CRT monitor connected. TVs/monitors connected cannot be enabled. If TVs and/or monitors connected using DisplayPort adapters, passive dongles, or active dongles cannot be enabled, visit http://www.amd.com/us/products/ desktop/graphics/ati-radeon-hd-5000/Pages/displayport-support.
24 Reference result of the product, whether your product contains a defect, and whether your product is under warranty. • AMD Customer Care is unable to assist with refunds, returns, or exchangespecific inquiries. If resolving the problem being experienced is critical to your decision to keep the product, it is your responsibility to ensure that you know and are within the period of time your reseller will allow for refunds, returns, or exchange.
Industry Canada Compliance Statement 25 • Connect the equipment to an outlet on a circuit different from that to which the receiver is connected. • Consult the dealer or an experienced radio/TV technician for help. The use of shielded cables for connection of the monitor to the graphics card is required to ensure compliance with FCC regulations. Changes or modifications to this unit not expressly approved by the party responsible for compliance could void the user's authority to operate this equipment.
26 Reference Waste Electrical and Electronic Equipment (WEEE) Directive Compliance This product was manufactured by Advanced Micro Devices, Inc. VCCI Class B ITE Compliance Information KCC Certification Information ATI Radeon™ HD 5750/5770 © 2009 Advanced Micro Devices, Inc.
BSMI Certification Information 27 "Class B" Equipment (Household purpose info/telecommunications equipment) As this equipment has undergone EMC registration for household purpose, this product can be used in any area including residential area. BSMI Certification Information © 2009 Advanced Micro Devices, Inc.
28 Reference ATI Radeon™ HD 5750/5770 © 2009 Advanced Micro Devices, Inc.