
User manual PowerBox Mercury SRS with OLDED Screen and GPS

www.powerbox-systems.com 17
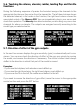
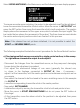
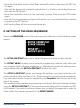
Select SERVO-MATCHING in the Main menu, and the following screen display appears:
To ensure accurate servo matching, the output to be adjusted must rst be initialised.
Leave the associated transmitter stick at centre. Move the cursor to INIT OUTPUT and
press the SET button. Now move the transmitter stick to both end-points. The graphic
display shows the movement of the upper arrow, which indicates the input signal. The
bar inside the box shows the movement of the output. The three lower arrows indicate
the centre and end-point positions which are ‘learned’ in this process.
Note: if the channel has not yet been initialised, it is not possible to select the
START and REVERSE SERVO points.
The following examples illustrate the correct procedure for the Servo-Match function:
a) Fine-tuning multiple servos connected to a single control surface; in this examp-
le: right aileron connected to output A and output B
- Disconnect the linkages from the unmatched servos, as they may exert damaging
forces during the adjustment procedure!
- First adjust the mechanical linkage of one servo (generally the inboard one,
i.e. closer to the fuselage, connected to OUTPUT A), then - if necessary -
adjust it at the transmitter, until the centre position and maximum end-points are as
you require.
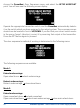
- Now select the channel to be ne-tuned in the servo-matching menu. In this example
it is OUTPUT B.
- Leave the corresponding transmitter stick at the centre position.
- Now select: INIT CHANNEL
- Initialise the output by moving the transmitter stick to both end-points in turn.
- Move the cursor to START SERVOMATCHING but do not press the SET button at
this stage!
- At the transmitter, move the aileron stick to the position to be adjusted, then press
the SET button.