
Assembly instruction
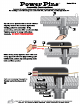

Tip of screw (1) should be level with or
slightly below the surface (2) of the
bridge, prior to assembly. If tip
protrudes, add extra flat washer(s) (3).
Tighten screw to snug with allen
wrench. DO NOT OVERTIGHTEN
Slide string body (4) into slot with end
wrap (5) and ball end (6), trailing 3/4”
behind end pocket (7) and gently push
ball end into pocket
Power Pins
TM
is a trademark of Bigrock Engineering. Patents Pending ©2013 All Rights Reserved
Bridge
Bridge Plate
Flat Washer
Lock Washer
Screw
Sound Board
P ow er P in s
TM
Assembly Instructions
Model PP-1
Power Pins
TM
are distributed by AP International. For more information, visit apintl.com or call 732.919.6200
1
2
3
4
5
6
8
3/4”
Ball end must lay flat and be
firmly seated in the pocket
(8)
7
Contents: Kit includes six pins, each with three flat washers and one lock washer
Pin Markings: Low E & A strings are marked with “B”, D & G with “M”, and B & high E with “H”