IMPERIAL MACHINE SCREW JACKS SINGLE FACE MOUNTING (MECHANICAL LINEAR ACTUATORS) SPARES LIST & MAINTENANCE INSTRUCTIONS MANUAL : MM-IMS-E-02 SUPPLIED BY: POWER JACKS LIMITED
Imperial Series – Machine Screw Jacks CONTENTS 1 UNIT DETAILS ....................................................................................................................................................................... 2 2 GENERAL INFORMATION ................................................................................................................................................. 3 2.1 2.2 2.3 2.4 3 MAINTENANCE ...........................................................................
Imperial Series – Machine Screw Jacks 2 General Information 2.1 General This manual contains maintenance instructions for Power jacks 1800, 9000, 4800 and 9800 imperial machine screw jacks. It describes and details procedures for disassembly, cleaning, inspection, rebuilding and assembly of these screw jacks. 2.
Imperial Series – Machine Screw Jacks 2.4 Important precautions In order to ensure that Power Jacks machine screw jacks provide good service over a period of years the following precautions should be taken: 1. Select a screw jack that has a rated capacity greater than the maximum load that may be imposed on it. 2.
Imperial Series – Machine Screw Jacks 3 Maintenance 3.1 Lubrication Unless otherwise specified, screw jacks are shipped packed with grease which should be sufficient for one month of normal operation. For normal operation the screw jack and gear boxes should be lubricated once a month, using one of the following Extreme Pressure greases or their equivalent. Socony Mobile Oil Co Texaco Gulf Oil Corp Shell Oil Co Mobilplex E.P. #1 Texaco E.P. #1 Gulf Crown E.P #1 Shell Alvania E.
Imperial Series – Machine Screw Jacks 5. Remove the top load bearing (7) which may be attached to either the shell cap (2) or worm gear (6A) or anti-backlash nut. Caution: Use only a wooden mallet to tap bearings loose. 6. Remove bottom load bearing (8) which may be attached to either the shell (3) (base plate for 100 and 150-ton models) or worm gear (6A). 7. Remove four cap screws (9) from each of the two worm flanges (11) and remove flanges. 8. Press oil seal (13) out of flange (11). 9.
Imperial Series – Machine Screw Jacks 5a On 5-ton and 35-ton models, press load bearing cones onto worm gear (6A) or worm gear nut assembly (6B). Small end of bearing cone should face away from gear teeth. 6. Install worm gear (6A) or worm gear and nut assembly (6B) in shell (3). Caution: Strike each end of worm shaft sharply with a wooden mallet to seat bearing properly. Recheck flange bolts for tightness. Worm should turn freely with minimum drag and end play.
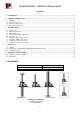
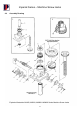
Imperial Series – Machine Screw Jacks 4 Parts List 4.1 General This section contains an exploded illustration of the M1800, M9000, M4800 and M9400 Series machine screw jack. The number adjacent to each part on the illustration is the index number. Keyed to this index number on the parts list is the part name When ordering parts be sure to include: 1. 2. The nameplate model of your unit Index number and name of part 4.
Imperial Series – Machine Screw Jacks 4.
Imperial Series – Machine Screw Jacks 5 Warranty Information 5.1 Limitation of Responsibility The ratings given in this manual were compiled using standard engineering procedures. The ratings are designed to guide the customer in the selection of a unit. We do not guarantee the ratings in specific applications. Prototype testing of every application is recommended before production. Our engineering facilities are available for consultation at all times.