ENGLISH R Please do not return unit to retailer. Por favor, no devuelva el aparato al lugar de compra. Veuillez ne pas retourner l’outil au détaillant. 1--800--554--6723 www.poulan--pro.com Instruction Manual Manual de Instrucciones Manuel d’Instructions ESPAÑOL SM210VS IMPORTANT MANUAL -- Do not throw away MANUAL IMPORTANTE - No lo descarte MANUEL IMPORTANT -- À Conserver Poulan PRO 1030 Stevens Creek Road Augusta, GA 30907 Poulan PRO 850 Matheson Blvd.
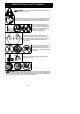
IDENTIFICATION OF SAFETY SYMBOLS WARNING: This unit can be dangerous! Careless or improper use can cause serious injury. Read your operator’s manual carefully until you completely understand and can follow all warnings and safety rules before operating the unit. Failure to do so can result in serious injury. Save operator’s manual. The blower can throw objects violently. You can be blinded or injured. Always wear hearing protection and safety glasses marked Z87.
IDENTIFICATION OF SAFETY SYMBOLS When using the vacuum attachment, the unit is designed to pick up dry material such as leaves, grass, small twigs, and bits of paper. Do not vacuum stones, gravel, metal, broken glass, etc., to avoid severe damage to the impeller. WARNING: Fire hazard. Never mix, pour, or store gasoline or use the unit near a flame or sparks (including smoking, open flames, or work that can cause sparks). WARNING: The muffler is very hot during and after use.
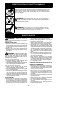
D D Move at least 10 feet (3 meters) away from fuel and fueling site before starting engine. Always store gasoline in a container approved for flammable liquids. OPERATE YOUR UNIT SAFELY WARNING: Stop the engine before opening the vacuum inlet door. The engine must be stopped and the impeller blades no longer turning to avoid serious injury from the rotating blades. D Inspect unit before each use for worn, loose, missing, or damaged parts. Do not use until unit is in proper working order.
ASSEMBLY WARNING: Stop engine and be sure the impeller blades have stopped turning before opening the vacuum inlet door or attempting to insert or remove the vacuum or blower tubes. The rotating blades can cause serious injury. Always disconnect the spark plug before performing maintenance or accessing movable parts. WARNING: If you receive your unit assembled, check each step to insure your unit is properly assembled and all fasteners are secure.
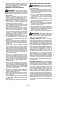
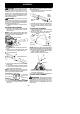
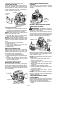
1. Insert the tip of a screwdriver into the latch area of the vacuum inlet. Latch Area Blower Outlet 6. Align slanted end of lower vacuum tube as shown. Firmly push lower vacuum tube into upper vacuum tube. Slanted end of lower vacuum tube Latch Area Vacuum Inlet Cover 2. Gently tilt the handle of the screwdriver toward the front of the unit to release the latch while pulling up on the vacuum inlet cover with your other hand. 3. Hold the vacuum inlet cover open until upper vacuum tube is installed.
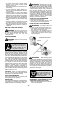
OPERATION KNOW YOUR BLOWER READ THIS INSTRUCTION MANUAL AND SAFETY RULES BEFORE OPERATING YOUR UNIT. Compare the illustrations with your unit to familiarize yourself with the location of the various controls and adjustments. Save this manual for future reference. MULCHING BLADES Your blower is equipped with mulching blades as a standard feature. When using the vacuum attachment, the mulching blades automatically reduce debris at a ratio of up to 16:1.
S To reduce noise levels, operate power blowers at the lowest possible throttle speed to do the job. S Use rakes and brooms to loosen debris before blowing. S In dusty conditions, slightly dampen surfaces or use a mister attachment when water is available. S Conserve water by using power blowers instead of hoses for many lawn and garden applications, including areas such as gutters, screens, patios, grills, porches, and gardens. S Watch out for children, pets, open windows, or freshly washed cars.
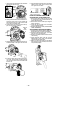
4. Pull starter rope handle sharply until engine starts and runs. 5. Allow unit to run for 10--15 seconds, then fully squeeze the throttle trigger to disengage the starting system. Throttle Position Lever (Cruise Control) STARTING A WARM ENGINE 2. Slowly press the primer bulb 6 times. 3. Move the start lever to the START position. Start Lever Starter Handle 1. Squeeze and hold the throttle trigger. 2. Pull starter rope sharply while squeezing throttle trigger until engine runs.
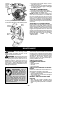
S Wipe off unit with a clean dry cloth. CLEAN AIR FILTER A dirty air filter decreases engine performance and increases fuel consumption and harmful emissions. Always clean or replace air filter after every 5 hours of operation or yearly, whichever comes first. Air Filter Cover CHECK MUFFLER MOUNTING SCREWS Once each year, ensure muffler mounting screws are tightened securely to prevent damage.
Idle Speed Screw To adjust idle speed: Allow engine to idle. Adjust speed until engine runs without stalling (idle speed too slow). S Turn idle speed screw clockwise to increase engine speed if engine stalls or dies. S Turn idle speed screw counterclockwise to decrease engine speed. Air Filter Cover If you require further assistance or are unsure about performing this procedure, contact an authorized service dealer or call 1--800--554--6723.
TROUBLESHOOTING TABLE WARNING: Always stop unit and disconnect spark plug before performing any of the recommended remedies below other than remedies that require operation of the unit. TROUBLE CAUSE Engine will not start. 1. Engine flooded. Engine will not idle properly. Engine will not accelerate, lacks power, or dies under a load. REMEDY 1. See “Starting a Flooded Engine” in Operation section. 2. Fill tank with correct fuel mixture. 2. Fuel tank empty. 3. Install new spark plug. 3.
LIMITED WARRANTY Poulan PRO, a division of Husqvarna Consumer Outdoor Products N.A., Inc., warrants to the original consumer purchaser that each new Poulan PRO brand gasoline tool or attachment is free from defects in material and workmanship and agrees to repair or replace under this warranty any defective gasoline product or attachment as follows from the original date of purchase. 2 YEARS - Parts and Labor, when used for household purposes.
abuse, neglect, improper maintenance, unapproved modifications, or the use of parts not made or approved by the original equipment manufacturer. You are responsible for presenting your small off--road engine to an Poulan PRO authorized repair center as soon as a problem exists. Warranty repairs should be completed in a reasonable amount of time, not to exceed 30 days.