
Assembly Instruction

3
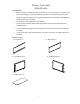
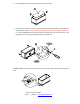
2. Put the Bottom panel (E) into the open toy box as shown carefully.
3. Carefully lay the Toy Box on a soft, scratch-free surface as shown in illustration. This position will
make assembly easier. Make sure the warning label apply to the bottom of Toy Box inside raised
area. And fix the Bottom panel (E) to the Front panel (A) , Back panel (B) , left side panel (C ) and
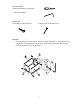
Right side panel (D) using 12pcs Phillips head screws 8x25mm (G).
Caution: adjust levelers on the bottom of the unit in or cut to ensure that it stand secure and does not
rock.
Thank you for your purchase
stores | catalog | www.potterybarnkids.com