
Assembly Instruction

Page 1/5
pottery barn kids
SANDBOX
PRE-ASSEMBLY:
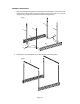
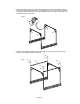
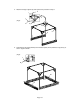
• Read all instructions before beginning assembly. The illustrations provided allow for easier
assembly when used in conjunction with the assembly instructions.
• For your safety and ease, assembly by two adults is recommended.
• Remove all part and hardware from the box and lay out on a clean, carpeted, or scratch- free
work surface. Use care as some parts or hardware may have sharp points or edges.
• Do not dispose of any contents until assembly is completed to avoid accidentally discarding small
parts and hardware.
• Use the parts and hardware lists to identify and separate each of the pieces included.
• Note: Do not fully tighten all bolts until all parts are in place. Failure to follow these instructions
may cause the bolts misalign during assembly.
• The use of power tools for assembly is not recommended. Power tools can damage hardware or
split wood.
PARTS INCLUDED:
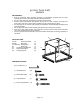
(A1/A2) Front / Back Panel (2)
(B1/B2) Side panel (2)
(C1/C2/C3/C4) Awning Poles (4)
(D) Plastic Tarp (1)
(E) Front/back horizontal Bars (2)
(F) Side horizontal Bars (2)
(G) Triangle Supports (8)
HARDWARE INCLUDED:
(H) 4mm Allen Key (1)
(I) Short Bolt 20mm (24)
(J) Medium Bolt 40mm (8)
(K) Long Bolt 50mm (4)
(L) Extra Long Bolt 60mm (16)
A1
B
1
C3
E
F
G
G
C1
C4
C2
B2
A2