
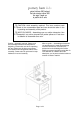
Assembly Instruction
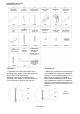


4. Fixer l’assemblage du schéma 3
sur le corps de l’îlot de cuisine (E) à
l'aide de deux goujons en bois (L) à
chaque extrémité. Placer le robinet (D)
sur l'îlot (E) en s'assurant que les trous
de vis sont alignés. Voir schéma 4.
4. Attach the Fig. 3 assembly onto the island
body (E) with two wood dowels (L) on each of
both ends. Place the water faucet (D) onto the
island body (E) making sure all the secrewholes
are aligned. See fig. 4.
Fig. 4
Schema 4
E
L
D
Fig. 3 Assembly
A
ssemblage
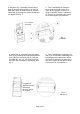
5. Fixer l’assemblage du schéma 3 sur
l’îlot (E) en vissant deux assemblages de
boulons longs d’en-dessous du dessus
de l’îlot (E) à l’aide de la clé Allen (N). Il
faut ouvrir la porte du four pour accéder
aux trous de vis. Voir schéma 5.
5. Secure the fig. 3 assembly onto the island
body (E) by screwing two long bolt assemblies
from under the island body top (E) using the
provided allen key (N). You will have to open
the oven door to access the screwholes. See
fig. 5.
Assemblage
de boulon long et
de rondelles
Long Bolt and
Washers Assembly
Fig. 5
Schema 5
Page 4 of 6