
Assembly Instruction
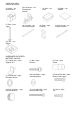

TOOLS REQUIRED:
OUTILS REQUIS :
(S) Allen Key – 1pc
Clé Allen
(T) AAA Battery (not included) – 2pcs
Piles AAA (non comprises)
ASSEMBLAGE
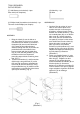
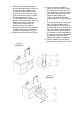
1. Couchez l'îlot de cuisine (A) sur le
côté sur une surface plane et au
toucher doux qui ne causera pas
d’éraflures, comme un tapis. Posez
d'abord une rondelle Grower (L), puis
une rondelle plate (M), sur un boulon
Allen court (N). Insérez le boulon
Allen court avec les rondelles dans
une patte (K) et dans l'un des avant-
trous situés sous l'îlot de cuisine (A).
Serrez le boulon à l'aide de la clé
Allen (S) fournie, tel qu'illustré.
Enfoncez un pied protecteur (O) sous
la patte (K) que vous venez de poser.
Répétez les étapes précédentes pour
les trois pattes (K) restantes.
(Schema 1)
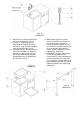
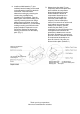
2. Posez une rondelle Grower (L), puis
une rondelle plate (M), sur un boulon
Allen long (P). Préparez-en deux
comme ça, puis utilisez-les pour
monter l'ensemble de robinets (B) sur
l'îlot de cuisine (A). Serrez les
boulons (P) à l'aide de la clé Allen (S)
fournie. Assurez-vous que la poignée
rouge soit placée à gauche du bec de
robinet à la fin du montage.
(Schema 2)
(U) Phillips Head Screwdriver (not included) – 1pc
Tournevis à tête Phillips (non compris)
ASSEMBLY
1. Bring the island (A) onto its side on a
soft, flat surface such as a rug or carpet.
First thread a lock washer (L) and then a
flat washer (M) onto an short allen bolt
(N). Fasten the short allen bolt and
washers through the foot (K) and into the
pre-drilled holes in the bottom of the
base as shown with the provided allen
key (S). Push the floor protector (O) into
the bottom of the foot. Repeat the
preceding steps with the remaining three
feet. (Fig. 1)
2. Thread a lock washer (L) and flat washer
(M) through a long allen bolt (P), make
two sets and use these to assemble the
faucet set (B) onto the island (A), using
the provided allen key (S). Make sure the
red handle is on the left side of the faucet
spout upon assembly. (Fig. 2)
(Fig.1)
(Schema 1)