
Assembly Instruction


pottery barn kids
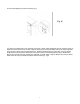
MADISON CABINET HUTCH
IMPORTANT SAFETY INSTRUCTIONS:
• Please read all instructions carefully before assembling.
• For your safety, assembly by two adults is recommended.
PRE-ASSEMBLY:
• Remove all parts and hardware from the box and lay out on a clean, carpeted, or scratch-free work surface,
as this will avoid damaging any parts during assembly. The shipping box provides an ideal work surface. Do
not dispose of any contents until assembly is completed to avoid accidentally discarding small parts or
hardware.
• Use the parts and hardware lists above to identify and separate each of the pieces included.
• The illustrations provided allow for easier assembly when used in conjunction with the assembly instructions.
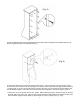
• Note: Do not fully tighten all bolts until all parts are in place. Failure to follow these instructions may cause
the bolts to misalign during assembly. Minifix Cam
need to be screw over 90° at least. If you feel hard to
reach this angle, please unscrew the Minifix Connecting Bolt a little and try again.
• If using power tools to aid in assembly please use caution. Power tools can damage hardware or split
wood.
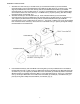
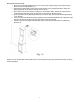
• This product has two version of door placement, the first version is to open from right, and the second is
from left. The door in the hutch package is for the first version (open door from right). If you want the
second version (open door from left), you need the door of another product – the Madison Cabinet - and
skip the following step 7 and refer to step 8,9,10.
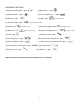
PARTS INCLUDED:
(A) Left Side Panel – 1pc
(B) Right Side Panel – 1pc
(C) Low Shelf– 1pc
(D) Upper shelf– 1pc
(E) Top Panel– 1pc
(F) Back Panel – 1pc
(G) Rail– 1pc
(H) Door– 1pc
TOOLS REQUIRED:
Phillips Head Screwdriver (not included)