
Assembly Instruction
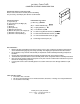


ASSEMBLY INSTRUCTIONS:
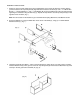
1. Attach one of the Top side panels (B) to the pre-drilled holes on the end of the Shelf (D), ensuring that the
grooves located on the Top side panel (B) align with those located on the Shelf (D). Use 1 ¼” x 28mm Allen
Bolt (K), 1 ¼” Spring Washer (L), and 1 ¼” Flat Washer (M) in each pre-drilled hole of the Top side panel (B),
tightening the connection using the Allen Key (J). Repeat this step with the second Top side panel (B) on the
opposite end of the Shelf. (Fig. 1)
Note: The correct order for the washers to go on the Allen Bolt is: Spring Washer first, Flat Washer second.
2. Secure the Divider (C) to the pre-drilled holes in the center of the Shelf (D), using (2) 4 x 25mm Medium
Wooden Screws (T). (Fig. 1)
(Fig. 1)
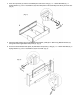
3. Upright the assembly from Steps 1 and 2 so that the Shelf (D) is resting flat on your work surface. Carefully
insert the Back Panel (E) in the grooves of the two Top side panels (B). Ensure that the Back Panel (E) rests
securely in the slot grooved into the Shelf (D). (Fig. 2)
(Fig. 2)