
Assembly Instruction
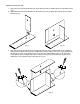
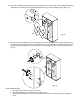

6. Turn the assembled piece upright. Place the Top Panel (J) on the assembled piece. Align the pre-drilled holes
of the Top Panel (J) to the wooden dowels of the Left Side, Right Side, Back Panels and the Long Divider (A,
B, C & E). Insert (4) Plastic Caps (V) into the pre-drilled holes on the Lower Shelf (D) and bottom front of the
Top Panel (J). (Fig. 6).
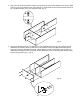
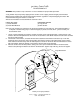
7. Lift the Top Panel (J) a little bit to allow the hinges of the Left and Right Door (H & I) to go into the Plastic
Caps (V) on the Lower Shelf (D) and Top Panel (J). Check alignment and secure the Top Panel (J) with the
remaining (4) Allen Bolts (M), Spring Washers (N) and Flat Washer (O) by inserting them into the fixed wood
cleats located at inside of the Left and Right Side Panels (A & B). Note: Doors are not identical and are
labeled Left & Right. Label is removable. (Fig. 7).
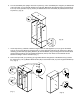
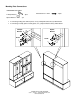
8. Secure the Top Panel (J) by inserting (2) Large Wood Screws through back of the Back Panel (C) and into
the Top Panel (J). Use (3) Medium Wood Screws (W) to secure Back Panel (C) to the Long/Short Dividers (E
& F). (Fig. 8).
T.
H.
I.
O.
N.
M.
L.
J.
V.
(Fig. 6)
(Fig. 7)
(Fig. 8)
E
A
C
B
W