
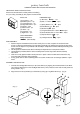
Assembly Instruction
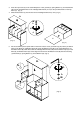

6. Upright the assembled cubby. Check alignment and tighten all bolts and screws.
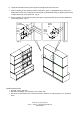
7. When connecting to other stacking Cameron cubby piece, place a T-Shape Bracket (R) over the pre-
er
. When connecting to side Cameron cubby piece, place a Square Bracket (Q) over the pre-drilled holes
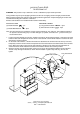
CARE INSTRUCTIONS:
soft cloth.
ipe with a clean, damp, cloth.
ives, or furniture polish on our lacquered
Thank you for your purchase.
stores
drilled holes on back of the cubby pieces securing with (6) Short Wood Screw (P). Repeat with the oth
T-Shape Bracket (R) on the other side. (Fig. 6)
8
on the cubby pieces. (Fig. 7)
T-Shape
)
Short
Square
Short
(Fig. 6) (Fig. 7)
bracket
(R
Bracket
(Q)
wood
screw
(P)
Wood
Screw
(P)
• Dust with a clean,
• Blot spills immediately, and w
• We do not recommend the use of chemical cleansers, abras
finish.
| catalog | www.potterybarnkids.com
1.800.290.8181