
Assembly Instruction


pottery barn kids
TIP RESTRAINT KIT
WARNING: This product is only a deterrent. It is not a substitute for proper adult supervision.
Young children may be injured by tipping furniture and the use of a tipping restraint is highly recommended.
When properly installed, this restraint could provide protection against the unexpected tipping of furniture. We
recommend mounting this restraint to a wall stud.
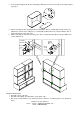
All Parts and Hardware are included with the Cameron Wall Cubby.
PARTS INCLUDED
(O) Plastic Restraint
- 1pc
(P) Plastic Wall Brackets
- 2pcs
Note: For safe mounting it is essential to use the proper hardware for your wall type. The included hardware is
HARDWARE NEEDED
(Q) Long Screws 3x32mm
- 2pcs
(R) Short Screws 3x19mm
- 2pcs
for drywall or stud mounting only. For other wall types (ie: plaster, concrete, brick…) please consult your
local hardware store.
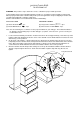
1. Locate a wall stud behind your furniture. Position a bracket on the stud approximately 1” below the top of the
furniture. Mark and drill pilot hole into the center of the stud with a 3/32” drill bit. Attach a bracket to the stud
with the long screws provided.
2. On the back of the furniture, a bracket will need to be attached to the furniture frame at the top. To do this,
temporarily move the furniture into its final position and mark the location of the wall bracket on the furniture
frame. Move the furniture away from the wall and place a bracket on the mark. Mark and drill holes for
screws with 3/32” drill bit. Attach the bracket to the furniture with the short screws provided.
3. Move the furniture into this final position, taking care to line up the wall bracket with the furniture bracket.
Thread a strap through the bracket as shown in the illustration. Tighten strap until snug. Do not over
tighten.
Plastic Restraint
Plastic wall bracket
Short wood screw
Long wood screw