
Assembly Instruction


Page 1/4
H.
O.
D.
F.
G.
pottery barn kids
CAMERON CRAFT CUBBY
PRE-ASSEMBLY:
• Read all instructions before beginning assembly. The illustrations provided allow for easier assembly when
used in conjunction with the assembly instructions.
• For your safety and ease, assembly by two adults is recommended.
• Remove all parts and hardware from the box and lay out on a clean, carpeted, or scratch-free work surface.
Use care as some parts or hardware may have sharp points or edges.
• Do not dispose of any contents until assembly is completed to avoid accidentally discarding small parts or
hardware.
• Use the parts and hardware lists to identify and separate each of the pieces included.
• Note: Do not fully tighten all bolts until all parts are in place. Failure to follow these instructions may cause
the bolts to misalign during assembly.
• The use of power tools for assembly is not recommended. Power tools can damage hardware or split wood.
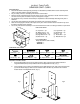
HARDWARE INCLUDED:
(K) Allen Key – 1pc
(L) Allen Bolt 1/4”x28mm – 8pcs
(M) Spring Washer – 8pcs
(N) Flat Washer – 8pcs
(O) Plastic Cap – 2pcs
(P) T-Shape Bracket – 2pcs
(Q) Square Bracket – 1pcs
(R) Wood Screw 3 x12mm
– 22pcs
ASSEMBLY INSTRUCTIONS:
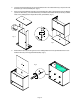
1. Place the Right Side Panel (D) on the working surface. Align and connect the wooden dowels on
Large/Small Shelf (F&G) to the pre-drilled holes on the Right Side Panel (D). (Fig. 1)
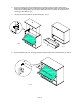
2. Insert a Plastic Cap (O) into the pre-drilled hole on the Right Side Panel (D), align and connect the Door
(H) onto the Plastic Cap (O). Make sure the wooden knob on the Door (H) is close to the end of the
wooden cleats on the Right Side Panel. (Fig. 2)
Fig. 1 Fig 2
A.
E.
I.
H.
F.
G.
J.
C.
D.
B.
PARTS INCLUDED:
(A) Top Panel – 1pc
(B) Bottom Panel – 1pc
(C) Left Side Panel – 1pc
(D) Right Side Panel – 1pc
(
E
)
Back Panel
–
1
p
c
TOOLS REQUIRED:
Philips Screwdriver (Not included)
(F) Large Shelf – 1pc
(G) Small Shelf – 1pc
(H) Door – 1pc
(I) Drawer Box – 1pc
(J) Wooden Rod -1pc