
Assembly Instruction


FURNITURE TIPPING RESTRAINT
Young children may be injured by tipping furniture. The use of a tipping restraint is highly
recommended.
When properly installed, this restraint could provide protection against the unexpected tipping
of furniture due to small tremors, bumping or climbing. We recommend mounting this restraint
to a wall stud.
WARNING: This product is only a deterrent. It is not a substitute for proper adult supervision.
Installation Instructions:
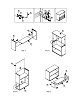
1. Attach one of the
Plastic Wall Brackets (O) near the top back edge of the furniture piece by
inserting the
Short Screw (Q).
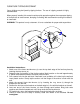
2. Determine the final position of the furniture piece. Mark location on the wall approximately
2” below the bracket mounted to the back of the furniture.
3. Drill a starter hole into the wall stud. If wall stud is not available, drill a hole into the wall and
insert plastic anchor. Gently tap the anchor until the flange of the anchor is flush with the
wall.
4. Attach the second Plastic Wall Bracket (O) by inserting the Long Screw (P) through the
bracket and into the wall.
5. Position the furniture so the bracket on the back edge is in line with the bracket on the wall.
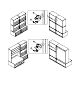
6. Lace one end of the
Plastic Restraint (N) down through each bracket. Bring both ends
together and slide the beaded end until it snap locks into the keyhole slot.
7. To double-lock, return the beaded end back through the keyholes, as shown.
8. Check to make sure the strap is securely laced and locked to the brackets. Do not
overtighten.