
Installation Guide


6
ASSEMBLY INSTRUCTIONS
Lowes.com/allenandroth
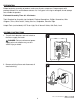
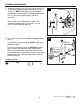
6.
This fixture (A) can be used with or without the pull
chain.
If you wish to use the fixture (A) WITH the pull chain,
proceed to Step 7.
If you wish to use the fixture (A) WITHOUT the pull
chain, remove wire connector (AA) from back of
fixture (A) and disconnect these two BLACK wires.
Unscrew pull chain ring and then remove switch from
back of fixture (A). Place cap (BB) firmly in hole on
front of fixture (A).
Hardware Used
Cap
x 1
BB
BLACK
BLACK
Pull Chain
Ring
Switch
AA
6
A
BB
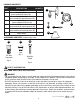
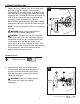
Temporarily place fixture (A) over mounting plate (B)
to determine amount of adjustment necessary for
screws (E). NOTE: The screws (E) should come
through holes in fixture (A) just enough so decorative
nuts (C) will fit flush against fixture (A) when
mounted.
Once screws (E) are adjusted, use pliers (not
included) to tighten nuts (F) on screws (E) until
nuts (F) touch mounting plate (B).
5.
5
Outlet Box
A
F
B
C
E