
Installation Guide


ASSEMBLY INSTRUCTIONS
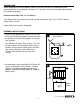
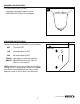
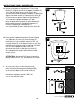
Remove rubber washer (F) from threaded rod (E).
Align hole in finial plate (C) with hole in glass shade
(B), making sure to turn finial plate (C) so the
semicircle aligns properly with glass shade (B), and
hold in place. Align threaded rod (E) with hole in
finial plate (C) and push up gently until
preassembled finial (D) touches finial plate (C).
Place rubber washer (F) onto threaded rod (E)
inside glass shade (B).
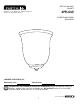
In order to keep finial plate (C) aligned properly with
glass shade (B), hold fixture from the bottom and
screw LED plate (A) onto threaded rod (E), turning
clockwise until secure. LED plate (A) should end up
with the LED side facing toward the front of the glass
shade (B); the battery compartment will be facing the
wall once installed.
CAUTION: Do NOT overtighten LED plate (A) as it
may crack.
3b
3a.
4
Lowes.com/
p
ortfolio
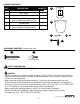
A
E
2
B
F
E
C
B
3a
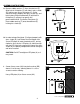
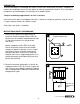
Screw fixture screw (AA) into plastic anchor (BB)
about 1/3 of the way, allowing about 1 in. of the
screw to remain showing.
Hang LED plate (A) on fixture screw (AA).
4.
BB
4
A
AA
AA
3b.
D
C