
Installation Guide


7
ASSEMBLY INSTRUCTIONS
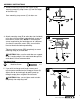
9.
Lowes.com/
p
ortfolio
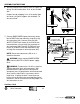
Carefully arrange excess wiring and wire connectors
(AA) within canopy at top of fixture (A).
Align holes in edge of canopy with screw holes at
ends of mounting strap (B). Secure fixture (A) with
mounting strap screws (C) that were previously
removed (Step 3, page 5).
Wrap electrical tape (not included) around each
individual wire connector (AA) down to the wire.
WARNING: Make sure no bare wire or wire
strands are visible after making connections.
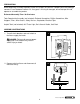
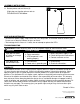
8.
Outlet Box
Remove socket ring (F) and spacer (E) from the
socket on fixture (A).
CAUTION: Be very careful when removing
socket ring (F) and spacer (E) so as not to break the
preassembled bulb cover.
Slide glass shade (D) and then spacer (E) very
carefully over the bulb cover on fixture (A). Secure
with socket ring (F).
CAUTION: Do not overtighten socket ring (F) as
glass may crack or break.
CAUTION: Be very careful when installing glass
shade (D), spacer (E) and socket ring (F) as the bulb
cover may crack or break.
10.
10
A
D
E
F
Outlet Box
Bulb Cover
8
AA
AA
AA
9
A
C
C
B
Canopy