
Installation Guide

ASSEMBLY INSTRUCTIONS/INSTRUCCIONES DE ENSAMBLAJE
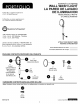
1.
Insert bulb (G) into the
socket (B). Screw the glass
lens (C) onto spot head (A)
with screws (AA).
Coloque
Ia
bombilla (G)
en
el portalampara (B). Atornille
Ia
mica de vidrio (C)
en
el
cabezal del reflector
(A)
con
los tornillos (AA) .
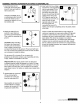
2.
Attach the stake (E) and
post (D) to spot head (A)
by turning counterclockwise.
Then, push the assembly into
ground.
G-
CAUTION: When installing
the fixture into the ground,
•0=----
do NOT push
on
the fixture
head. Instead, hold the post
and push the fixture into the ground. For ground with hard
soil, use a trowel (not included) to loosen the soil. DO NOT
use a hammer to install this fixture.
Fije
Ia
estaca (E) y
el
poste (D)
en
el
soporte (A)
girandolos
en
direcci6n contraria a las manecillas del reloj.
Luego, entierre
el
ensamble
en
el
suelo.
PRECAUCION: NO ejerza presion sobre
el
cabezal de
Ia
lampara cuando instale
Ia
lampara
en
el
S!Jelo.
En
Iugar
de ello, sostenga
el
poste y entierre
Ia
lampara
en
el
suelo.
Para suelos con tierra dura, use una IIana
(nose
incluye)
para aflojar
Ia
tierra. NO uti lice
un
martillo para instalar esta
lampara.
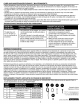
3.
Disassemble the connector
(F) by unscrewing the
connector top cover (F1)
from the wire guide (F2).
Desensamble
el
conector
(F)
desatornillando
Ia
cubierta
superior del conector (F1) de
Ia
gufa para cables (F2).
3
4.
Insert wire from low-voltage
transformer (sold separately)
into the wire guide (F2) by
twisting the wire into each
end
of
the wire guide (F2).
Ensure the wire lays flat and
straight
in
the wire guide
(F2). Align the pins
on
the
connector top cover (F1) so
each pin lines up with
opposite sides
of
the wire.
Securely tighten the
connector top cover (F1),
making sure the pins completely pierce the plastic shield
of
the wire.
lnserte
el
cable del transformador de bajo voltaje (se
vende por separado)
en
Ia
gufa para cables (F2) girando
el cable
en
cada extrema de
Ia
gufa para cables (F2).
Asegurese de que
el
cable quede plano y recto
en
Ia
gufa
para cables (F2). Alinee las clavijas
en
Ia
cubierta
superior del conector (F1), de manera que cada clavija
se alinee con los extremos opuestos del cable. Apriete
bien
Ia
cubierta superior del con ector (F1) asegurandose
de que las clavijas atraviesen por completo
Ia
protecci6n
de plastico del cable.
Lowes.
co
m/po rtfol
io