
Installation Guide


21
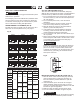
TROUBLESHOOTING GUIDE
Troubleshooting Chart
Symptom(s) Possible Cause(s) Corrective Action(s)
Noisy operation 1. Incorrect belt tension.
2. Dry spindle.
3. Loose spindle pulley.
4. Loose motor pulley.
1. Adjust tension. See section “Assembly - Belt
Tension”.
2. Lubricate spindle.
3. Check tightness of retaining nut on pulley, and
tighten if necessary.
4. Tighten set screw in motor pulley.
Drill bit burns 1. Incorrect speed.
2. Chips not coming out of hole.
3. Dull drill bit.
4. Feeding too slowly.
5. Not lubricated.
1. Change speed. See Section “ Operation - Speeds
and Belt Placement Table”.
2. Retract drill frequently to clear chips.
3. Resharpen drill bit.
4. Feed fast enough – allow drill to cut.
5. Lubricate drill.
Run out of drill bit point/
drilled hole not round.
1. Grain in wood or lengths of cutting
flutes and/or angles not equal.
2. Bent drill bit.
1. Resharpen drill bit correctly.
2. Replace drill bit.
Wood splinters on
underside.
1. No backup material under
workpiece.
1. Use backup material. See Section
“BASIC DRILL PRESS OPERATION”.
Workpiece torn loose from
hand.
1. Not supported or clamped properly.
1. Support workpiece or clamp it. See Section
“BASIC DRILL PRESS OPERATION”.
Drill bit binds in workpiece. 1. Workpiece pinching drill bit, or
excessive feed pressure.
2. Improper belt tension.
1. Support workpiece or clamp it. See Section
“BASIC DRILL PRESS OPERATION”.
2. Adjust tension. See Section “ Assembly - Belt
Tension”.
Excessive drill bit runout or
wobble.
1. Bent drill bit.
2. Worn bearings.
3. Drill bit not properly installed in
chuck.
4. Chuck not properly installed.
1. Replace drill bit.
2. Replace bearings.
3. Install drill properly. See Section “BASIC DRILL
PRESS OPERATION” and “ASSEMBLY”.
4. Install chuck properly. See Section
“ASSEMBLY INSTALLING THE CHUCK”.
Quill returns too slow or too
fast.
1. Coil spring has improper tension.
1. Adjust spring tension. See Section “ASSEMBLY
ADJUSTMENTS QUILL/RETURN SPRING”.
Chuck will not stay attached
to spindle. It falls off when
trying to install.
1. Dirt, grease, or oil on the tapered
inside surface of chuck or on the
spindle’s tapered surface.
1. Using a non-alcohol based cleaner, clean the
tapered surface of the chuck and spindle to remove
all dirt, grease and oil. See Section “ASSEMBLY
INSTALLING THE CHUCK”.
WARNING
!
For assistance with your product, visit our website at www.portercable.com for a list of service centers, or call the
Porter-Cable Customer Care Center at (888) 609-9779.
To avoid injury from an accidental start, turn the switch OFF and always remove the plug from the power source before
making any adjustments.
REPLACEMENT PARTS
Use only identical replacement parts. For a parts list or to order parts, visit our service website at www.portercable.
com. You can also order parts from your nearest Porter-Cable Factory Service Center or Porter-Cable Authorized War-
ranty Service Center. Or, you can call our Customer Care Center at (888) 609-9779.
SERVICE AND REPAIRS
All quality tools will eventually require servicing and/or replacement of parts. For information about Porter-Cable, its
factory service centers or authorized warranty service centers, visit our website at www.portercable.com or call our
Customer Care Center at (888) 609-9779. All repairs made by our service centers are fully guaranteed against defec-
tive material and workmanship. We cannot guarantee repairs made or attempted by others.
You can also write to us for information at Power Tool Specialists, Inc. 684 Huey Road, Rock Hill, SC 29730,
(888) 609-9779 - Attention: Product Service. Be sure to include all of the information shown on the nameplate of your
tool (model number, type, serial number, etc.).
GENERAL