
Installation Guide


18
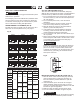
Fig. U
LOCKING THE CHUCK AT THE DESIRED DEPTH
(FIG. V)
1. Turn the switch to “OFF,” turn the feed handles until
the chuck (1) is at the desired depth. Hold the feed
handles at this position.
2. Turn the stop nut (2), located under the stop (3),
counterclockwise and upwards, until it is against the
stop (3).
3. The chuck will now be held at this position when the
feed handles are released.
Fig. V
REMOVING CHUCK AND ARBOR (FIG. W)
1. With the switch “OFF” and the unit unplugged, adjust
the depth stop nut (1) to hold the drill at a depth of 3
in. (7.6 cm). (See instructions for “LOCKING CHUCK
AT DESIRED DEPTH”).
2. Align the key holes in the spindle (2) and quill (3) by
rotating the chuck by hand.
3. Bag “D” - Insert the key wedge (4) into the key holes
(2 & 3).
4. Tap the key wedge (4) lightly with a plastic tipped
hammer, until the chuck and arbor fall out of the
spindle.
NOTE: Place one hand below the chuck to catch it
when it falls out.
“ON,” use only the self-ejecting chuck key supplied
with this drill press. ALWAYS recheck and remove
the chuck key before turning the power “ON.”
NOTE: To prevent the workpiece or backup material
from being torn from your hands while drilling, you
MUST position the workpiece against the LEFT side
of the column. If the workpiece or the backup material
is not long enough to reach the column, clamp them
to the table. Failure to secure the workpiece could
result in personal injury.
Fig. T
DRILLING TO A SPECIFIC DEPTH (FIG. U)
Drilling a blind hole (not all the way through workpiece)
to a given depth can be done two ways:
Workpiece method
1. Mark the depth of the hole (1) on the side of the
workpiece.
2. Turn the switch to “OFF,” bring the drill bit down until
the tip is even with the mark.
3. Hold the feed handle (2) at this position.
4. Depress the spring-loaded button (3) and move the
stop nut (4) until the bottom of the nut contacts the
stop (5).
5. Connect the machine to the power source and drill
a test hole to check the adjustment. The drill bit will
now stop after traveling the distance marked on the
workpiece.
NOTE: Readjust, if necessary, by rotating the stop
nut (4) for fine adjustment. You do not have to
depress the button (3) to rotate the stop nut (4).
Depth scale method
NOTE: With the chuck quill assembly fully retracted the
tip of the drill bit, the drill bit must be just slightly above
the top of the workpiece.
1. Turn the switch to “OFF,” rotate the feed handle (2)
until stop (5) points to the desired depth on the depth
scale (6) and hold the feed handle (2) in that position.
2. Depress the spring-loaded button (3) and move the
stop nut (4) until the bottom of the nut contacts the
stop (5).
3. Connect the machine to the power source and drill
a test hole to check the adjustment. The drill bit will
stop after traveling the distance selected on THE
DEPTH SCALE.
NOTE: Readjust, if necessary, by rotating the stop
nut (4) for fine adjustment. You do not have to
depress the button (3) to rotate the stop nut (4).
1
3
2
3
2
1
5
4
6
3
2
1