
Installation Guide


13
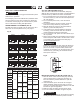
INSTALLING FEED HANDLES (FIG. E)
1. Bag “E” - Locate the three feed handles (1) in the
loose parts bag.
2. Screw the three feed handles (1) into the threaded
holes (2) on either the right or left side hub assembly
(3) and tighten.
NOTE: The feed handles can be installed on either
the right-hand side or left-hand side.
Fig. E
INSTALLING THE CHUCK (FIG. F, G, H)
Before any assembly of the chuck and arbor to the
drill press head, clean all mating surfaces with a non
petroleum based product; such as alcohol or lacquer
thinner. Any oil or grease used in the packing of these
parts must be removed otherwise the chuck may come
loose during operation.
1. Bag “D, F” - Push the chuck (1) onto the spindle
arbor (2). Tap gently on the arbor with a hammer or
rubber mallet to ensure a proper seat.
Fig. F
2. Lower the spindle by turning the feed handles (3)
counterclockwise, until the slot (4) appears on the
quill (5).
3. Push the chuck and spindle arbor up into the
spindle, making sure the tang (6) (upper narrow end
of the spindle arbor shank) is engaged and locked
in the inner slot (7) of the spindle. This can be seen
through the outer slot (4) of the quill by rotating the
chuck and arbor until the two slots are aligned.
4. Open the jaws of the chuck (1) by rotating the chuck
sleeve clockwise. To prevent damage,
1
2
3
WARNING
!
make sure the jaws are completely receded into the
chuck.
NOTE: Clean the taper with a non-alcohol based
cleaner before inserting it into the arbor.
Fig. G
5. Using a rubber mallet, or a hammer and a block of
wood, firmly tap the chuck upward into position on
the spindle shaft.
Fig. H
3
1
2
5
7
6
4
2
3
CHUCK KEY STORAGE (FIG. I)
Storage holder (1) for the chuck key (2) is located on the
right side of the drill press.
Fig. I
1
2
2
5
1