
Installation Guide


INSTALLATION INSTRUCTIONS:
-4-
PUMP SIZE SUGGESTIONS
1’ – 2’ Height:
800 gph minimum / 1500gph maximum
2’ – 4’ Height:
1000 gph minimum / 2500gph maximum
4’ – 6’ Height:
1500 gph minimum / 5000gph maximum
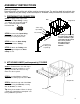
STEP 1: Build an elevated area to
partially bury the Weir, using
surrounding landscape materials.
STEP 2: Place the Weir on top of the
mound, draping the liner into the pond.
Pack the area surrounding the weir
until it is solid.
STEP 3: Secure the mound and Weir with
rocks, bricks, or other reinforcement.
STEP 4: Place the Pump in the pond and
attach tubing securely to pump output.
STEP 5: Bury the Tubing.
STEP 6: Fill the Pond with water.
STEP 7: Plug pump into GFCI Outlet,
check flow of waterfall, look for any leaks,
and adjust if necessary
STEP 8: Finish your surrounding landscape
with rocks, plants, etc. covering the weir
components as much as possible.
STEP 9: Enjoy your Pond and Waterfall!
Pond
Elevated Mound of
Soil, Sand, Rocks
GFCI
Receptacle
Buried
Tubing
Partially buried
Weir
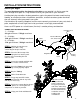
Before you begin:
The most important advice for choosing a location we can provide is to find an area that
offers enough level space in a “High Ground” area of your yard that fits your intentions.
Avoiding low lying area offers the best protections against the potential of water runoff causing
flooding, or unwanted residues of herbicides, pesticides, or other hazardous garden chemicals
that can adversely affect your ponds’ ecosystem.
Considerations for creating viewpoints from the most commonly used areas of your yard, deck, or
patio, coupled with a line of sight from inside your home is also highly recommended.
Access to GFCI power at a safe distance (five feet) is another primary consideration.
Pump
Tip:
We recommend
Microbe-Lift brand
Pond Treatments to
keep your pond clear
and clean, and to help
promote and maintain
the beneficial bacteria
needed to ensure a
healthy pond
environment.
Diagram #4