
Installation Guide


ASSEMBLY INSTRUCTIONS
Before you begin:
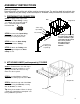
Determine which side of the weir will be used for the water input. The weir has both left and right side
inlets, however they are factory sealed and require a “knockout” hole pushed out to activate the inlet.
1. PREPARING THE CONNECTION
2. ATTACHING LINER (sold separately) TO WEIR
READ AND FOLLOW
ALL SAFETY
INSTRUCTIONS!
SAVE THIS MANUAL
FOR FUTURE
REFERENCE.
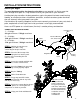
STEP 1
: Apply Teflon Tape to the
threads of the Input fitting. If using
1 ½” tubing, you can gently saw off
the 1” extension portion to allow
maximum flow.
STEP 2: Connect the Input fitting
to the chosen side of the weir by
threading it securely to the unit.
STEP 3: Place the Hose Clamp
over one end of the Tubing.
STEP 4: Attach the Tubing to the
Input fitting and tighten the Hose
Clamp to seal.
Weir
Corrugated
Tubing (Sold
Separately)
Hose Clamp
Input fitting
Liner
STEP 1:
Determine the size and shape
of the liner required to provide a secure
spillway, to reduce the chance of any
water loss due to splash.
STEP 2: Cut the Liner as shown in
diagram #3 to allow proper fit to the Weir
STEP 3: Attach the top end of the Liner
to the Weir using the Bracket, securing
with 12 Screws, as shown.
Tip: Using clear outdoor silicone is always
a good way of providing a waterproof seal
to any addition to your weir.
Teflon Tape
The tubing assembly may
be connected to the Weir
on either the Weir’s right
or left side. The knockout
hole can be pushed
through by using a
screwdriver and a
hammer.
Diagram #3
Diagram #2
-2-