
User's Manual


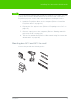
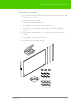
Table Of Contents
- Welcome
- Installing ēno interactive whiteboards
- Preparing to use ēno
- Using ēno interactive whiteboards
- Get started using ēno interactive whiteboards
- ēno interactive whiteboard control icons
- Projector control icons (for the PolyVision projector)
- Cursor control using the ēno stylus
- Using the on-screen keyboard
- Writing and erasing with the ēno stylus
- Printing and saving
- Spotlight and reveal options
- Opening a blank window for writing
- The PolyVision driver
- Configuring PolyVision driver options
- Configuring PolyVision projectors
- Choosing alignment accuracy
- Using on-screen tools
- Getting help
- Checking for updates
- Exiting the PolyVision driver
- To uninstall the PolyVision driver in Windows
- To uninstall the PolyVision driver on a Macintosh
- To uninstall the PolyVision driver using Linux
- Care and maintenance
- Technical support
- Warranty
- Appendix 1: ēno Bluetooth pairing options
- Index

PolyVision 9
Installing ēno interactive whiteboards
note:
NOTE:
ēno one interactive whiteboards include two magnetic icon strips: one that
controls the interactive whiteboard functions and one that controls the
PolyVision projector on/off, video mute, brightness, and input source.
3. Install the PolyVision driver on the computer. (Refer to “Install the
PolyVision driver” on page 22.)
4. Prepare the ēno stylus for use. (Refer to “Preparing to use ēno” on
page 25.)
5. Connect a projector to the computer. (Refer to “Getting started in
projection mode” on page 34.)
6. Test the ēno whiteboard. (Refer to “Get started using ēno interactive
whiteboards” on page 36.)
Mounting ēno 2610 and 2810 to a wall
You need to provide the following tools: