
User's Manual


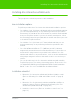
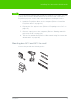
Table Of Contents
- Welcome
- Installing ēno interactive whiteboards
- Preparing to use ēno
- Using ēno interactive whiteboards
- Get started using ēno interactive whiteboards
- ēno interactive whiteboard control icons
- Projector control icons (for the PolyVision projector)
- Cursor control using the ēno stylus
- Using the on-screen keyboard
- Writing and erasing with the ēno stylus
- Printing and saving
- Spotlight and reveal options
- Opening a blank window for writing
- The PolyVision driver
- Configuring PolyVision driver options
- Configuring PolyVision projectors
- Choosing alignment accuracy
- Using on-screen tools
- Getting help
- Checking for updates
- Exiting the PolyVision driver
- To uninstall the PolyVision driver in Windows
- To uninstall the PolyVision driver on a Macintosh
- To uninstall the PolyVision driver using Linux
- Care and maintenance
- Technical support
- Warranty
- Appendix 1: ēno Bluetooth pairing options
- Index

PolyVision 8
Installing ēno interactive whiteboards
Installing ēno interactive whiteboards
Two people are needed for portions of this installation.
ēno installation options
PolyVision provides these ēno interactive whiteboard installation options:
• ēno 2610: a 4’ x 6’ (1223mm x 1638mm) wall-mounted whiteboard that
you can install permanently on any wall using instructions provided in
this manual. ēno 2610 can also be mounted on a mobile stand available
from your PolyVision dealer. If you use the mobile stand option, follow
the mounting instructions provided with the mobile stand, then proceed
to “Install the PolyVision driver”.
• ēno 2810: a 4’ x 8’ (1223mm x 2171mm) whiteboard that you can
mount permanently on any wall using instructions provided in this
manual.
• ēno click 2650 and 2850: the 75” (1905mm) and 93” (2362mm)
magnetically-mounted interactive whiteboard that you can mount to a
metal surface using instructions provided in this manual. ēno click
whiteboards adhere to any metal surface, such as another whiteboard,
using unique magnetic fasteners that make it safe to use and easy to
remove.
• ēno one (models vary): the ēno interactive whiteboard with a built-in
PolyVision projector in a variety of mounting options. Refer to the “ēno
one Adjustable Wall Mount and Adjustable Mobile Stand Installation
Guide” or the “ēno one Fixed Wall Arm Installation Guide.”
Installation checklist
1. Mount the ēno interactive whiteboard (2610 or 2810) to a wall.
(Refer to “Mounting ēno 2610 and 2810 to a wall” on page 9)
Or,
1. Mount the ēno click interactive whiteboard (2650 or 2850) to a
magnetic surface. (Refer to “Magnetically mounting ēno click
whiteboards (2650 and 2850)” on page 16.)
2. Install the control icons. (Refer to “Install the control icons” on
page 21.)