
User's Manual
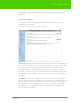
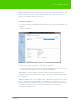
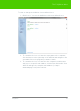
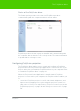
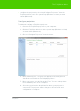
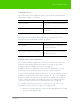
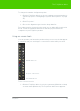
Table Of Contents
- Welcome
- Installing ēno interactive whiteboards
- Preparing to use ēno
- Using ēno interactive whiteboards
- Get started using ēno interactive whiteboards
- ēno interactive whiteboard control icons
- Projector control icons (for the PolyVision projector)
- Cursor control using the ēno stylus
- Using the on-screen keyboard
- Writing and erasing with the ēno stylus
- Printing and saving
- Spotlight and reveal options
- Opening a blank window for writing
- The PolyVision driver
- Configuring PolyVision driver options
- Configuring PolyVision projectors
- Choosing alignment accuracy
- Using on-screen tools
- Getting help
- Checking for updates
- Exiting the PolyVision driver
- To uninstall the PolyVision driver in Windows
- To uninstall the PolyVision driver on a Macintosh
- To uninstall the PolyVision driver using Linux
- Care and maintenance
- Technical support
- Warranty
- Appendix 1: ēno Bluetooth pairing options
- Index

PolyVision 58
The PolyVision driver
2. Choose “Configure Projectors” from the menu.
3. Click a projector.
4. Move the cursor over the active link under “Icon strip” and select
from “A,” “B,” or “C” to correspond to the magnetic projector control
icon strip labeled “A,” “B,” or “C” that is fastened to the whiteboard
for that projector. Choose “All” when you are using one projector.
In addition, in rooms where multiple PolyVision projectors are connected to
the same computer, each projector is associated with an added computer
monitor that includes a unique “A,” “B,” or “C” on-screen icon strip. Refer
to "Using on-screen tools" on page 59.
To change the monitor and on-screen icon strip that appear on a
whiteboard:
1. Click the PolyVision driver icon in the system tray (Windows or Linux)
or menu extras (Macintosh).
2. Choose “Configure Projectors” from the menu.
3. Click a projector.
4. Move the cursor over the active link under “Monitor” and select from
the available monitors. The projector now displays the monitor and
on-screen icon strip you selected.
Choosing alignment accuracy
The alignment between your projector and the PolyVision product is
important. PolyVision offers three levels of alignment: good, better, best.
The default is “better” alignment.
You might need to use more or fewer alignment points to improve the
correspondence between the position of the computer cursor and the
point of contact when you tap the PolyVision product. (Some video
projectors, for instance, do not produce a linear display when projection
with keystone correction is used.)
“A” on-screen icon strip