
User's Manual
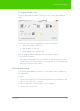
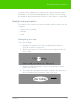
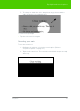
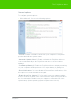
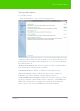
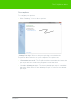
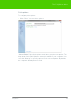
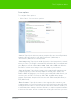
Table Of Contents
- Welcome
- Installing ēno interactive whiteboards
- Preparing to use ēno
- Using ēno interactive whiteboards
- Get started using ēno interactive whiteboards
- ēno interactive whiteboard control icons
- Projector control icons (for the PolyVision projector)
- Cursor control using the ēno stylus
- Using the on-screen keyboard
- Writing and erasing with the ēno stylus
- Printing and saving
- Spotlight and reveal options
- Opening a blank window for writing
- The PolyVision driver
- Configuring PolyVision driver options
- Configuring PolyVision projectors
- Choosing alignment accuracy
- Using on-screen tools
- Getting help
- Checking for updates
- Exiting the PolyVision driver
- To uninstall the PolyVision driver in Windows
- To uninstall the PolyVision driver on a Macintosh
- To uninstall the PolyVision driver using Linux
- Care and maintenance
- Technical support
- Warranty
- Appendix 1: ēno Bluetooth pairing options
- Index

PolyVision 50
The PolyVision driver
Save options
To configure Save options:
• Click “Save”. You see these options:
“Save in”: Specify the directory where snapshot files are saved. By default,
snapshot files are saved to your “My Documents” (Windows) or
“Documents” (Macintosh or Linux) folder.
“Save image size”: Specify the width (in pixels) of the image that is created
when you save. (The height is automatically determined by your whiteboard
size.) Options include 2560, 2048, 1600, 1280, 1024, 800, and “Monitor
Resolution” which saves images set to the width of your monitor.
“Save as file type”: Specify the format of the snapshot file saved on your
computer when you save an image. Options include PDF, JPEG, TIFF,
PNG, or BMP. In Windows, you can also save as GIF. On a Macintosh, you
can also save as PICT, Photoshop, SGI, TGA, and Quicktime Image
formats. By default, snapshot files are saved in JPG format (Windows) or
PDF (Macintosh).
“Base file name”: Specify the name of the snapshot files saved on your
computer when you save an image from your PolyVision product. Click the
existing base file name to enter a new file name. Check boxes enable you
to add a date/time stamp to the base filename, to add a sequential number
to the base file name, and to overwrite the existing file each time you save.